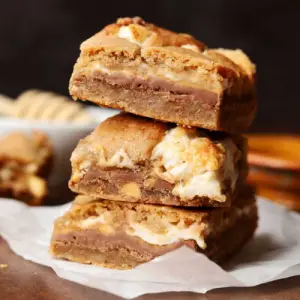
Peanut Butter and Chocolate S’mores Bars
Soft, chewy, and layered with chocolate, peanut butter, and toasted marshmallows, these s’mores cookie bars are the ultimate treat. High in protein and fiber, they’re easy to make, perfect for dessert, snacking, or sharing, and require no campfire.
Equipment
- 8x8-inch square baking pan – 1
- Parchment paper – enough to line pan with 2-inch overhang
- Binder clips (¾-inch) – 2
- Large mixing bowl (1)
- Handheld mixer or rubber spatula – 1
- Offset spatula (optional) – 1
- Microwave-safe bowl – 1
- Knife, lightly oiled – 1
Ingredients
- 6 tbsp 84g unsalted butter, softened
- ½ cup + 1 tbsp 125g light brown sugar, packed
- 1 large egg room temperature
- 1 tbsp 15ml honey
- 1 tsp 5ml pure vanilla extract
- 1 cup 142g all-purpose flour
- ½ cup 71g whole wheat flour
- ½ tsp salt
- ¼ tsp baking powder
- ¼ tsp ground cinnamon
- ⅛ tsp baking soda
- 2 x 100g milk chocolate bars or 200g chips
- ½ cup 120g smooth or crunchy peanut butter
- 21 regular-sized marshmallows
Instructions
- Prepare Your Baking Pan: Start by preheating your oven to 350°F (175°C). Take an 8x8-inch square metal baking pan and line it with parchment paper. Make sure to leave a 2-inch overhang on opposite sides; this will help you lift the bars out easily after baking. To keep the parchment in place, use ¾-inch binder clips on the edges. This ensures your layers stay neat and your pan remains clean.
- Cream the Butter and Sugar: In a large mixing bowl, combine softened butter, light brown sugar, and honey. Using a handheld mixer or a wide rubber spatula, beat or stir the mixture until smooth and slightly fluffy. This step is crucial because properly creamed butter and sugar create a light texture in your cookie bars. Make sure there are no lumps, and the mixture looks creamy and uniform.
- Add the Egg and Vanilla: Once the butter and sugar mixture is creamy, add 1 large egg and 1 teaspoon of vanilla extract. Mix thoroughly until fully combined. Scrape down the sides of the bowl to ensure the egg is evenly incorporated. The egg adds moisture and helps bind the dough together, while vanilla provides depth of flavor.
- Incorporate the Dry Ingredients: In a separate small bowl, whisk together all-purpose flour, whole wheat flour, salt, baking powder, baking soda, and ground cinnamon. Gradually sprinkle this dry mixture into your wet ingredients. Fold carefully using a spatula until just combined. Be gentle to avoid overmixing, which could make the cookie bars tough. The dough should be soft and slightly sticky, yet manageable.
- Form the Base Layer: Take two-thirds of the dough and press it evenly into the bottom of your prepared pan. Use floured hands or a small offset spatula to smooth it out. This base will serve as the foundation for your s’mores layers, so make it even and consistent in thickness. Don’t worry if the dough is sticky—lightly flouring your hands prevents it from sticking too much.
- Layer the Chocolate: Place your milk chocolate bars over the dough. Arrange them so that they cover the entire surface, pressing lightly to create an even layer. If using chocolate chips, sprinkle them evenly across the base. This chocolate layer will melt slightly during baking, adding a rich, gooey sweetness to every bite.
- Add the Peanut Butter: Melt ½ cup peanut butter in a microwave-safe bowl for about 30 seconds, just enough to make it pourable but not runny. Drizzle the melted peanut butter evenly over the chocolate layer. This creates a creamy, nutty layer that complements the chocolate and marshmallows perfectly.
- Top with Marshmallows: Scatter 21 regular-sized marshmallows over the chocolate and peanut butter. Place the pan in the oven for 3 minutes to gently melt the marshmallows. Then, switch to the broiler setting and toast for about 1 minute—keep a close eye on them to avoid burning. Once golden and puffy, immediately press them down slightly with an oiled offset spatula. Try to spread them evenly while still sticky; this will help the top layer of dough adhere better.
- Cover with Remaining Dough: Divide the remaining one-third of the dough into four portions. Roll or pat each portion into flat sheets using as much flour as needed to prevent sticking. Drape each sheet over the marshmallow layer, covering as much as possible.It’s perfectly fine if marshmallows peek through—this adds a rustic, appealing look. Gently press the dough edges to seal slightly.
- Bake Until Golden: Place the pan in the preheated oven and bake for 20–25 minutes, or until the top is a beautiful golden brown. The bars should be set but still soft and chewy. Baking time may vary slightly depending on your oven, so start checking around 18 minutes.
- Cool Before Slicing: Allow the s’mores bars to cool for at least 1 hour. This helps the marshmallow layer stabilize and makes slicing easier. For the cleanest slices and least mess, let the bars cool for 8 hours or overnight. When ready to cut, lightly oil a sharp knife and wipe it clean between each slice to prevent sticking.
- Serve and Enjoy: Once sliced, serve your s’mores cookie bars warm for gooey indulgence, or enjoy them cold for a more set texture.These bars are perfect as a dessert, snack, or even a portable treat for gatherings. Store leftovers in an airtight container at room temperature for up to 3 days, or refrigerate for up to 5 days for longer freshness.
Notes
- For best results, use room-temperature butter and egg to ensure smooth, evenly mixed dough.
- If dough sticks to your hands, lightly flour your palms or use an offset spatula.
- Toast marshmallows carefully under the broiler and watch closely to prevent burning.
- For a neater look, allow bars to cool completely before slicing; overnight chilling is ideal.
- Chocolate can be substituted with chocolate chips, chunks, or dark chocolate depending on preference.
- This recipe works well with crunchy or smooth peanut butter for different textures.
- Bars can be cut into different sizes for portion control or serving flexibility.
