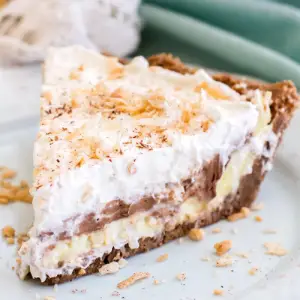
Easy Creamy Chocolate Coconut Pie
A creamy, no-bake chocolate coconut pie featuring layers of coconut cream, chocolate cream, and whipped topping over a crunchy cookie crust. Quick, easy, and utterly delicious, it’s perfect for summer desserts, special occasions, or anytime you crave a sweet, indulgent treat without turning on the oven.
Equipment
- 9" or 10" pie plate
- Food Processor or Blender
- Mixing bowls (3 medium)
- Hand or stand mixer
- whisk
- Spatula
- Microwave-safe bowl
Ingredients
Crust
- 15 oz E.L. Fudge Keebler Cookies crushed
- 1/2 cup unsalted butter melted
Coconut Cream Filling
- 3.4 oz instant coconut pudding mix
- 1 1/3 cups whole milk
- 4 oz cream cheese softened
- 1/2 cup sweetened shredded coconut
Chocolate Cream Filling
- 4 oz cream cheese softened
- 2 oz semi-sweet chocolate melted
Whipped Cream Topping
- 1 cup heavy whipping cream
- 2 tbsp powdered sugar
- 1 tsp vanilla extract
Optional Toppings
- Toasted coconut
- Chocolate shavings
Instructions
- Prepare the Cookie Crust: Begin by crushing the E.L. Fudge Keebler cookies. For best results, place the cookies in a food processor and pulse until they become a fine, even crumb. If you don’t have a food processor, place the cookies in a resealable plastic bag and crush them with a rolling pin until finely ground. Transfer the cookie crumbs to a medium-sized mixing bowl. Pour in the melted butter and stir thoroughly until every crumb is coated and holds together slightly when pressed. Take a 9-inch or 10-inch pie plate and press the cookie mixture evenly into the bottom and slightly up the sides, forming a firm, level crust. Set aside while you prepare the fillings.
- Make the Coconut Cream Layer: In a clean mixing bowl, whisk together the instant coconut pudding mix and milk. Whisk continuously for 1–2 minutes until the pudding begins to thicken and has a smooth, creamy texture. Next, add the softened cream cheese and beat with a hand or stand mixer on medium speed until fully combined and silky smooth. Gently fold in the shredded coconut using a spatula, making sure it is evenly distributed throughout the mixture. This coconut cream layer should be thick but spreadable. Once ready, spoon the filling onto the prepared cookie crust and use a spatula to spread it evenly, creating a smooth base layer.
- Prepare the Chocolate Cream Layer: Begin by melting the semi-sweet chocolate. Place the chocolate in a microwave-safe bowl and heat in 30-second intervals at 50% power, stirring thoroughly between each interval until completely melted. Allow the chocolate to cool for 1–2 minutes so it’s slightly warm but not hot. In a separate bowl, combine the softened cream cheese with the melted chocolate. Beat together until smooth, creamy, and free of lumps. Carefully spread this chocolate cream mixture over the coconut layer in an even, consistent layer. Ensure that the edges meet the crust, and smooth the top with a spatula to create a polished appearance.
- Whip the Cream Topping: Pour the heavy whipping cream into a clean mixing bowl. Using a hand or stand mixer, beat the cream on medium speed until soft peaks begin to form. This means when you lift the beaters, the cream holds its shape briefly before gently folding over. Add in the powdered sugar and vanilla extract, then continue beating until stiff peaks form and the cream becomes thick, airy, and glossy. Spread the whipped cream carefully over the chocolate layer, covering it completely. Use a spatula to smooth the surface or create soft peaks for a more decorative appearance.
- Add Optional Garnishes: If desired, sprinkle toasted coconut and chocolate shavings over the top of the whipped cream for a beautiful, indulgent finish. Toasted coconut adds a nutty aroma and crunch, while chocolate shavings enhance the visual appeal and richness. Use a light hand to avoid weighing down the fluffy whipped cream.
- Chill to Set: Cover the pie loosely with plastic wrap and place it in the refrigerator. Chill for at least 1–2 hours, allowing the layers to firm up and the flavors to meld together. This step is essential for the pie to hold its shape when sliced.
- Serve and Enjoy: Once fully chilled, slice the pie using a sharp knife, wiping the blade clean between cuts to maintain neat slices. Serve chilled and enjoy the creamy, chocolatey, coconut-rich layers with friends and family. Leftovers should be stored in the refrigerator for up to 3–4 days, ensuring the pie remains fresh and the textures intact.
Notes
- For a firmer crust, chill the pressed cookie base in the refrigerator for 10–15 minutes before adding the fillings.
- Make sure the cream cheese is fully softened to avoid lumps in both the coconut and chocolate layers.
- When melting chocolate, use short intervals in the microwave or a double boiler to prevent burning.
- Whip the cream just until stiff peaks form—overbeating can turn it into butter.
- This recipe can be doubled for a larger gathering; just use a 12-inch pie plate or two smaller pies.
