Creamy Mulberry Ice Cream
A creamy, naturally sweet mulberry ice cream made with just six ingredients. Perfectly balanced with fresh or frozen berries, this gluten-free dessert is quick, easy, and irresistibly smooth. Ideal for a refreshing summer treat or a family-friendly dessert.
Equipment
- 1 Ice cream maker (frozen for at least 24 hours)
- 1 Fine mesh sieve
- 1 Small or medium saucepan
- 1 Immersion blender (or regular blender/food processor)
- 1 Spatula
- 1 Large bowl with ice (optional, for cooling syrup)
- Measuring Cups and Spoons
Ingredients
For the Mulberry Syrup:
- 2 cups fresh or frozen mulberries stems optional
- 1 cup granulated sugar
- ¼ teaspoon salt
- 1 tablespoon lemon juice optional, to balance sweetness
For the Ice Cream Base:
- 1½ cups heavy whipping cream
- 1 cup whole milk
- 2 teaspoons vanilla extract optional, for flavor depth
Optional Addition:
- ¼ cup fresh mulberries for stirring into the churned ice cream
Instructions
- Prepare Your Ice Cream Maker: Before starting any cooking, make sure your ice cream maker bowl is completely frozen. Most models require at least 24 hours in the freezer for optimal churning. This ensures the ice cream sets quickly and achieves a creamy, smooth texture. If you forget to freeze the bowl in advance, you can still prepare the ice cream mixture and refrigerate it until the bowl is ready.
- Wash and Prep Mulberries: Rinse your fresh mulberries gently under cold water to remove any dirt or impurities. If using frozen mulberries, no thawing is necessary. Decide whether to remove the stems: while edible, removing them creates a smoother pulp and syrup, perfect for drizzling or using as a spread later. Set aside about ¼ cup of berries if you want to fold them into the ice cream at the end.
- Cook Mulberry Syrup: In a small or medium saucepan, combine 2 cups of mulberries, 1 cup of sugar, ¼ teaspoon salt, and 1 tablespoon of lemon juice. Heat over medium heat, stirring occasionally, until the sugar fully dissolves and the mulberries release their juices. You’ll notice the mixture becoming deep purple and fragrant—this is the foundation of your ice cream flavor.
- Puree the Mulberries: Remove the pan from heat and allow it to cool slightly for safety. Using an immersion blender, pulse the mulberries gently to break them down. Aim for a slightly chunky texture rather than a completely smooth puree. If you don’t have an immersion blender, transfer the mixture carefully to a regular blender or food processor. The goal is to create a thick, luscious syrup while keeping some fruit texture.
- Simmer the Syrup for Thickness: Return the partially blended mulberry mixture to low heat. Let it simmer gently for about 10 minutes, stirring frequently. Keep a close eye on it to prevent it from sticking or boiling over. The syrup is ready when it slightly clings to the sides of the pan. This slow reduction intensifies the mulberry flavor and ensures your ice cream has a rich, vibrant color.
- Strain the Syrup: Place a fine mesh sieve over a large bowl. Carefully pour the hot mulberry syrup into the sieve and use a spatula or spoon to press the liquid through. You should end up with about ¾ cup of smooth syrup and ½ cup of mulberry pulp. The pulp is perfect for spreading on toast, stirring into yogurt, or saving for another dessert. If your syrup seems too thin, return it to the pan and simmer for a few more minutes until it reaches a thicker consistency.
- Combine Ice Cream Base: In a large mixing bowl, combine the mulberry syrup with 1½ cups heavy cream, 1 cup whole milk, and 2 teaspoons vanilla extract (if using). Stir gently but thoroughly to distribute the syrup evenly. Some of it may sink to the bottom, which is fine; it will create beautiful streaks of flavor in the finished ice cream. Taste and adjust sweetness if necessary.
- Churn the Ice Cream: Pour the mixture slowly into the frozen ice cream maker bowl while the machine is running. Churn for at least 20 minutes, following your ice cream maker’s instructions. The mixture should thicken and increase in volume as air incorporates, creating a creamy, soft-serve texture. If you like, fold in the reserved ¼ cup of fresh mulberries during the last minute of churning for extra bursts of berry flavor.
- Transfer to Freezer Container: Once churning is complete, transfer the ice cream carefully into a freezer-safe container. A bread loaf pan works perfectly as it allows even freezing and easy scooping. Smooth the top with a spatula and cover tightly with plastic wrap to prevent freezer burn.
- Freeze Until Firm: Place the container in the freezer for at least 4 hours, or until the ice cream is completely firm. For the best texture, let it sit at room temperature for 5-10 minutes before scooping. This will make serving easier and enhance the creamy mouthfeel.
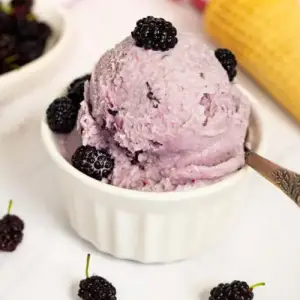
- Serve and Enjoy: Scoop the ice cream into bowls or cones and serve immediately. Garnish with fresh mulberries, a drizzle of the reserved syrup, or a sprinkle of chopped nuts for added texture. This dessert is naturally gluten-free, vegetarian-friendly, and perfectly balanced to enjoy as a sweet, refreshing treat any day of the week.
Notes
- Freeze the ice cream maker bowl at least 24 hours before churning for best results.
- Removing mulberry stems is optional; they’re edible, but stem-free berries yield a smoother syrup and pulp.
- Fresh or frozen mulberries work well—no need to thaw frozen ones before cooking.
- The leftover mulberry pulp from straining makes a delicious spread for toast or swirl-in for yogurt.
- For a creamier texture, chill all ingredients before mixing them into the ice cream base.
- A loaf pan works perfectly for freezing the churned ice cream.
- Always cover the ice cream tightly to prevent freezer burn and maintain flavor.
