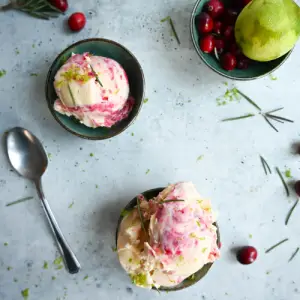
Creamy Cranberry Vanilla Ice Cream
A creamy homemade vanilla ice cream layered with a tangy cranberry swirl for a festive and refreshing dessert. Smooth, rich, and perfectly balanced between sweet and tart, this ice cream is delicious on its own or paired with cakes and pies.
Equipment
- 1 Ice Cream Maker
- 1 Immersion Blender
- 2 Medium Saucepan
- 2 Mixing Bowls (medium size)
- 1 Fine mesh sieve
- 1 Freezer-safe container
Ingredients
Cranberry Sauce
- 1 pint fresh or frozen cranberries
- 1 cup sugar
- 1 cup water
- 2 tablespoons lemon juice
- 1 tablespoon lemon or lime zest
Ice Cream Base
- 1 ½ cups heavy cream
- 2 cups whole milk
- ¾ cup sugar
- ¼ cup 50 g glucose syrup (or light corn syrup substitute)
- 5 large egg yolks
- ¼ teaspoon ice cream stabilizer optional
- 2 tablespoons vanilla extract
- 1 pinch salt
Instructions
- Prepare the Cranberry Sauce Base: In a medium saucepan, combine the cranberries, sugar, and water. Place the pan over medium heat and allow the mixture to cook gently. Stir frequently with a wooden spoon or silicone spatula to prevent the sugar from sticking to the bottom. As the cranberries heat, they will begin to soften and burst, releasing their natural juices and forming a glossy syrup. Continue cooking until all the sugar has completely dissolved and the mixture has slightly thickened. This should take about 8–10 minutes.
- Enhance Flavor with Citrus: Once the cranberries have softened and the sauce has reached a light simmer, remove the pan from the heat. Stir in the lemon juice and freshly grated lemon or lime zest to brighten the flavor. If you prefer a smooth sauce, use an immersion blender to carefully puree the mixture until silky, or press it through a fine mesh sieve to remove skins and seeds. Transfer the finished cranberry sauce to a clean container and refrigerate until completely cool.
- Heat the Dairy and Sweeteners: To start the ice cream base, pour the whole milk, heavy cream, glucose syrup (or light corn syrup), and sugar into a clean saucepan. Place it over medium heat and whisk occasionally to combine the ingredients. Allow the mixture to heat slowly until it comes to a gentle boil. This step ensures the sugar dissolves completely and the dairy develops a richer body. Once the mixture has reached a full boil, remove the pan from the stovetop.
- Temper the Egg Yolks: In a separate bowl, whisk the egg yolks until smooth and slightly thickened. To prevent the yolks from scrambling when mixed with the hot liquid, carefully ladle in about half of the warm dairy mixture, adding it in a slow, steady stream while whisking vigorously. This process is called tempering and helps the yolks adjust to the heat gradually. Once combined, pour the tempered yolk mixture back into the saucepan with the remaining hot milk and cream.
- Cook the Custard Base: Return the saucepan to the stovetop over medium-low heat. Stir constantly with a heatproof spatula or whisk, making sure to scrape the bottom and sides to prevent scorching. If you are using an ice cream stabilizer, sprinkle it in now and whisk thoroughly to distribute evenly. Continue cooking until the custard thickens slightly and reaches 180°F (82°C). The mixture should coat the back of a spoon without running off immediately when you draw a line through it with your finger.
- Cool the Mixture Quickly: Prepare an ice bath by filling a large bowl with ice and water. Place a medium heatproof bowl inside the ice bath and set a fine mesh sieve on top. Strain the hot custard through the sieve into the inner bowl to remove any curdled bits or lumps. Stir gently as it cools to speed up the process. The custard should cool down to around 50°F (10°C) or feel cool to the touch. Once cooled, whisk in the vanilla extract and a pinch of salt for flavor balance.
- Rest the Custard: Transfer the cooled custard base to the refrigerator and let it chill for at least 4 hours, or ideally overnight. This resting period allows the flavors to deepen and helps the fat and proteins in the mixture stabilize, which leads to a creamier ice cream texture. While optional, this step is highly recommended if you want your ice cream to have professional-quality smoothness.
- Churn the Ice Cream: Once the custard has thoroughly chilled, pour it into your ice cream maker. Follow the manufacturer’s instructions for churning—typically 20 to 30 minutes—until the mixture reaches the consistency of soft-serve ice cream. The churning process incorporates air, giving the ice cream its light, scoopable texture.
- Create the Cranberry Swirl: Spoon about one-third of the churned ice cream into a pre-chilled freezer-safe container. Add 2–3 spoonfuls of the cooled cranberry sauce on top, then repeat the layering process with more ice cream and sauce until both are used. To create the swirl, insert a butter knife or chopstick into the container and gently drag it through the mixture in an “S” motion. This will distribute the cranberry sauce in beautiful ribbons without fully blending it into the ice cream.
- Freeze Until Firm: Smooth the top with a spatula, cover the container tightly with a lid, and place it in the freezer. Allow the ice cream to firm up for at least 2 hours, or until it reaches a scoopable consistency. The longer it rests, the more stable the texture will be. For best results, let the container sit at room temperature for 3–5 minutes before scooping to make serving easier.
- Serve and Enjoy: Scoop the ice cream into bowls, cones, or alongside your favorite holiday dessert. The creamy vanilla custard combined with the tangy cranberry ribbons makes a visually stunning and flavor-packed treat. Store any leftovers in the freezer for up to one week for best texture and taste.
Notes
- Custard Base: Cooking the base to 180°F (82°C) ensures a creamy, thick texture without curdling.
- Glucose Syrup: Helps prevent ice crystals and keeps the ice cream smoother; light corn syrup works as a substitute.
- Optional Stabilizer: Adds extra creaminess and helps maintain texture if storing for more than a day or two.
- Fruit Swaps: Substitute cranberries with blueberries, raspberries, or strawberries, but reduce sugar by 2–3 tablespoons for naturally sweeter fruits.
- Chilling Time: Resting the custard in the fridge for several hours (or overnight) deepens flavor and improves texture.
- Swirl Technique: Avoid overmixing the cranberry sauce into the ice cream—gentle swirling creates attractive ribbons and distinct bursts of flavor.
- Serving Tip: Let ice cream sit at room temperature for 3–5 minutes before scooping for the perfect texture.
- Best Enjoyed Fresh: Consume within one week for peak flavor, though it can last up to two weeks when stored properly.
