Creamy Almond Joy Ice Cream
A simple no-churn vegan ice cream made with frozen bananas, coconut, almonds, and chocolate chips. This dairy-free dessert is creamy, naturally sweetened, and ready in just a few hours—perfect for a refreshing, plant-based treat.
Equipment
- 1 Blender or food processor
- 1 Airtight Freezer-safe Container
- 1 mixing spoon or spatula
- 1 ice cream scoop
Ingredients
- 3 large bananas sliced and frozen
- ½ cup coconut cream or cold plant-based milk
- 2 tablespoons maple syrup or honey/agave
- 1 teaspoon almond extract
- ½ cup unsweetened coconut flakes
- ¼ cup unsalted almonds roughly chopped
- ½ cup vegan chocolate chips
Instructions
- Prepare the Frozen Bananas: Begin with ripe bananas that have been peeled, sliced into coins, and frozen for at least 3–4 hours, or ideally overnight. Using very ripe bananas ensures natural sweetness and creaminess. Freezing them solid is key to achieving a rich, ice-cream-like texture once blended. If your bananas have been stored in a freezer bag, break apart any chunks before blending for smoother processing.
- Start Blending the Base: Place the frozen banana slices into a high-powered blender or a food processor. Pulse a few times at first to break down the fruit into smaller crumbles. Avoid adding liquid right away—this step allows the bananas to form a creamy, soft-serve consistency without becoming watery. Scrape down the sides of the blender bowl with a spatula if pieces stick.
- Add Creaminess and Flavor: Once the bananas are crumbly, pour in the coconut cream or very cold plant-based milk, along with maple syrup and almond extract. Blend again, stopping as needed to scrape the sides, until the mixture becomes thick, smooth, and creamy. The almond extract provides that signature Almond Joy flavor, while the coconut cream gives the ice cream its rich, velvety base.
- Fold in the Mix-Ins: After blending the base until silky, transfer the mixture into a large mixing bowl. Gently fold in the unsweetened coconut flakes, chopped almonds, and vegan chocolate chips. Folding instead of blending keeps the add-ins chunky, giving you crunchy bites of nuts, chewy coconut, and bits of melty chocolate in every scoop—just like the candy bar that inspired this recipe.
- Transfer to Freezer Container: Spoon the mixture into an airtight, freezer-safe container. Smooth out the surface with the back of a spoon or spatula to create an even layer. A shallow container works best because it allows the ice cream to freeze more evenly and makes scooping easier later.
- Freeze Until Firm: Place the container in the freezer for at least 3–4 hours, or until the ice cream is firm enough to scoop. If freezing overnight, the texture will be harder—don’t worry, this is normal for no-churn recipes. To prevent freezer burn, make sure the lid is tightly sealed or cover the surface with parchment paper before sealing.
- Soften Before Serving: When ready to serve, remove the container from the freezer and let it sit at room temperature for 5–10 minutes. This step softens the ice cream slightly, making it easier to scoop and ensuring a creamy, scoopable texture. Use a sturdy ice cream scoop that has been dipped in warm water for the best results.
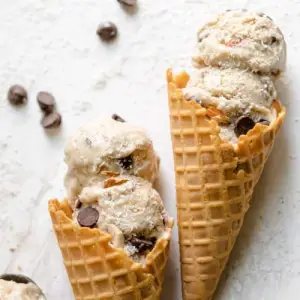
- Serve and Enjoy: Scoop into bowls, cones, or parfait glasses. Garnish with extra shredded coconut, a drizzle of melted chocolate, or a sprinkle of chopped almonds for presentation and added crunch. Enjoy immediately as a refreshing dairy-free dessert or store leftovers back in the freezer for up to 7 days.
Notes
- Use ripe bananas for the sweetest, creamiest base. Overripe bananas with brown spots work best.
- Freeze bananas overnight for best texture; shorter freezing may result in softer ice cream.
- Coconut cream creates the richest texture, but chilled almond or oat milk also works.
- Add mix-ins after blending to keep the texture chunky and candy-bar inspired.
- Allow ice cream to soften before scooping for smooth, creamy servings.
