10-Minute Fiber-Rich Fruit Cups
Delight in these quick, no-cook fruit cups, made with a mix of fresh fruits and a splash of lemonade or juice. Perfect for on-the-go snacking, meal prep, or a kid-friendly treat, they are naturally sweet, hydrating, and packed with fiber and vitamins.
Equipment
- 4 small storage containers (4 ounces each)
- Measuring cups
- Knife
- Cutting board
- Spoon for stirring
Ingredients
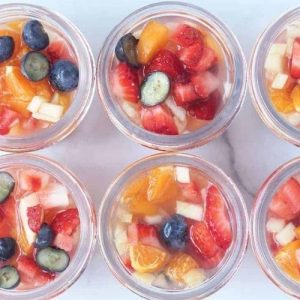
- 2 cups fresh fruit finely diced (strawberries, blueberries, grapes, peaches, apricots, cherries, or apple)
- 1 cup lemonade low-sugar if preferred (or apple juice, coconut water, or a 50/50 mix of water and juice)
Instructions
- Prepare Your Workspace: Start by gathering a clean cutting board, a sharp knife, and a large bowl for mixing your fruit. Make sure your storage containers are washed and ready. Using containers around 4 ounces each works perfectly for portioning individual servings. This preparation ensures a smooth, organized process and prevents any fruit from bruising or spilling during assembly.
- Select and Wash Fruits: Choose a variety of fresh, ripe fruits such as strawberries, blueberries, grapes, peaches, apricots, cherries, and apples. Wash all fruits thoroughly under cold running water to remove dirt and any residual pesticides. Pat the fruits dry with a clean kitchen towel or paper towel to remove excess moisture, which helps the fruit maintain its natural flavor and texture when stored.
- Pit and Peel if Needed: For fruits like cherries, apricots, and peaches, carefully remove the pits with a small paring knife. For apples, peel the skin if preparing the cups for young children or anyone who prefers a softer texture. This step ensures that every bite is safe, easy to chew, and enjoyable.
- Dice Fruits Evenly: Finely dice all fruits into small, bite-sized pieces, roughly ¼ to ½ inch in size. Consistently sized pieces make the fruit easier to eat and give the cups a professional, store-bought feel. Place all diced fruits in the large mixing bowl as you go to keep your workspace organized.
- Combine with Liquid: Pour 1 cup of your chosen liquid over the diced fruit. You can use lemonade for a tangy twist, apple juice for natural sweetness, coconut water for hydration, or a 50/50 mix of juice and water to control sugar content. Gently stir the fruit with a spoon to ensure every piece is lightly coated. This step adds flavor and helps prevent fruit from browning quickly.
- Fill the Containers: Spoon the fruit mixture into your prepared containers, filling each about ¾ full. Pour just enough liquid to cover the fruit lightly, allowing some space at the top to avoid spills when sealing the lid. Take care to distribute the fruit evenly so each container has a colorful, appealing mix.
- Seal and Store: Securely close the lids of each container to keep the fruit fresh. If you plan to eat them right away, you can serve immediately. For later use, store the fruit cups in the refrigerator for up to 3 days. The cold temperature preserves freshness, texture, and flavor while keeping the fruit safe to eat.
- Optional Freezing for Popsicles: If you want a frozen treat, simply place the sealed containers or popsicle molds in the freezer for several hours. Frozen fruit cups make a refreshing, healthy snack, perfect for warm days or as a fun alternative for kids’ lunchboxes.
- Serve and Enjoy: Before serving, give the fruit cups a gentle stir to redistribute the liquid. Serve them chilled straight from the fridge, or if frozen, allow them to soften slightly for easy spooning. These colorful, naturally sweet cups are perfect for snack time, a quick breakfast, or as a light dessert option.
Notes
- Use ripe, fresh fruits for the best flavor and natural sweetness. Overripe fruit can become mushy when mixed with liquid.
- To make the fruit easier to eat, dice all pieces evenly and finely, especially apples, which may be peeled for younger children.
- Feel free to experiment with your favorite seasonal fruits, or stick to 1-2 favorites for a simpler version.
- The liquid not only adds flavor but also helps prevent browning in fruits like apples and peaches.
- These fruit cups are naturally low in calories, hydrating, and a great way to sneak in vitamins and fiber.
