
All products are selected by our editorial team for quality. If you buy through our links, we may earn a small commission at no extra cost to you.
Baking bread at home can be a deeply satisfying experience, and there’s nothing like the smell of fresh, homemade bread wafting through the kitchen.
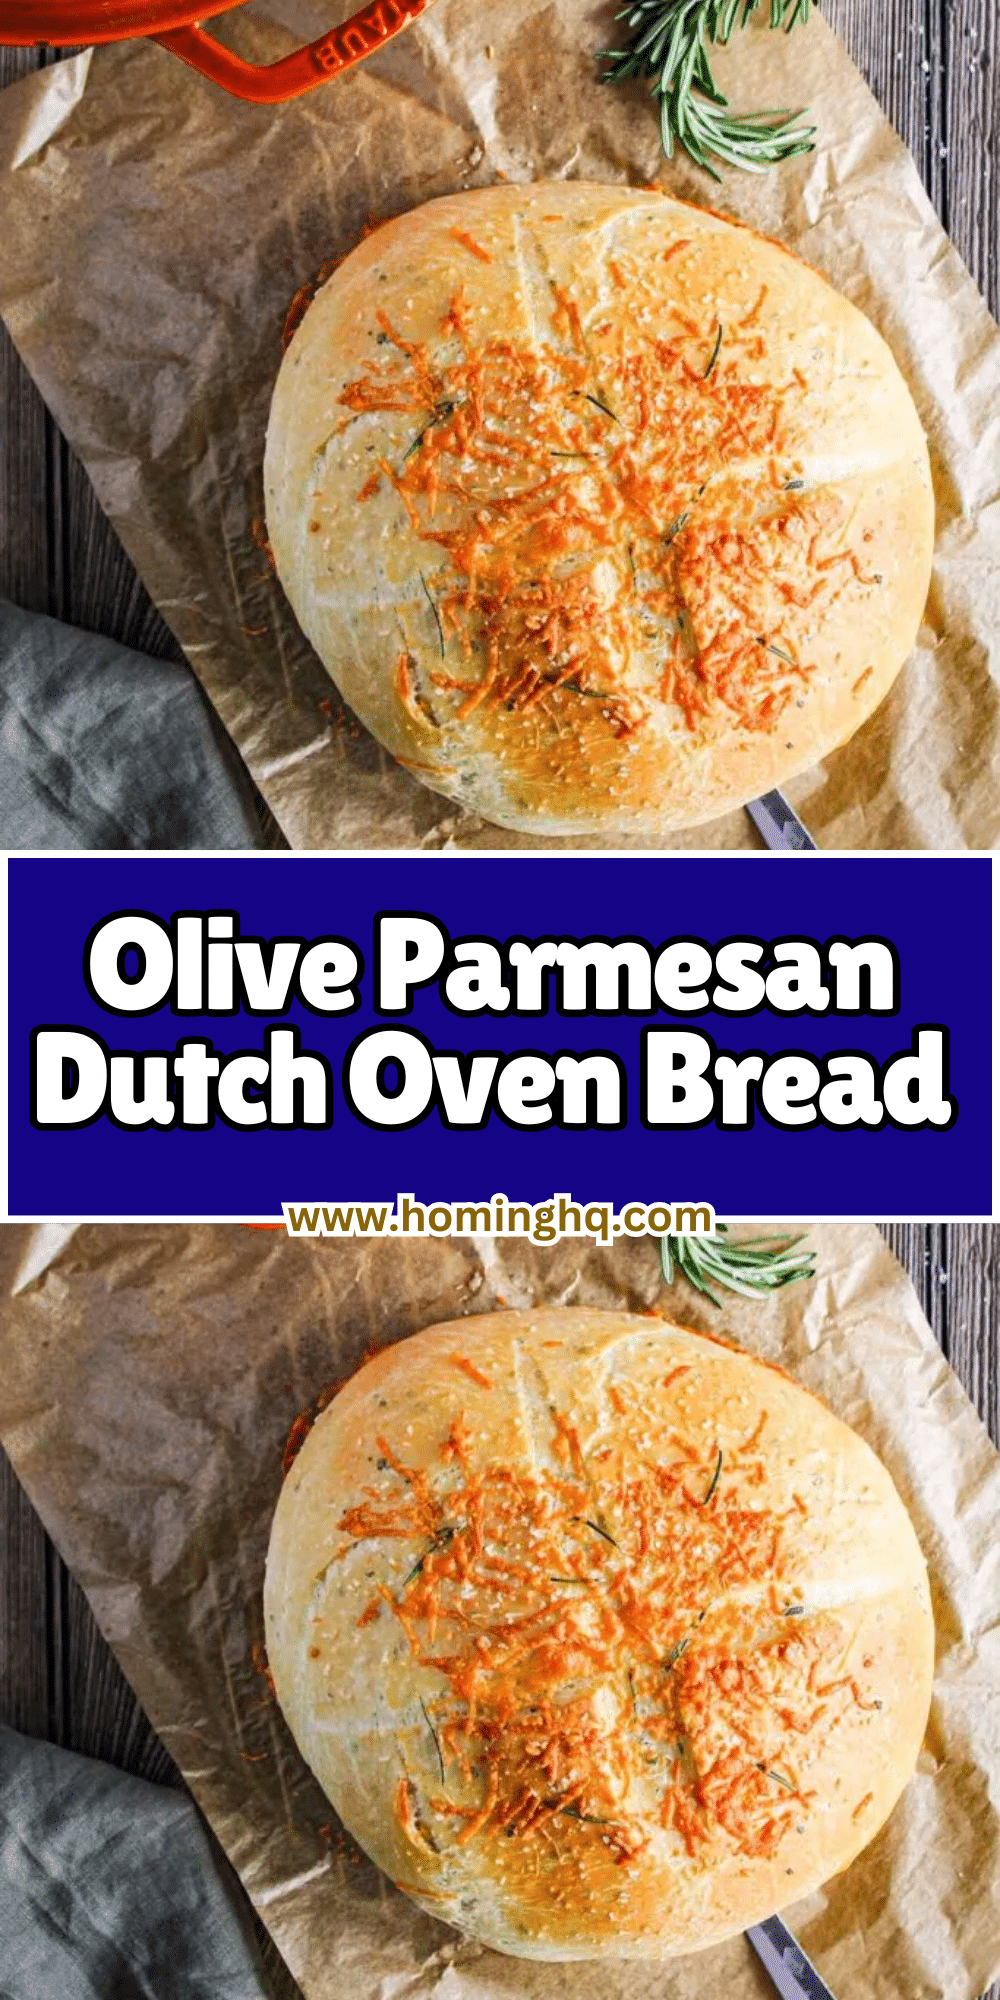
This Olive Parmesan Dutch Oven Bread brings together two classic ingredients—olives and parmesan cheese—creating a bread with a wonderfully savory flavor profile.
The combination of rich parmesan and briny olives, paired with the method of baking it in a Dutch oven, gives this bread its signature crispy crust and soft, airy interior.
Whether you’re serving it as a side dish at a family dinner, pairing it with your favorite soup, or enjoying a slice with olive oil and balsamic vinegar, this bread will become a staple in your home.
Best of all, the recipe is incredibly easy to follow, and the results are consistently delicious.
Read on to discover how you can make this delightful Olive Parmesan Dutch Oven Bread yourself!
Ingredients for Olive Parmesan Dutch Oven Bread
Creating the perfect loaf of Olive Parmesan Dutch Oven Bread begins with the right ingredients.
Here’s everything you’ll need to bring this savory bread to life:
Basic Ingredients
To form the foundation of your bread, you’ll need these basic pantry staples:
- Flour: All-purpose flour works wonderfully for this recipe, providing the right texture for a hearty, chewy bread.
- Yeast: Active dry yeast is the best choice for this recipe, helping your dough rise and giving the bread its light, airy texture.
- Salt: Essential for flavor, salt enhances the taste and balances the richness of the parmesan.
- Sugar: A small amount of sugar helps activate the yeast and encourages a perfect rise.
- Warm Water: The warm water (around 100°F) is key to activating the yeast without killing it.
Flavor Enhancements
These ingredients will give the bread its unique, savory profile:
- Olive Oil: Adds richness and moisture to the dough, while also helping develop a golden crust when baked.
- Parmesan Cheese: Freshly grated parmesan is the star of this bread, lending its nutty, salty flavor to the dough.
- Black Olives: Pitted and chopped, black olives bring a savory, slightly tangy element to the bread that pairs beautifully with the parmesan.
- Optional Fresh Herbs: Fresh rosemary or thyme can be added for an aromatic twist, enhancing the overall flavor of the bread.
Tools You’ll Need
To ensure your bread comes out perfectly, these tools will be essential:
- Dutch Oven: A heavy-duty Dutch oven is crucial for baking this bread, as it traps heat and moisture to create the perfect crust.
- Mixing Bowl: You’ll need a large bowl to mix the dough.
- Measuring Spoons and Cups: Accurate measurements are important for the perfect dough consistency.
- Wooden Spoon or Spatula: Ideal for mixing the ingredients without overworking the dough.
Preparing the Dough
Now that you have your ingredients ready, it’s time to start making the dough. Follow these simple steps to ensure you get a beautifully textured, flavorful dough for your bread.
Step 1: Activating the Yeast
The first step in bread-making is to activate the yeast.
n a small bowl, dissolve the active dry yeast in warm water with a pinch of sugar.
Stir gently and let it sit for about 5 to 10 minutes.
You’ll know the yeast is ready when it begins to bubble and foam, indicating that it’s active and ready to work its magic on your dough.
Step 2: Mixing the Dough
In a large mixing bowl, combine the flour and salt.
Use a wooden spoon or spatula to mix these dry ingredients together.
Once well-combined, pour in the yeast mixture along with the olive oil. Stir until everything begins to come together, forming a sticky dough.
At this point, you can also add in your chopped black olives and grated parmesan cheese.
Stir them into the dough evenly so every bite will have a perfect mix of flavors.
Step 3: Kneading the Dough
Kneading is essential to developing the gluten structure, giving your bread the perfect chewy texture.
Transfer the dough to a lightly floured surface and begin kneading.
Push down with the palms of your hands, fold the dough over, and turn it a quarter turn.
Repeat this process for about 8 to 10 minutes, or until the dough is smooth and elastic.
If you’re using a stand mixer, you can attach the dough hook and knead on low speed for about 5 minutes.
If the dough feels too sticky, sprinkle it with a little more flour, but be careful not to add too much, as you want to maintain a slightly tacky dough.
Step 4: First Rise
Once the dough is kneaded, place it in a lightly oiled bowl.
Cover the bowl with a damp cloth or plastic wrap and let it rise in a warm place for about 1 to 2 hours, or until it has doubled in size.
The dough needs this time to ferment, develop flavor, and rise to the perfect height.
To speed up the rising process, you can place the bowl in a slightly warm oven (turned off) or near a heat source, but be careful not to make it too hot, as extreme temperatures can kill the yeast.
You have not enough Humanizer words left. Upgrade your Surfer plan.
Shaping and Preparing for Baking
Once the dough has risen beautifully and doubled in size, it’s time to shape it and prepare it for the final bake.
Here’s how to ensure your Olive Parmesan Dutch Oven Bread gets the perfect shape and texture:
Step 5: Shaping the Dough
After the first rise, gently punch down the dough to release any air bubbles. Then, transfer it to a lightly floured surface.
Shape the dough into a round loaf by folding the edges inward and tucking them under.
Use the palms of your hands to gently stretch the dough into a smooth, round shape, ensuring the top is taut.
If you prefer a more rustic look, you can shape the dough into a slightly oblong or freeform shape, but a round loaf works best for this recipe to achieve the classic artisan look.
Step 6: Second Rise
After shaping the dough, it’s important to let it rise again, though this time for a shorter period—about 30 to 45 minutes.
Place the shaped dough on a piece of parchment paper, and cover it loosely with a cloth.
This second rise helps the dough achieve a light, airy texture, so don’t skip this step.
While the dough is resting, you can begin preheating your Dutch oven to ensure it’s hot and ready for the bread.
Step 7: Preparing the Dutch Oven
Preheat your Dutch oven (with its lid on) in the oven at 475°F (245°C) for about 30 minutes.
A preheated Dutch oven is essential for creating the perfect environment for baking bread—it traps steam, which leads to a crisp, golden crust, and allows the bread to bake evenly.
If you don’t have parchment paper, you can dust the surface of the dough with a little extra flour, but parchment paper will make it easier to transfer the dough into the hot Dutch oven.
Baking the Olive Parmesan Bread
With the dough shaped, risen, and the Dutch oven preheated, you’re ready to bake the bread.
Here’s how to achieve the perfect bake for this Olive Parmesan Dutch Oven Bread:
Step 8: Baking in a Dutch Oven
Carefully remove the preheated Dutch oven from the oven (it will be very hot!), and lift the parchment paper with the dough onto the Dutch oven insert.
Gently lower the dough into the pot, ensuring it sits comfortably in the center.
Be cautious as the Dutch oven is very hot. Place the lid back on the pot, and return it to the oven.
Bake the bread at 475°F (245°C) for about 25 minutes with the lid on.
This initial phase of baking traps steam, which helps the dough rise higher and results in a soft, airy interior.
Step 9: Removing the Lid for a Golden Finish
After the initial 25 minutes, carefully remove the lid from the Dutch oven.
This will allow the bread to bake uncovered for the remaining time, giving it a beautiful golden-brown crust.
Continue baking for another 15 to 20 minutes, or until the bread has a deep golden color and a crispy crust.
You can also check for doneness by tapping the bottom of the loaf—if it sounds hollow, your bread is ready.
Step 10: Checking for Doneness
To ensure your Olive Parmesan Dutch Oven Bread is fully baked, remove it from the oven and let it cool slightly.
The bread should have a deep golden-brown color on top, and the crust should feel firm and crisp to the touch.
Tapping the bottom of the loaf will produce a hollow sound, which is a good indicator that the bread is fully cooked through. If it doesn’t sound hollow, return the bread to the oven for an additional 5-10 minutes.
Once it’s baked to perfection, remove the bread from the Dutch oven, and let it cool on a wire rack before slicing.
The cooling process helps the bread set its crumb and prevents it from becoming too soft or doughy on the inside.
Tips and Tricks for Success
Baking the perfect Olive Parmesan Dutch Oven Bread requires a bit of practice and attention to detail.
Here are some helpful tips to ensure your bread turns out beautifully every time:
1. Temperature Matters
Ensure that the water used to activate the yeast is warm but not hot—ideally around 100°F (38°C).
If the water is too hot, it could kill the yeast, resulting in dough that doesn’t rise.
Similarly, make sure the Dutch oven is preheated thoroughly to create that perfect crispy crust.
2. Don’t Overwork the Dough
While kneading is crucial to developing the right texture, avoid overworking the dough.
Knead just enough to bring the dough together into a smooth, elastic consistency.
Over-kneading can lead to dense bread, which we want to avoid.
3. Let the Dough Rise Properly
Patience is key when allowing the dough to rise.
Be sure to give the dough ample time to rise in a warm environment.
If your kitchen is chilly, consider turning on the oven for a few minutes and turning it off before placing the dough inside to rise.
4. Experiment with Add-ins
While this recipe calls for black olives and parmesan cheese, feel free to experiment with other add-ins.
Sun-dried tomatoes, garlic, or different cheeses like mozzarella or goat cheese can add new dimensions to the bread.
Just be sure to chop or grate your add-ins evenly for consistent flavor throughout.
5. Cooling is Important
Once the bread is baked, allow it to cool completely on a wire rack.
Cutting into the bread too soon can cause it to become doughy, as the steam inside hasn’t had enough time to dissipate.
Frequently Asked Questions (FAQs)
1. Can I use a different type of flour for this recipe?
Yes, you can experiment with whole wheat flour or a mixture of all-purpose and whole wheat flour.
Keep in mind that whole wheat flour will make the bread denser, so you may need to adjust the water slightly to get the right dough consistency.
2. Can I use instant yeast instead of active dry yeast?
Yes, you can substitute instant yeast for active dry yeast.
Instant yeast doesn’t need to be activated in warm water, so you can mix it directly with the dry ingredients.
The rise times may be slightly shorter, so keep an eye on the dough.
3. What can I do if my dough doesn’t rise?
If your dough doesn’t rise, it could be due to inactive yeast or an overly cold environment.
Make sure your yeast is fresh and the water is at the right temperature (100°F).
Try placing the dough in a warmer area, such as near a heat source or inside a slightly warm oven, to encourage rising.
4. Can I add more olives or cheese to the dough?
Yes, feel free to add more olives or cheese for a more intense flavor.
Just be mindful not to add too much liquid from the olives, as this can affect the dough’s consistency.
5. How should I store the Olive Parmesan Bread?
Store the bread in an airtight container or wrap it in a clean cloth at room temperature for up to 3 days.
If you want to store it for a longer period, freeze it after it has completely cooled.
To thaw, simply leave it at room temperature or warm it in the oven for a few minutes.
Conclusion
Baking Olive Parmesan Dutch Oven Bread at home is a rewarding and enjoyable experience that results in a flavorful, rustic loaf with a beautiful texture.
The combination of savory olives and sharp parmesan, baked to perfection in a Dutch oven, creates a bread that is as delicious as it is satisfying.
With simple ingredients and a few easy steps, you can enjoy freshly baked bread at home, perfect for any occasion.
Whether served with a hearty meal or enjoyed on its own with a drizzle of olive oil, this bread is sure to become a favorite in your baking repertoire.
Give it a try and savor the delightful flavors of homemade Olive Parmesan Dutch Oven Bread!

Olive Parmesan Dutch Oven Bread
Equipment
- Dutch Oven (1) – 4 to 6-quart, with lid
- Mixing Bowl (1) – Large for mixing dough
- Measuring Spoons (1 set) – For accurate ingredient measurements
- Measuring Cups (1 set) – For liquids and dry ingredients
- Wooden Spoon or Spatula (1) – For mixing dough
- Parchment Paper (1 sheet) – Optional, for easy transfer into the Dutch oven
- Wire Rack (1) – For cooling the bread
Ingredients
- 3 cups 360g – All-purpose flour
- 1 teaspoon 5g – Salt
- 1 teaspoon 4g – Sugar
- 1 packet 7g – Active dry yeast
- 1 1/4 cups 300ml – Warm water
- 2 tablespoons 30ml – Olive oil
- 1/2 cup 50g – Grated Parmesan cheese
- 1/2 cup 75g – Pitted black olives (chopped)
- Optional – Fresh rosemary or thyme for extra flavor
Instructions
- Activate the Yeast: In a small bowl, combine the warm water (100°F) with sugar and sprinkle the yeast on top. Stir gently and let sit for 5-10 minutes until it becomes foamy.
- Mix Dry Ingredients: In a large mixing bowl, combine the flour and salt. Stir to evenly distribute the salt through the flour.
- Add Wet Ingredients: Pour the activated yeast mixture and olive oil into the flour mixture. Stir until a sticky dough forms.
- Incorporate Add-ins: Add the chopped olives and grated parmesan to the dough, and stir until evenly distributed.
- Knead the Dough: Turn the dough out onto a floured surface and knead for 8-10 minutes until smooth and elastic. You can also use a stand mixer with a dough hook for this step.
- First Rise: Place the dough in a lightly oiled bowl and cover it with a damp cloth or plastic wrap.Let it rise in a warm place for 1-2 hours, or until it has doubled in size.
- Shape the Dough: Punch down the dough and transfer it to a floured surface. Shape the dough into a round loaf by folding the edges inward and rolling it into a tight ball.
- Second Rise: Place the shaped dough on a piece of parchment paper and cover it with a cloth. Let it rise for 30-45 minutes.
- Preheat the Dutch Oven: Preheat your Dutch oven, with the lid on, in the oven at 475°F (245°C) for 30 minutes.
- Bake the Bread: Carefully transfer the dough (with parchment paper) into the preheated Dutch oven. Cover with the lid and bake for 25 minutes.
- Uncover and Finish Baking: After 25 minutes, remove the lid and bake the bread for another 15-20 minutes, or until the top is golden brown and the crust is crisp.
- Cool: Remove the bread from the Dutch oven and cool on a wire rack for at least 15 minutes before slicing.
Notes
Recipe Notes
- Flavor Variations: Feel free to add other ingredients like garlic, fresh herbs, or sun-dried tomatoes to personalize the bread. Just be sure to adjust the amount of flour if the dough gets too wet from extra ingredients.
- Freezing: This bread can be frozen after baking. Simply let it cool completely, then wrap it in plastic wrap and aluminum foil before freezing. To reheat, thaw at room temperature and warm in the oven for a few minutes.
- Make-Ahead Tip: If you want to prepare the dough ahead of time, you can let it rise in the refrigerator overnight. In the morning, shape it, let it rise for a bit longer, and bake as directed.
- Crispier Crust: For an even crispier crust, you can mist the dough with a bit of water before covering it with the Dutch oven lid. This creates steam while baking, resulting in an extra-crunchy exterior.
