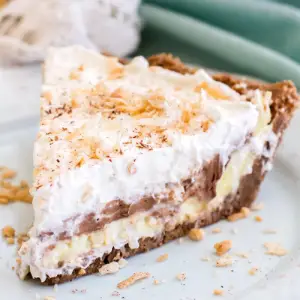
Indulge in a creamy, no-bake chocolate coconut pie that’s perfect for any season!
This dessert layers rich chocolate cream, luscious coconut filling, and fluffy whipped cream over a crunchy cookie base.
High in protein from cream cheese, packed with fiber from coconut, and featuring healthy fats, it’s an easy, satisfying treat for weeknight desserts or effortless entertaining.
Easy Creamy Chocolate Coconut Pie
Equipment
- 9" or 10" pie plate
- Food Processor or Blender
- Mixing bowls (3 medium)
- Hand or stand mixer
- whisk
- Spatula
- Microwave-safe bowl
Ingredients
Crust
- 15 oz E.L. Fudge Keebler Cookies crushed
- 1/2 cup unsalted butter melted
Coconut Cream Filling
- 3.4 oz instant coconut pudding mix
- 1 1/3 cups whole milk
- 4 oz cream cheese softened
- 1/2 cup sweetened shredded coconut
Chocolate Cream Filling
- 4 oz cream cheese softened
- 2 oz semi-sweet chocolate melted
Whipped Cream Topping
- 1 cup heavy whipping cream
- 2 tbsp powdered sugar
- 1 tsp vanilla extract
Optional Toppings
- Toasted coconut
- Chocolate shavings
Instructions
- Prepare the Cookie Crust: Begin by crushing the E.L. Fudge Keebler cookies. For best results, place the cookies in a food processor and pulse until they become a fine, even crumb. If you don’t have a food processor, place the cookies in a resealable plastic bag and crush them with a rolling pin until finely ground. Transfer the cookie crumbs to a medium-sized mixing bowl. Pour in the melted butter and stir thoroughly until every crumb is coated and holds together slightly when pressed. Take a 9-inch or 10-inch pie plate and press the cookie mixture evenly into the bottom and slightly up the sides, forming a firm, level crust. Set aside while you prepare the fillings.
- Make the Coconut Cream Layer: In a clean mixing bowl, whisk together the instant coconut pudding mix and milk. Whisk continuously for 1–2 minutes until the pudding begins to thicken and has a smooth, creamy texture. Next, add the softened cream cheese and beat with a hand or stand mixer on medium speed until fully combined and silky smooth. Gently fold in the shredded coconut using a spatula, making sure it is evenly distributed throughout the mixture. This coconut cream layer should be thick but spreadable. Once ready, spoon the filling onto the prepared cookie crust and use a spatula to spread it evenly, creating a smooth base layer.
- Prepare the Chocolate Cream Layer: Begin by melting the semi-sweet chocolate. Place the chocolate in a microwave-safe bowl and heat in 30-second intervals at 50% power, stirring thoroughly between each interval until completely melted. Allow the chocolate to cool for 1–2 minutes so it’s slightly warm but not hot. In a separate bowl, combine the softened cream cheese with the melted chocolate. Beat together until smooth, creamy, and free of lumps. Carefully spread this chocolate cream mixture over the coconut layer in an even, consistent layer. Ensure that the edges meet the crust, and smooth the top with a spatula to create a polished appearance.
- Whip the Cream Topping: Pour the heavy whipping cream into a clean mixing bowl. Using a hand or stand mixer, beat the cream on medium speed until soft peaks begin to form. This means when you lift the beaters, the cream holds its shape briefly before gently folding over. Add in the powdered sugar and vanilla extract, then continue beating until stiff peaks form and the cream becomes thick, airy, and glossy. Spread the whipped cream carefully over the chocolate layer, covering it completely. Use a spatula to smooth the surface or create soft peaks for a more decorative appearance.
- Add Optional Garnishes: If desired, sprinkle toasted coconut and chocolate shavings over the top of the whipped cream for a beautiful, indulgent finish. Toasted coconut adds a nutty aroma and crunch, while chocolate shavings enhance the visual appeal and richness. Use a light hand to avoid weighing down the fluffy whipped cream.
- Chill to Set: Cover the pie loosely with plastic wrap and place it in the refrigerator. Chill for at least 1–2 hours, allowing the layers to firm up and the flavors to meld together. This step is essential for the pie to hold its shape when sliced.
- Serve and Enjoy: Once fully chilled, slice the pie using a sharp knife, wiping the blade clean between cuts to maintain neat slices. Serve chilled and enjoy the creamy, chocolatey, coconut-rich layers with friends and family. Leftovers should be stored in the refrigerator for up to 3–4 days, ensuring the pie remains fresh and the textures intact.
Notes
- For a firmer crust, chill the pressed cookie base in the refrigerator for 10–15 minutes before adding the fillings.
- Make sure the cream cheese is fully softened to avoid lumps in both the coconut and chocolate layers.
- When melting chocolate, use short intervals in the microwave or a double boiler to prevent burning.
- Whip the cream just until stiff peaks form—overbeating can turn it into butter.
- This recipe can be doubled for a larger gathering; just use a 12-inch pie plate or two smaller pies.
Chef’s Secrets For Perfect Layers
The key to a visually stunning and delicious pie lies in layering with care.
Spread the coconut cream first and smooth it evenly to create a stable foundation for the chocolate layer.
When adding the chocolate cream, work gently to avoid mixing the layers.
Allow the chocolate to cool slightly before spreading—it prevents melting the coconut cream beneath.
For the whipped cream, make sure both your bowl and beaters are chilled; cold equipment produces a lighter, fluffier topping.
A final tip: lightly toast the coconut in a dry skillet until golden for extra flavor and crunch without adding calories.
Serving Suggestions To Impress Guests
This pie is versatile and pairs beautifully with fresh fruit such as sliced strawberries, raspberries, or a few blueberries on the side.
For a festive touch, drizzle melted chocolate over individual slices or dust with cocoa powder before serving.
It’s perfect for summer parties, holiday dinners, or as a simple weeknight treat.
Serve chilled with coffee, tea, or a glass of cold milk to balance the richness of the creamy layers.
Individual slices can be plated with a sprig of mint or a sprinkle of toasted coconut for an elegant presentation.
Storage Tips For Best Results
Store the pie in an airtight container in the refrigerator for up to 3–4 days to maintain freshness and texture.
If you plan to make it ahead, prepare the cookie crust and coconut layer first, then assemble the chocolate and whipped cream layers just before serving to keep the pie looking pristine.
Freezing is possible, but it may slightly change the texture of the whipped cream; if freezing, cover tightly and thaw in the refrigerator overnight before serving.
Always slice with a clean, sharp knife to ensure neat, even pieces.
Frequently Asked Questions
1. Can I make this pie ahead of time?
Absolutely! You can prepare the crust and fillings a day in advance and assemble the pie the same day you plan to serve it.
Just keep it refrigerated until serving to ensure the layers remain firm.
2. Can I use a different type of cookie for the crust?
Yes, graham crackers, chocolate wafers, or digestive biscuits can be substituted.
Adjust the butter slightly if the cookies are drier or finer to help the crust hold together.
3. How can I make this pie dairy-free or vegan?
You can use dairy-free cream cheese, plant-based milk, and coconut or soy-based whipped topping.
Choose dairy-free chocolate to maintain the chocolate layer. The flavors will remain rich and creamy.
4. What’s the best way to prevent the whipped cream from deflating?
Ensure the cream and mixing bowl are chilled before whipping.
Beat just until stiff peaks form, and fold gently onto the chocolate layer.
Avoid overmixing or stirring too vigorously afterward.
5. Can I add extra flavor to the pie?
Yes! A teaspoon of coconut extract in the coconut layer or a splash of coffee or espresso in the chocolate layer can elevate the flavors.
Orange zest or a few drops of rum extract can also add a gourmet twist.
