This roasted red pepper and white bean hummus is a creamy, flavorful twist on a classic dip, packed with plant-based protein, fiber, and healthy fats from tahini.
Naturally oil-free, low in saturated fat, and vegan-friendly, it’s perfect for quick snacks, meal prep, or entertaining.
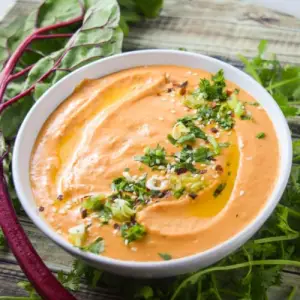
Smooth, vibrant, and satisfying, it’s a wholesome addition to any everyday table.
White Bean Roasted Red Pepper Hummus
Equipment
- 1 glass baking dish
- 1 Food processor
- 1 prep bowl
- 1 Knife
- 1 Cutting Board
- 1 Spoon or spatula
- Measuring Cups and Spoons
Ingredients
- 3 large red bell peppers
- 2 cans 15 oz. each white beans, refrigerated overnight (or ~3 cups cooked beans + 1/3 cup reserved cooking liquid)
- 2 cloves garlic minced
- 1/3 cup tahini
- 1 tsp ground cumin
- 1/2 tsp ground coriander
- Pinch red pepper flakes
- Pinch ground black pepper
- 1/2 cup fresh lemon juice plus extra to taste
- Cold water as needed
- Salt to taste
- Chopped cilantro optional, for garnish
- Toasted sesame seeds optional, for garnish
Instructions
- Prepare the Oven and Red Peppers: Preheat your oven to 350°F (175°C). While the oven warms, wash the red bell peppers thoroughly and cut them in half lengthwise. Remove the stems, seeds, and any tough white pith inside. Arrange the peppers cut-side up in a glass baking dish. Make sure they are spaced out so the heat circulates evenly for uniform roasting.
- Roast the Red Peppers – First Stage: Place the baking dish in the preheated oven and let the peppers roast undisturbed for about 30 minutes. During this time, the natural sugars in the peppers will start to caramelize, and the peppers will begin to soften. Resist the urge to stir too soon, as this ensures even cooking and concentrated flavor.
- Roast the Red Peppers – Second Stage: After the initial 30 minutes, flip each pepper so the cut side is now facing down. Continue roasting for an additional 20–30 minutes, until the peppers are very tender, slightly shriveled, and reduced in size. You’ll notice a deepening of color and aroma—a sign that the peppers are fully roasted and flavorful.
- Steam and Peel the Peppers: Transfer the roasted peppers to a prep bowl and cover them with a plate to trap the steam. Let them sit for about 10 minutes. The steam will loosen the skins, making them easy to peel off. Once cooled slightly, carefully remove the outer skins and set the roasted peppers aside. Optional: save the skins for adding extra flavor to homemade broths or soups.
- Blend the Base Ingredients: In a food processor, add the minced garlic, tahini, ground cumin, ground coriander, red pepper flakes, black pepper, and 1/2 cup of fresh lemon juice. Process these ingredients until you achieve a smooth, cohesive paste. This aromatic base will infuse the hummus with rich flavor.
- Prepare the White Beans: Drain the white beans, reserving about 1/3 cup of the cooking or canning liquid (aquafaba). This liquid will help achieve a creamy, smooth consistency without the need for added oil. If using freshly cooked beans, make sure they are cooled and tender.
- Incorporate Roasted Peppers and Beans – First Half: Add the roasted red peppers and roughly half of the white beans to the food processor. Pulse or process until the mixture is partially smooth, scraping down the sides with a spatula as needed. This helps evenly distribute the peppers and begins building the creamy texture.
- Incorporate Remaining Beans – Second Half: Add the remaining white beans and process continuously until the mixture is as smooth as possible. Check the texture and make sure there are no large chunks left. The goal is a silky, velvety hummus where the beans and peppers are fully blended.
- Adjust Consistency with Aquafaba and Cold Water: With the processor running, slowly drizzle in the reserved bean liquid. If the hummus still seems too thick, add cold water gradually, one tablespoon at a time, until the desired consistency is achieved. The hummus should be creamy, spreadable, and easy to scoop, without being runny.
- Season to Taste: Taste the hummus and adjust the seasoning as needed. Add additional salt, lemon juice, or spices according to your preference. Each batch of hummus can vary slightly depending on the beans’ saltiness or freshness of the peppers, so follow your palate for the perfect balance of flavor, heat, and acidity.
- Garnish and Serve: Transfer the hummus to a serving bowl. Garnish with chopped fresh cilantro or green onions and a sprinkle of toasted sesame seeds. For an extra touch of richness, you can drizzle a small amount of olive oil on top, though the hummus is deliciously creamy even without it.
- Storage Tips for Leftovers: Store any leftover hummus in an airtight container in the refrigerator for up to one week. The flavors will deepen over time, making it even tastier the next day. Before serving, stir gently to restore smoothness.
Notes
- White beans create a naturally creamy, smooth texture that requires no peeling, unlike chickpeas.
- Roasting the red peppers until caramelized adds sweetness and depth of flavor.
- Blending tahini with lemon juice first ensures maximum creaminess and prevents graininess.
- Slowly streaming in aquafaba or cold water produces an airy, silky texture without added oil.
- The recipe is naturally vegan, gluten-free, nut-free, soy-free, and low in saturated fat.
- Flavors deepen over time, making the hummus even tastier the next day.
- Easily customizable with extra spices, herbs, or toppings such as smoked paprika, chili flakes, or olive oil drizzle.
- Works well as a dip, spread, or base for grain bowls and wraps.
- Meal-prep friendly—stores well in the fridge and freezer.
- A healthy, protein-rich, and fiber-packed alternative to store-bought dips.
Chef’s Secrets for Perfect Creaminess
The key to luscious hummus lies in technique.
First, take time to roast the peppers until they are deeply tender and slightly caramelized—this intensifies their natural sweetness and gives the dip a richer flavor.
When blending, always start with tahini, lemon juice, garlic, and spices before adding beans and peppers.
This creates a smooth base that prevents graininess. For a velvety finish, drizzle aquafaba or chilled water slowly while the processor is running.
Don’t rush this step—the gradual incorporation of liquid transforms the texture from heavy to airy and dreamy.
Serving Suggestions for Every Occasion
This hummus is as versatile as it is delicious. Serve it as a dip with warm pita bread, crunchy veggie sticks, or whole-grain crackers for a healthy snack or appetizer.
Spread it onto wraps, sandwiches, or toast for a flavorful, protein-packed alternative to mayonnaise.
It also pairs beautifully with Mediterranean-inspired grain bowls, roasted vegetables, or grilled proteins.
For gatherings, garnish with cilantro, sesame seeds, or a drizzle of olive oil to elevate presentation and impress guests.
Smart Storage and Make-Ahead Tips
One of the best things about this recipe is its ability to be made ahead of time. Store the hummus in an airtight container in the refrigerator for up to 5–7 days.
The flavors will actually improve as they rest, making the hummus more flavorful the next day.
If it thickens slightly in the fridge, stir in a splash of cold water or lemon juice to restore its creamy consistency.
For longer storage, portion the hummus into freezer-safe containers and freeze for up to 3 months.
Thaw overnight in the fridge and give it a good stir before serving.
Frequently Asked Questions
1. Can I use chickpeas instead of white beans?
Yes, you can substitute chickpeas, but the texture will be slightly less silky.
White beans create a smoother, lighter hummus, while chickpeas give a heartier, more traditional feel.
2. Do I have to peel the beans for extra smoothness?
No peeling is needed! White beans are naturally softer than chickpeas, so they blend into a creamy dip without removing their skins.
The gradual blending method with tahini and aquafaba also ensures smoothness.
3. What can I use instead of tahini?
If you don’t have tahini, try using sunflower seed butter or cashew butter for a similar creaminess.
Keep in mind this may slightly alter the flavor profile, but it will still be delicious.
4. How can I make this recipe spicier?
For extra heat, increase the red pepper flakes, add a pinch of cayenne, or blend in a roasted chili pepper along with the bell peppers.
Adjust gradually so the spice level matches your taste.
5. Is this hummus good for meal prep?
Absolutely! This hummus keeps well in the fridge all week, making it perfect for meal prep.
Portion it into small containers for quick grab-and-go snacks, or use it as a ready-made spread for sandwiches and bowls.
