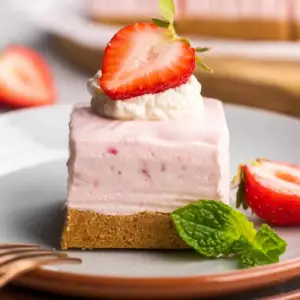
Indulge in these No-Bake Strawberry Cheesecake Bars, a delightfully creamy treat that’s perfect for summer.
With a crunchy graham cracker crust and a silky strawberry cream filling, this dessert is quick, fuss-free, and freezer-friendly.
Packed with protein from cream cheese and healthy fats from butter, it’s an easy, satisfying option for everyday snacking or meal prep.
Strawberry Cheesecake Bars
Equipment
- 1 Food Processor or Blender
- 1 8×8-inch baking dish
- Parchment paper
- 1 Mixing bowl
- Measuring Cups and Spoons
- 1 Whisk or hand mixer
Ingredients
- 2 cups graham cracker crumbs
- ½ cup unsalted butter melted
- 16 oz cream cheese room temperature
- 2 cups fresh strawberries diced
- ¾ cup granulated sugar
- 1 teaspoon vanilla extract
- 1 cup heavy cream cold
Instructions
- Prepare the Baking Dish: Start by lining an 8×8-inch baking dish with parchment paper.Make sure the paper covers the bottom and sides completely. This will prevent the cheesecake bars from sticking and make it easier to remove them once frozen. Set the prepared dish aside while you work on the crust.
- Make the Graham Cracker Crust: Place 2 cups of graham cracker crumbs into a food processor. Pulse the crumbs several times until they become fine and uniform in texture. Transfer the crumbs to a mixing bowl. Pour in ½ cup of melted unsalted butter and stir until the crumbs are evenly coated. The mixture should hold together slightly when pressed, forming a cohesive crust.
- Form the Crust Base: Transfer the graham cracker mixture into the prepared baking dish. Spread it evenly across the bottom using a spatula. Take the bottom of a measuring cup or a glass and press the crumbs firmly into place to create a compact, even layer. This helps the crust stay intact when you slice the bars later. Once pressed, refrigerate the crust while preparing the filling to allow it to firm up.
- Blend the Cream Cheese Filling: In a food processor or blender, combine 16 ounces of room-temperature cream cheese, 2 cups of diced fresh strawberries, ¾ cup of granulated sugar, and 1 teaspoon of vanilla extract. Blend the mixture until completely smooth, with no lumps of cream cheese or fruit chunks. The strawberries should be fully incorporated, creating a vibrant pink, creamy mixture.
- Whip the Heavy Cream: In a separate bowl, pour 1 cup of cold heavy cream. Using a hand mixer or whisk, whip the cream until stiff peaks form. Stiff peaks mean the cream holds its shape and doesn’t collapse when the whisk is lifted. This step is crucial to give the cheesecake filling a light, airy texture rather than a dense consistency.
- Fold Cream into Filling: Carefully fold the whipped cream into the cream cheese and strawberry mixture in two stages. Use a spatula and gently cut through the center of the mixture, then fold it over. Rotate the bowl as you fold to ensure the whipped cream is evenly combined. Avoid overmixing, as this can deflate the whipped cream and make the filling too dense.
- Assemble the Cheesecake Bars: Remove the graham cracker crust from the refrigerator. Pour the creamy strawberry mixture over the chilled crust, spreading it evenly with a spatula. Smooth the top gently, making sure the filling reaches all corners of the dish. This will ensure each bar has a uniform layer of delicious cheesecake.
- Freeze to Set: Cover the baking dish tightly with plastic wrap to prevent freezer burn and odors from affecting the flavor. Place the dish in the freezer for at least 5 hours, or preferably overnight. Freezing solidifies the filling and helps the bars hold their shape when sliced.
- Slice and Serve: Once fully frozen, remove the plastic wrap. Lift the cheesecake slab out of the dish using the parchment paper. Place it on a cutting board and use a sharp knife to cut into 12 equal squares. For cleaner cuts, you can warm the knife slightly by dipping it in hot water and wiping it dry before slicing.
- Enjoy or Store: Serve immediately for a refreshing dessert, or store in an airtight container in the freezer for up to 1 month. To enjoy later, you can let individual bars sit at room temperature for 5–10 minutes to soften slightly before eating.
Notes
- Cream Cheese Temperature: Make sure your cream cheese is at room temperature before blending. This ensures a smooth, lump-free filling that mixes easily with the strawberries and whipped cream.
- Crust Firmness: Press the graham cracker crust firmly using a measuring cup or glass to help it hold together when slicing frozen bars.
- Whipping Technique: Whip the heavy cream until stiff peaks form, but do not overwhip, as it can turn grainy.
- Strawberry Selection: Fresh, ripe strawberries give the best flavor and vibrant color. Frozen strawberries can be used but should be thawed and drained to avoid excess moisture.
- Blending Options: A food processor, blender, Vitamix, or immersion blender works well to create a smooth filling.
Chef’s Secrets for Perfect Cheesecake
The key to achieving a creamy, stable cheesecake lies in attention to temperature and technique.
Always start with room-temperature cream cheese, as this ensures it blends seamlessly with the strawberries and sugar.
When folding in whipped cream, use gentle, deliberate motions to maintain a light, airy texture.
Press the crust firmly into the pan to avoid crumbling and refrigerate it briefly before adding the filling.
Small touches, such as warming your knife before slicing frozen bars, guarantee clean, beautiful servings every time.
Serving Suggestions for Maximum Delight
These cheesecake bars are versatile and can be served in numerous ways.
For a simple presentation, dust with powdered sugar or drizzle with melted dark chocolate.
Add fresh strawberry slices or a few mint leaves for a visually appealing garnish.
They pair wonderfully with a cup of coffee, iced tea, or even a light dessert wine.
Perfect for summer picnics, birthday parties, or casual family treats, these bars can also be plated individually with whipped cream for a refined dessert experience.
Storage Tips to Maintain Freshness
Store these bars in an airtight container in the freezer for up to one month.
For easy access, separate layers with parchment paper to prevent sticking.
If you prefer slightly softer bars, leave them at room temperature for 5–10 minutes before serving.
Avoid storing in the refrigerator for long periods, as the crust may soften and the filling lose its ideal texture.
Freezing ensures the bars remain firm and perfect for slicing and serving at any time.
Frequently Asked Questions
1. Can I make this recipe ahead of time?
Yes! These cheesecake bars are perfect for make-ahead dessert. Prepare the crust and filling, then freeze for at least 5 hours or overnight.
This makes them ideal for parties or meal prep.
2. Can I use frozen strawberries instead of fresh?
You can, but be sure to thaw and drain them thoroughly to avoid extra moisture that could make the filling runny.
Fresh strawberries generally give the best flavor and color.
3. How can I make the crust more flavorful?
Add a teaspoon of cinnamon or a tablespoon of finely chopped nuts to the graham cracker crumbs before pressing them into the pan.
This adds depth and a subtle crunch.
4. How do I prevent the cheesecake from sticking to the pan?
Lining your pan with parchment paper is essential.
Make sure it covers the sides as well as the bottom, and lightly grease it for extra assurance when removing the bars.
5. Can I substitute heavy cream with a lighter option?
Heavy cream is ideal for achieving the creamy, stiff texture.
You can try whipping coconut cream for a dairy-free alternative, but the texture and flavor may differ slightly.
