All products are selected by our editorial team for quality. If you buy through our links, we may earn a small commission at no extra cost to you.
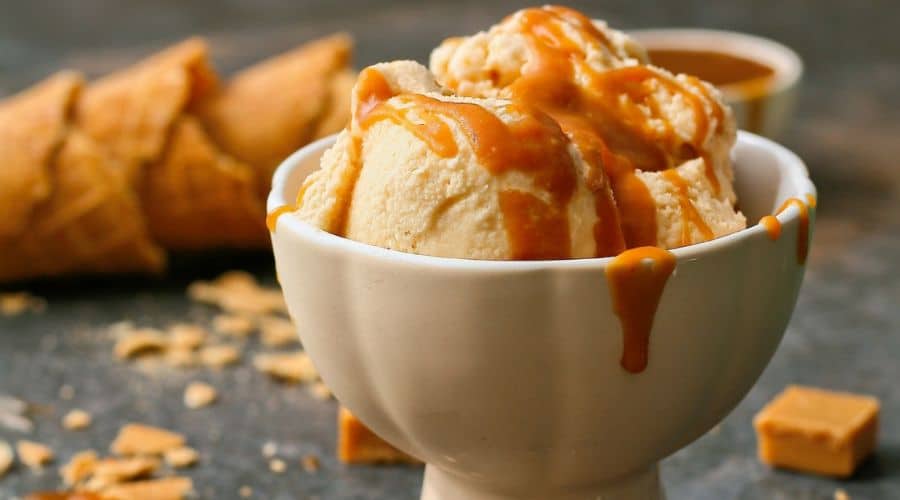
Salted Caramel Ice Cream is a beloved treat that combines the richness of creamy vanilla ice cream with the delightful contrast of sweet and salty flavors.
Whether you’re indulging after a long day or serving it at a special occasion, this ice cream is the perfect balance of comforting sweetness and savory depth.
What sets this flavor apart is the salty kick that cuts through the smooth, velvety sweetness, making each bite more exciting than the last.
This homemade version is incredibly easy to prepare and will leave you with a premium ice cream experience without ever needing to step foot in a store.
Let’s dive into what makes this treat so irresistible!
What Makes Salted Caramel Ice Cream So Irresistible?
The magic behind Salted Caramel Ice Cream lies in its perfect harmony of two distinct flavors: sweet caramel and a hint of salt.
The caramel, made from slowly melted sugar, offers a rich, deep sweetness, while the sea salt provides a burst of flavor that enhances the overall taste.
The savory element of salt helps to counterbalance the natural sweetness, creating a flavor profile that is complex yet undeniably delicious.
What makes this ice cream irresistible is its ability to satisfy both sweet and savory cravings in one scoop.
The silky smooth texture of the ice cream also elevates the experience, making it a luxurious dessert that’s just as perfect for everyday indulgence as it is for celebrating special moments.
The contrast between the creamy ice cream and the swirls of salted caramel creates a truly exceptional dessert.
Essential Ingredients for Salted Caramel Ice Cream
To create the perfect Salted Caramel Ice Cream, you don’t need many ingredients – just a few key staples to ensure the best results. Here’s what you’ll need:
- Heavy Cream: The rich, velvety texture of heavy cream gives the ice cream its luxurious mouthfeel and smoothness.
- Whole Milk: Provides a balance between richness and creaminess without being overly heavy.
- Sugar: Both granulated sugar for the ice cream base and brown sugar for making the caramel sauce.
- Egg Yolks: Essential for making a custard-style ice cream base that’s extra creamy and thick.
- Vanilla Extract: Adds depth to the flavor, enhancing the overall sweetness of the ice cream.
- Sea Salt: A key element that brings out the caramel’s full flavor and cuts through its sweetness for that signature balance.
- Butter: Adds richness to the caramel sauce and helps create the smooth consistency.
The quality of your ingredients will have a huge impact on the flavor, so choose the best you can find for an unforgettable salted caramel experience.
How to Make Salted Caramel from Scratch
Creating the perfect salted caramel sauce is the foundation of this recipe, and it’s easier than you might think. Here’s how to do it step by step:
Step 1: Caramelize the Sugar
In a medium saucepan, add the sugar and cook it over medium heat.
Stir the sugar occasionally until it begins to melt and turn golden brown.
Be careful not to let it burn, as this will give the caramel a bitter taste.
Once the sugar has fully melted into a smooth amber liquid, it’s time to add the butter.
Step 2: Add Butter and Cream
Once the sugar has reached the right color, carefully add the butter. It will bubble up, so be cautious.
Stir the mixture until the butter is fully melted, and then pour in the heavy cream slowly, continuing to stir.
This step helps to bring the caramel sauce to a silky, smooth consistency. Keep stirring until fully combined.
Step 3: Add Salt
Now that your caramel sauce is ready, sprinkle in the sea salt. Start with a small pinch, and taste the sauce.
Add more if needed, as the salt enhances the flavor without overpowering the sweetness.
Stir the mixture well to incorporate the salt.
Step 4: Let It Cool
Once your caramel sauce is perfectly balanced and smooth, remove it from the heat and let it cool.
It will thicken as it cools, ready to be swirled into your ice cream.
This homemade caramel is rich and flavorful, making it the perfect base for your salted caramel ice cream!
How to Layer Salted Caramel into Your Ice Cream
Layering the salted caramel into your ice cream is an essential step that brings out the beauty and flavor of your homemade treat.
You want to ensure that the caramel is evenly distributed while maintaining those irresistible swirls throughout.
Here’s how to do it:
Step 1: Prepare Your Ice Cream Base
Once you have prepared your ice cream base and it’s ready to churn, begin the process by churning the base in your ice cream maker according to the manufacturer’s instructions.
The ice cream will thicken and take on a smooth, creamy texture as it freezes.
Step 2: Add the Caramel
When the ice cream has reached a soft-serve consistency, it’s time to add your salted caramel sauce.
Using a spoon or a small cup, drizzle generous amounts of caramel sauce over the churned ice cream.
You can add the caramel in layers, spooning a little over the surface of the ice cream and then folding it in gently with a spatula.
Be sure to leave some pockets of caramel so you get that signature swirl effect.
Step 3: Create the Perfect Swirls
To create beautiful swirls of caramel, use a spatula or a butter knife to gently fold the caramel into the ice cream.
Make sure not to overmix, as you want the swirls to remain distinct.
If you prefer larger swirls of caramel, fold less vigorously.
For smaller, more intricate swirls, mix more thoroughly.
Step 4: Freeze for the Final Set
Once the caramel is swirled in, transfer the ice cream to an airtight container.
Use the back of a spoon to smooth out the top and ensure even layers. Place the container in the freezer to allow the salted caramel ice cream to harden completely, usually for about 4 hours or overnight.
By following these steps, you’ll create the perfect balance of creamy ice cream and sweet-salty caramel with every scoop.
Freezing and Storing Your Ice Cream
Homemade salted caramel ice cream needs to be stored properly to maintain its rich texture and flavor.
Follow these tips to keep your ice cream fresh and delicious:
Step 1: Store in an Airtight Container
Once your ice cream is fully churned and swirled with salted caramel, transfer it into an airtight container.
This will prevent any ice crystals from forming and ensure the texture stays smooth.
Choose a container that fits the amount of ice cream, leaving just a little space at the top to allow for any expansion as the ice cream freezes.
Step 2: Cover the Ice Cream
For extra protection, press a piece of plastic wrap directly onto the surface of the ice cream before sealing the container with a lid.
This helps prevent freezer burn and keeps the ice cream from absorbing any unwanted freezer odors.
Step 3: Freeze Until Firm
After covering the ice cream, place it in the coldest part of your freezer.
Let it freeze for at least 4-6 hours, or until it becomes firm and scoopable. If you prefer a firmer texture, leave it for up to 12 hours.
Step 4: Serve and Enjoy
Once the ice cream is completely frozen and firm, it’s ready to serve!
Take it out of the freezer and let it sit at room temperature for a few minutes to soften slightly for easier scooping.
If you plan to store it for a longer time, ensure the lid is tightly sealed and place it back in the freezer immediately after serving.
By following these simple freezing and storing techniques, your salted caramel ice cream will stay fresh, creamy, and as delicious as the day you made it!
Conclusion
In conclusion, Salted Caramel Ice Cream is the perfect combination of sweet and salty, making it a favorite for many.
From creating your own rich and velvety caramel sauce to churning a smooth custard-based ice cream, every step of the process adds to the indulgence of this treat.
Whether you enjoy it in a cone, as part of a sundae, or on its own, this homemade ice cream offers a decadent experience that store-bought versions can’t match.
By following the steps outlined here, you’ll be able to make a batch of salted caramel ice cream that’s smooth, flavorful, and a guaranteed crowd-pleaser.
The beauty of this recipe lies in its simplicity – just a few quality ingredients and some patience can transform your kitchen into a personal ice cream parlor.
Enjoy your homemade creation, and share it with family and friends for a special dessert everyone will love!
Frequently Asked Questions (FAQ)
1. Can I make Salted Caramel Ice Cream without an ice cream maker?
Yes! If you don’t have an ice cream maker, you can still make this recipe.
After preparing the base and caramel, pour the mixture into a shallow container.
Every 30 minutes, stir the ice cream with a fork to break up any ice crystals. Repeat this process for about 3-4 hours, until the ice cream reaches a creamy consistency.
2. How can I make this recipe dairy-free?
To make Salted Caramel Ice Cream dairy-free, substitute the heavy cream and milk with coconut milk or almond milk, and use a dairy-free butter alternative.
For the caramel, make sure to use a dairy-free butter and coconut cream in place of the heavy cream for a similar rich texture.
3. How long will homemade salted caramel ice cream last in the freezer?
Homemade salted caramel ice cream can last up to 2-3 weeks in the freezer when stored in an airtight container.
However, for the best flavor and texture, it’s recommended to consume it within 1-2 weeks.
4. Can I make the salted caramel sauce in advance?
Absolutely! You can make the salted caramel sauce ahead of time and store it in an airtight container in the fridge for up to a week.
Just warm it slightly before adding it to the ice cream base or using it as a topping.
5. What if my salted caramel ice cream turns out too hard or too soft?
If your ice cream is too hard, allow it to soften at room temperature for 5-10 minutes before scooping.
If it’s too soft, this could be due to not churning it long enough or not freezing it properly.
Make sure the ice cream maker is functioning correctly, and ensure the freezer is set to the right temperature for solidifying the ice cream.

Salted Caramel Ice Cream
Equipment
- Ice Cream Maker – 1 (recommended for best texture)
- Saucepan – 1 (for caramel sauce)
- Mixing Bowls – 2 (for ice cream base and caramel)
- Whisk: 1 (for mixing ingredients)
- Spatula – 1 (for folding in the caramel)
- Airtight Container – 1 (for storing ice cream)
Ingredients
- 1 ½ cups 360 ml Heavy Cream
- 1 ½ cups 360 ml Whole Milk
- ¾ cup 150 g Granulated Sugar
- ¾ cup 150 g Brown Sugar
- 4 large Egg Yolks
- 1 tsp Vanilla Extract
- 3 tbsp 45 g Unsalted Butter
- 1 tsp Sea Salt
- 1 ¼ cups 300 ml Heavy Cream (for the caramel sauce)
Instructions
Make the Salted Caramel Sauce:
- In a medium saucepan, melt ¾ cup granulated sugar over medium heat, stirring occasionally, until it turns golden brown and smooth.
- Add 3 tbsp butter and stir until fully melted and combined.
- Carefully add 1 ¼ cups heavy cream to the caramel (it will bubble), then stir until smooth.
- Stir in 1 tsp sea salt and remove from heat. Let the caramel cool while you prepare the ice cream base.
Prepare the Ice Cream Base:
- In a mixing bowl, whisk together egg yolks and ¾ cup brown sugar until smooth and creamy.
- In a saucepan, combine 1 ½ cups heavy cream and 1 ½ cups whole milk over medium heat, heating until just about to simmer (do not boil).
- Gradually pour the warm cream mixture into the egg yolks while whisking constantly to temper the eggs.
- Pour the egg mixture back into the saucepan and cook over low heat, stirring constantly, until the custard thickens (about 8-10 minutes). You can test by coating the back of a spoon with the custard.
- Remove from heat and stir in 1 tsp vanilla extract.
Churn the Ice Cream:
- Pour the custard into an ice cream maker and churn according to the manufacturer’s instructions until it reaches soft-serve consistency.
- Layer the Caramel into the Ice Cream:
- In the ice cream maker, drizzle a few spoonfuls of salted caramel sauce over the ice cream and fold gently to create caramel swirls. Leave some pockets of caramel for texture.
- Transfer the ice cream to an airtight container and freeze for 4-6 hours or until firm.
Serve:
- Scoop the salted caramel ice cream into bowls or cones, and enjoy!
Notes
- The salted caramel sauce can be made in advance and stored in an airtight container for up to a week. Reheat it gently before using.
- If you don’t have an ice cream maker, simply pour the ice cream base into a shallow container and stir every 30 minutes while it freezes to prevent ice crystals.
- Feel free to add mix-ins like chocolate chunks, crushed nuts, or swirls of additional caramel for a twist.
