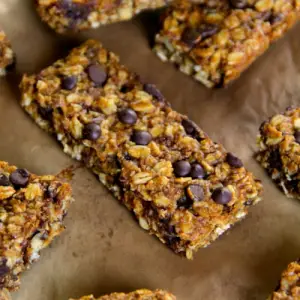
These soft and chewy pumpkin granola bars are a wholesome, plant-powered snack you’ll want to make on repeat.
Packed with fiber-rich oats, nutrient-dense pumpkin, and good fats from almond butter, they offer long-lasting energy without excess sugar or saturated fat.
Naturally sweetened and dotted with chocolate chips, they strike the perfect balance between healthy and satisfying. Ideal for quick breakfasts, school lunches, or meal-prep snacks, these bars are both nourishing and delicious.
30-Minute Chewy Pumpkin Granola Bars
Equipment
- 1 large mixing bowl
- 1 mixing spoon or spatula
- 1 8×8 inch (20×20 cm) baking pan
- Parchment paper (1 sheet)
- Measuring Cups & Spoons
Ingredients
- 2 cups 160 g rolled oats
- 2 tablespoons 14 g ground flaxseed
- 1 teaspoon ground cinnamon
- ½ teaspoon ground ginger
- ¼ teaspoon ground cloves
- ¼ teaspoon ground nutmeg
- ¼ teaspoon salt
- ½ cup 120 g pumpkin puree (canned or homemade)
- ¼ cup 64 g creamy almond butter
- ¼ cup 80 g brown rice syrup*
- 2 tablespoons 25 g coconut sugar (or similar unrefined sugar)
- 1 teaspoon vanilla extract
- ⅓ cup 60 g chocolate chips
Instructions
- Prepare Your Baking Pan: Begin by preheating your oven to 350°F (176°C). This ensures the oven is fully heated and ready once your mixture is ready to bake. Next, take an 8×8 inch (20×20 cm) square baking pan and line it with parchment paper. Leave a few inches of overhang on two opposite sides—this little trick makes lifting the bars out much easier later. If you’d like, lightly grease the parchment with oil or nonstick spray to prevent any sticking. Set the prepared pan aside while you move on.
- Mix the Dry Ingredients: In a large mixing bowl, add the rolled oats, ground flaxseed, cinnamon, ginger, cloves, nutmeg, and salt. Use a spoon or spatula to stir everything together until the spices are evenly distributed throughout the oats. Taking the time to combine the dry ingredients thoroughly helps ensure that each bar has an even flavor with warm, autumn-inspired spices in every bite.
- Blend the Wet Ingredients: In the same bowl (no need to dirty another one), add the pumpkin puree, almond butter, brown rice syrup, coconut sugar, and vanilla extract. Use a sturdy spatula or wooden spoon to mix everything together. The mixture may feel sticky and thick at first, but keep folding and pressing until the wet and dry ingredients form a uniform dough. The oats should be evenly coated, and there should be no dry pockets left at the bottom of the bowl.
- Fold in the Chocolate Chips: Once the base mixture is well combined, gently fold in the chocolate chips. Stir just enough to distribute them evenly throughout the dough. If your mixture feels warm from stirring, the chocolate may start to melt slightly—that’s perfectly fine and can even create delicious little streaks of chocolate in your bars.
- Transfer and Press the Mixture: Scoop the mixture into your prepared baking pan. Use a greased spatula, the back of a spoon, or even your slightly damp hands to spread the dough out evenly across the pan. Be sure to press down firmly—this step is important! Compacting the mixture tightly helps the bars hold their shape once baked and cut, giving them that chewy, cohesive texture instead of falling apart. Pay attention to the corners and edges so the bars bake evenly.
- Bake Until Golden at the Edges: Place the baking pan into the preheated oven and bake for 18 to 20 minutes. You’ll know the bars are ready when the edges turn a light golden brown, but the center still looks soft and slightly underbaked. Remember, granola bars firm up as they cool, so avoid overbaking or they may become too dry.
- Cool Before Cutting: Once baked, carefully remove the pan from the oven and set it on a wire rack. Allow the bars to cool in the pan for at least 20 minutes. This cooling time is crucial—it helps the mixture set so the bars can be cut cleanly without crumbling. After cooling, lift the slab out of the pan using the parchment paper overhang and place it on a cutting board.
- Slice and Store Properly: Using a sharp knife, cut the cooled slab into 10 even bars (or smaller squares if you prefer bite-sized pieces). Store the granola bars in an airtight container at room temperature for up to 5 days. For longer storage, you can refrigerate them to keep them firm, or freeze them individually wrapped for up to 2 months—just thaw before enjoying.
Notes
- Rolled oats give the bars a hearty texture—avoid quick oats, as they may make the bars too soft.
- Ground flax not only boosts fiber and nutrients but also helps bind the mixture naturally.
- Pressing the mixture firmly into the pan is key for bars that hold together well after baking.
- Don’t skip the cooling step—slicing too early can cause crumbling.
- Brown rice syrup works best for binding, but honey is a good non-vegan substitute.
- Pumpkin keeps the bars moist without needing excess oil or butter.
Chef’s Secrets for Best Results
The secret to chewy, well-structured granola bars lies in how firmly the mixture is packed into the pan before baking.
The tighter you press, the less likely they’ll crumble later.
Another key tip is to balance the moisture—pumpkin adds natural softness, but too much can make the bars soggy, so be precise with your measurements.
Using brown rice syrup is particularly helpful because its sticky texture binds the oats better than other sweeteners.
If you’re after extra flavor, toast your oats in the oven for 5–7 minutes before mixing them in—this adds a lovely nutty depth that pairs beautifully with the pumpkin spice.
Lastly, sprinkle a few extra chocolate chips on top before baking for a bakery-style finish.
Serving Suggestions for Every Occasion
These pumpkin granola bars are versatile enough to enjoy in countless ways.
For a quick breakfast, pair one bar with a glass of almond milk, a latte, or a protein smoothie for a balanced start to the day.
They also make excellent school or office snacks, since they travel well and don’t require refrigeration.
For a dessert-style treat, warm a bar in the microwave for a few seconds and serve with a spoonful of Greek yogurt or a drizzle of melted dark chocolate.
If you’re making them for a gathering, cut the bars into bite-sized squares, arrange on a platter, and dust lightly with cinnamon for a festive, shareable option.
Storage Tips to Keep Freshness
To keep your bars soft and chewy, store them in an airtight container lined with parchment paper to prevent sticking.
At room temperature, they will stay fresh for about 4–5 days, making them ideal for weekly meal prep.
If you prefer a firmer texture, refrigerate the bars, where they’ll last up to a week.
For long-term storage, wrap each bar individually in parchment or plastic wrap, place them in a freezer-safe bag, and freeze for up to 2 months.
Simply let them thaw at room temperature or warm them briefly in the microwave before enjoying.
Frequently Asked Questions
1. Can I use quick oats instead of rolled oats?
Rolled oats are best because they hold their texture during baking, giving the bars chewiness.
Quick oats may make the bars softer and more crumbly. If you must substitute, reduce the amount slightly and expect a different texture.
2. What can I use instead of almond butter?
Any nut or seed butter will work—peanut butter for a richer flavor, cashew butter for mild creaminess, or sunflower seed butter for a nut-free option.
Just make sure it’s creamy and not overly oily or dry.
3. Do I have to use brown rice syrup?
Brown rice syrup binds the bars particularly well, but honey or maple syrup can be substituted.
Keep in mind that bars made with maple syrup may be slightly softer and less cohesive.
4. How do I prevent the bars from falling apart?
The most common reasons are not pressing the mixture firmly enough into the pan or cutting before they’ve cooled fully.
Always pack the mixture tightly and let the bars cool at least 20 minutes before slicing.
5. Can I make these bars gluten-free or vegan?
Yes! Use certified gluten-free oats to make them gluten-free.
For vegan bars, stick with brown rice syrup or maple syrup instead of honey, and choose dairy-free chocolate chips.
Both adjustments are easy and won’t change the flavor much.
