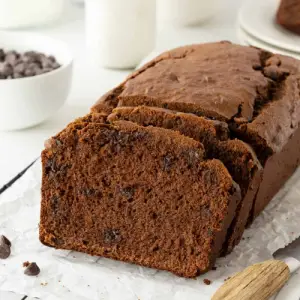
This Chocolate Peanut Butter Banana Bread is a decadent yet wholesome twist on a classic favorite.
Packed with ripe bananas, creamy peanut butter, and rich cocoa, it delivers natural sweetness, plant-based protein, and fiber in every slice.
Easy to prepare and naturally satisfying, it’s perfect for breakfast, a quick snack, or meal prep.
With good fats and protein from peanut butter, it’s both indulgent and nourishing.
Chocolate Peanut Butter Banana Bread
Equipment
- 1 large mixing bowl
- 1 medium mixing bowl
- Electric mixer
- Wooden spoon
- 9 × 5-inch loaf pan
- Measuring Cups and Spoons
- Wire rack
Ingredients
- ½ cup unsalted butter softened
- 1 cup granulated sugar
- 2 large eggs
- ½ cup creamy peanut butter
- 1 cup mashed ripe bananas about 2 bananas
- 1 teaspoon pure vanilla extract
- 1½ cups all-purpose flour
- 1 teaspoon baking soda
- ⅓ cup unsweetened cocoa powder
- ½ cup sour cream regular or light
- ¾ cup semisweet chocolate chips
Instructions
- Preheat and Prepare Pan: Begin by preheating your oven to 350°F (175°C). While the oven warms, prepare a 9 × 5-inch loaf pan by lightly greasing it with nonstick cooking spray or a thin layer of butter. To prevent sticking, you can also line the bottom with parchment paper, allowing for easy removal once the bread is baked. Set aside while you prepare the batter.
- Cream Butter and Sugar: In a large mixing bowl, combine ½ cup of softened unsalted butter and 1 cup of granulated sugar. Using an electric mixer, beat the ingredients on medium speed until the mixture is light, fluffy, and pale in color. This process incorporates air into the butter, helping to create a tender, moist bread. Scrape down the sides of the bowl with a spatula to ensure everything is evenly combined.
- Incorporate Eggs and Peanut Butter: Add 2 large eggs, one at a time, to the creamed butter and sugar, mixing well after each addition. Next, add ½ cup of creamy peanut butter and continue to beat until the mixture becomes smooth, creamy, and well combined. The peanut butter enriches the batter, adding both flavor and protein, while creating a slightly denser, indulgent texture.
- Blend in Bananas and Vanilla: Mash 2 very ripe bananas until smooth (a few small lumps are okay for texture) and fold them into the mixture along with 1 teaspoon of pure vanilla extract. Mix gently until fully incorporated. The bananas add natural sweetness and moisture, while the vanilla enhances the overall flavor profile.
- Prepare Dry Ingredients: In a separate medium bowl, whisk together 1½ cups all-purpose flour, 1 teaspoon baking soda, and ⅓ cup unsweetened cocoa powder. Sifting or whisking helps distribute the cocoa and soda evenly, ensuring a consistent rise and even chocolate flavor throughout the bread.
- Combine Wet and Dry Ingredients (First Half): Add half of the dry ingredients to the wet banana mixture. Using a wooden spoon or spatula, gently fold the ingredients together until just combined. Avoid overmixing to prevent a dense, tough loaf. The mixture should be thick but smooth, with streaks of cocoa blended evenly.
- Incorporate Sour Cream (First Half): Add ¼ to ½ cup of sour cream to the batter and gently fold it in. The sour cream contributes moisture and a slight tang, which balances the sweetness and enhances tenderness. Continue folding carefully to maintain the airy texture of the batter.
- Combine Remaining Dry Ingredients: Add the remaining dry ingredients to the mixture and fold gently until nearly incorporated. This step ensures that all the flour and cocoa are evenly distributed without overworking the batter, which could make the bread dense.
- Add Remaining Sour Cream and Chocolate Chips: Fold in the rest of the sour cream, then carefully stir in ¾ cup of semisweet chocolate chips. The chocolate chips melt slightly during baking, creating pockets of rich chocolate in every bite, while the sour cream ensures the bread remains moist and soft.
- Transfer Batter to Pan: Scrape the prepared batter into the greased loaf pan, spreading it evenly with a spatula. Tap the pan lightly on the counter to remove any large air bubbles and smooth the top for an even bake.
- Bake the Bread: Place the loaf pan in the preheated oven and bake for 55 to 60 minutes. To check doneness, insert a toothpick into the center of the loaf; it should come out clean or with a few moist crumbs (not wet batter). Baking times may vary slightly depending on your oven, so start checking at 50 minutes.
- Cool the Loaf (In-Pan): Remove the bread from the oven and allow it to cool in the pan on a wire rack for 20–30 minutes. This rest time helps the loaf set and makes it easier to remove from the pan without breaking.
- Cool the Loaf (On Rack): Carefully lift the bread out of the pan and transfer it to the wire rack. Let it cool for at least an additional 30 minutes or until completely cooled before slicing. Cooling ensures the texture is perfect and prevents the bread from crumbling.
- Slice and Serve: Once cooled, use a serrated knife to slice the bread into 10 even pieces. Serve as a breakfast treat, snack, or dessert. Optional: pair with a smear of peanut butter, a drizzle of chocolate, or a cup of coffee or tea for a complete indulgent experience.
- Storage Tips (Optional Step for Readers): Wrap any leftover slices in foil or store in an airtight container at room temperature for up to 4 days. For longer storage, refrigerate up to a week or freeze individually wrapped slices for up to 3 months.
Notes
- For the best flavor and texture, use very ripe bananas. The riper they are, the sweeter and more moist your bread will be.
- Room-temperature ingredients, including butter, eggs, and sour cream, help the batter mix evenly and create a tender crumb.
- Avoid overmixing the batter once the dry ingredients are added. Overmixing can make the bread dense and tough.
- This recipe can be doubled for a larger crowd; simply bake in two loaf pans or adjust the baking time for a larger single pan.
- Chocolate chips can be swapped for chopped dark chocolate or even peanut butter chips for a flavor twist.
Chef’s Secrets for Perfect Loaf
The key to a perfectly moist and flavorful Chocolate Peanut Butter Banana Bread lies in balancing texture and flavor.
Use very ripe bananas and slightly softened butter to ensure a smooth, creamy batter.
Gently fold in the flour and cocoa mixture instead of vigorously mixing to prevent a dense loaf.
Incorporating sour cream adds moisture and a subtle tang, enhancing the richness of the peanut butter.
For extra chocolatey pockets, reserve a few chocolate chips to sprinkle on top before baking—they’ll create a delicious melted crust on the surface.
Serving Suggestions for Maximum Enjoyment
This bread is incredibly versatile and can be served in multiple ways.
For breakfast, pair a slice with Greek yogurt or a drizzle of honey for extra protein and natural sweetness.
As an afternoon snack, serve slightly warmed with a spread of peanut butter or a thin layer of chocolate ganache.
For a dessert option, top slices with fresh berries or a dollop of whipped cream.
It’s also perfect for meal prep: individually wrap slices to grab-and-go during a busy week.
Storage Tips for Freshness
To keep your bread soft and flavorful, allow it to cool completely before storing.
Wrap it in foil or place it in an airtight container at room temperature for up to four days.
If you’d like it to last longer, refrigerate for up to a week.
For long-term storage, wrap individual slices in plastic wrap, then place them in a freezer-safe bag, where they can remain fresh for up to three months.
When ready to enjoy, simply thaw at room temperature or warm gently in the oven.
Frequently Asked Questions
1. Can I make this recipe gluten-free?
Yes! Replace the all-purpose flour with a 1-to-1 gluten-free baking flour blend.
Make sure it contains xanthan gum or another binder to help maintain the bread’s structure.
Baking time may need a few extra minutes, so check doneness with a toothpick.
2. Can I use natural peanut butter instead of creamy?
Absolutely! Natural peanut butter works well, but ensure it’s well-stirred before measuring.
The texture may be slightly denser, and the bread might have a stronger peanut flavor.
3. How can I make mini muffins instead of a loaf?
Grease or line mini muffin tins and fill each about three-quarters full with batter.
Bake at 350°F (175°C) for 15–18 minutes or until a toothpick comes out clean.
This yields roughly 36 mini muffins and is perfect for portion-controlled snacks.
4. Can I reduce sugar or make it healthier?
You can reduce the sugar by ¼ cup without compromising texture too much, but the bread will be slightly less sweet.
Adding unsweetened applesauce or mashed dates can also enhance natural sweetness while keeping the bread moist.
5. How do I prevent the bread from being dry?
Use very ripe bananas and gently fold in the batter to avoid overmixing. Including the sour cream helps retain moisture.
Be careful not to overbake—check the loaf a few minutes before the suggested baking time and remove it when a toothpick comes out mostly clean with a few moist crumbs.
