All products are selected by our editorial team for quality. If you buy through our links, we may earn a small commission at no extra cost to you.
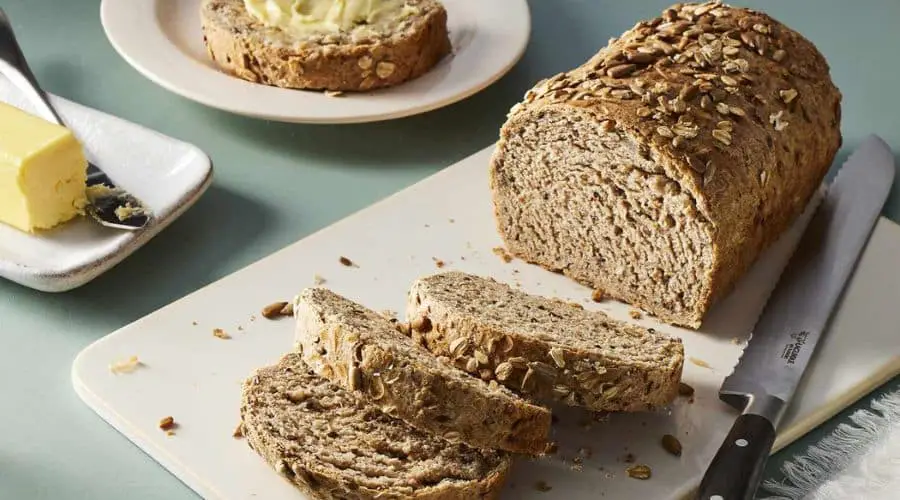
Multigrain bread is a wholesome, nutrient-dense alternative to traditional white or whole wheat bread.
Made from a combination of grains such as whole wheat, oats, flaxseeds, and millet, this bread offers a rich, hearty texture and a deep, nutty flavor.
Baking your own multigrain bread at home allows you to control the quality of ingredients, ensuring a preservative-free and healthier option for you and your family.
Whether you’re looking for a nutritious breakfast option, a sturdy base for sandwiches, or simply a delicious homemade loaf, this multigrain bread recipe will elevate your baking experience.

Health Benefits of Multigrain Bread
Multigrain bread is more than just a flavorful choice—it is packed with essential nutrients that contribute to overall well-being.
Rich in Fiber for Better Digestion
The combination of grains in multigrain bread provides a high fiber content, which supports healthy digestion and helps prevent constipation.
Fiber also plays a role in regulating blood sugar levels, making this bread a great choice for those managing their glucose intake.
Packed with Essential Nutrients
Different grains contribute a variety of vitamins and minerals, such as iron, magnesium, and B vitamins.
These nutrients are crucial for maintaining energy levels, supporting brain function, and promoting overall health.
Supports Heart Health
Many of the grains used in multigrain bread, such as oats and flaxseeds, are rich in heart-healthy compounds like omega-3 fatty acids and beta-glucans.
These help lower bad cholesterol (LDL) and reduce the risk of cardiovascular diseases.
Keeps You Fuller for Longer
Thanks to its high fiber and protein content, multigrain bread provides sustained energy and promotes satiety, making it an excellent addition to a balanced diet.
It can help curb cravings and prevent unnecessary snacking.
Essential Ingredients for Multigrain Bread
The beauty of multigrain bread lies in its variety of grains, each contributing unique flavors and nutritional benefits.
Whole Wheat Flour
Whole wheat flour serves as the base of the bread, providing structure and a hearty, nutty flavor.
It is packed with fiber, vitamins, and minerals, making it a healthier alternative to refined white flour.
Mixed Grains and Seeds
A combination of grains like oats, millet, barley, and flaxseeds adds texture and enhances the bread’s nutritional profile.
These grains contribute fiber, protein, and healthy fats, boosting the bread’s overall health benefits.
Yeast and Warm Water
Yeast is essential for fermentation, allowing the bread to rise and develop a soft, airy texture.
Activating yeast in warm water helps kickstart the process, ensuring a well-risen loaf.
Honey or Maple Syrup (Optional)
A touch of natural sweetener enhances the flavor while also aiding in yeast activation.
Honey and maple syrup are great choices as they add mild sweetness without overpowering the grains’ natural taste.
Olive Oil or Butter
A small amount of fat helps improve the texture, keeping the bread moist and tender.
Olive oil offers heart-healthy benefits, while butter adds richness to the loaf.
Salt
Salt is essential for flavor and also plays a role in controlling yeast activity. It helps balance the taste and enhances the overall bread structure.
By using high-quality ingredients and experimenting with different grains, you can customize your multigrain bread to suit your taste and dietary needs.
Tools and Equipment Needed
Before you begin making multigrain bread, it’s important to have the right tools to ensure a smooth baking process.
While this recipe doesn’t require any specialized equipment, having these essential tools on hand will make preparation easier and more efficient.
Mixing Bowls
You’ll need at least two mixing bowls—one for combining dry ingredients and another for wet ingredients.
A large bowl is ideal for mixing and kneading the dough.
Measuring Cups and Kitchen Scale
Accurate measurements are key to achieving the right dough consistency.
A set of measuring cups and spoons will help with liquid and dry ingredients, while a kitchen scale ensures precision, especially when weighing flour and grains.
Stand Mixer or Hand Kneading
If you prefer a hands-off approach, a stand mixer with a dough hook attachment can do the kneading for you.
However, hand-kneading is just as effective and gives you more control over the dough’s texture.
Bread Pan
A standard 9×5-inch loaf pan works well for this recipe, ensuring a well-shaped and evenly baked loaf.
If you prefer a rustic, free-form loaf, you can also shape the dough by hand and bake it on a baking sheet.
Dough Scraper (Optional)
A dough scraper is helpful for handling sticky dough and shaping it during the kneading process.
Clean Kitchen Towel or Plastic Wrap
Covering the dough during proofing helps retain moisture and promotes a good rise.
A clean kitchen towel or plastic wrap works best for this step.
Oven Thermometer
To ensure even baking, an oven thermometer can help you verify that your oven reaches and maintains the correct temperature.
With these tools ready, you can confidently move on to the step-by-step bread-making process.
Step-by-Step Guide to Making Multigrain Bread

Making multigrain bread requires patience and precision, but the result is a flavorful, homemade loaf that’s well worth the effort.
Step 1: Preparing the Dough
Begin by activating the yeast. In a small bowl, combine warm water (around 110°F or 45°C) with honey or maple syrup and sprinkle the yeast on top.
Let it sit for about 5–10 minutes until it becomes foamy.
In a large mixing bowl, combine whole wheat flour, mixed grains, and salt.
Once the yeast is activated, add it to the dry ingredients along with olive oil or melted butter.
Mix until a sticky dough forms.
Step 2: Kneading and First Rise
Transfer the dough to a lightly floured surface and knead for about 8–10 minutes until it becomes smooth and elastic.
If using a stand mixer, knead on low speed with a dough hook for approximately 5–7 minutes.
Place the kneaded dough in a greased bowl, cover it with a damp kitchen towel or plastic wrap, and let it rise in a warm place for about 1–1.5 hours, or until it doubles in size.
Step 3: Shaping the Dough and Second Rise
Once the dough has risen, punch it down to release excess air.
Transfer it to a floured surface and shape it into a loaf.
If using a bread pan, gently press the dough into the pan, ensuring it fits evenly.
Cover the loaf again and allow it to rise for another 30–45 minutes, or until it puffs up slightly above the pan’s edges.
Step 4: Baking the Bread
Preheat the oven to 375°F (190°C). If desired, brush the top of the dough with a little water or milk and sprinkle extra grains for a decorative touch.
Bake for 30–35 minutes or until the loaf is golden brown and sounds hollow when tapped on the bottom.
To ensure it’s fully baked, check that the internal temperature reaches about 200°F (93°C).
Step 5: Cooling and Storing
Once baked, remove the bread from the pan and let it cool on a wire rack for at least an hour before slicing.
Proper cooling prevents excess moisture from making the bread soggy.
Store your multigrain bread in an airtight container at room temperature for up to 3 days, or freeze slices for longer storage.
By following these steps carefully, you’ll achieve a soft yet hearty loaf perfect for everyday use.
Tips and Tricks for the Perfect Multigrain Bread
Baking multigrain bread at home can be incredibly rewarding, but small mistakes can affect the final texture and flavor.
Here are some expert tips to help you achieve a perfect loaf every time.
Use the Right Ratio of Flour and Grains
While adding multiple grains enhances the bread’s nutritional value, too many heavy or coarse grains can weigh down the dough.
Keep a balanced ratio of whole wheat flour to mixed grains to maintain a good rise and texture.
Hydrate the Grains Before Mixing
Some grains, like oats and flaxseeds, absorb a lot of moisture.
Soaking them in warm water for 10–15 minutes before adding them to the dough helps prevent a dry, dense loaf.
Don’t Rush the Proofing Process
Yeast needs time to work its magic. Allowing the dough to rise fully during both proofing stages ensures a soft, airy crumb.
If the dough hasn’t doubled in size, let it proof a bit longer.
Check Dough Consistency During Kneading
The dough should be slightly sticky but not overly wet. If it feels too dry, add a teaspoon of water at a time.
If it’s too sticky, lightly flour your hands instead of adding excess flour to the dough.
Bake with Steam for a Crispier Crust
For a beautifully crisp crust, place a shallow pan of hot water on the oven’s lower rack while baking.
The steam helps create a golden, crunchy exterior while keeping the inside soft.
By keeping these tips in mind, you’ll consistently bake a delicious, well-textured multigrain bread that rivals any bakery.
Frequently Asked Questions
1. Why is my multigrain bread dense and heavy?
A dense loaf is usually the result of not enough kneading, insufficient proofing time, or using too many coarse grains without proper hydration.
Make sure the dough has been kneaded until smooth and allowed to rise fully before baking.
2. How can I make my bread softer?
For a softer loaf, try adding a little extra fat (olive oil or butter) and increasing the hydration by slightly adjusting the water content.
Avoid overbaking, as it can dry out the bread.
3. Can I make multigrain bread without yeast?
Yes, but the texture will be different. You can use baking powder or baking soda with an acidic ingredient like yogurt or buttermilk for a quicker, denser bread.
However, traditional yeast-based bread has better structure and flavor.
4. Can I use a bread machine for this recipe?
Absolutely! Simply follow the instructions for adding ingredients in your bread machine’s manual.
Most machines have a whole grain or multigrain setting, which is ideal for this type of dough.
5. How do I store multigrain bread to keep it fresh?
Store the bread in an airtight container at room temperature for up to three days.
For longer storage, wrap it tightly in plastic wrap and freeze slices in a ziplock bag.
When ready to eat, toast or warm slices in the oven for the best texture.
Conclusion
Making multigrain bread at home is a rewarding experience that allows you to enjoy a nutritious and flavorful loaf without preservatives or additives.
By carefully selecting your grains, kneading the dough properly, and allowing enough time for proofing, you can achieve a perfect balance of softness and texture.
Experiment with different grain combinations, seeds, and add-ins to create a loaf that suits your taste.
Whether enjoyed fresh with butter, toasted with jam, or used for sandwiches, this homemade multigrain bread will quickly become a staple in your kitchen.
Try this recipe and share your results—there’s nothing better than the aroma of freshly baked bread filling your home!

Multigrain Bread
Equipment
- 2 Mixing Bowls
- 1 measuring cup set
- 1 kitchen scale (optional)
- 1 Stand Mixer (or for hand kneading)
- 1 Bread Pan (9×5-inch)
- 1 Dough Scraper (Optional)
- 1 Clean Kitchen Towel or Plastic Wrap
- 1 Oven Thermometer (Optional)
Ingredients
Dry Ingredients
- 2 ½ cups Whole Wheat Flour
- ½ cup Rolled Oats
- ¼ cup Flaxseeds
- ¼ cup Sunflower Seeds
- 1 ½ teaspoons Salt
Wet Ingredients
- 1 cup Warm Water 110°F or 45°C
- 2 teaspoons Active Dry Yeast
- 2 tablespoons Honey or Maple Syrup
- 2 tablespoons Olive Oil or Melted Butter
Toppings (Optional)
- 1 tablespoon Rolled Oats or Seeds for garnish
Instructions
Step 1: Activate the Yeast
- In a small bowl, combine warm water and honey (or maple syrup). Sprinkle yeast on top and let it sit for 5–10 minutes until foamy.
Step 2: Mix the Dry Ingredients
- In a large mixing bowl, combine whole wheat flour, rolled oats, flaxseeds, sunflower seeds, and salt. Stir to evenly distribute the grains.
Step 3: Form the Dough
- Add the activated yeast mixture and olive oil (or melted butter) to the dry ingredients. Mix until a sticky dough forms.
Step 4: Knead the Dough
- Transfer the dough to a lightly floured surface and knead for 8–10 minutes until smooth and elastic.If using a stand mixer, knead with a dough hook on low speed for 5–7 minutes.
Step 5: First Rise
- Place the dough in a greased bowl, cover it with a kitchen towel, and let it rise in a warm place for 1–1.5 hours, or until doubled in size.
Step 6: Shape the Loaf
- Once risen, punch down the dough and shape it into a loaf. Place it into a greased 9×5-inch bread pan.
Step 7: Second Rise
- Cover the pan and let the dough rise again for 30–45 minutes, until it slightly puffs over the edge of the pan.
Step 8: Bake the Bread
- Preheat the oven to 375°F (190°C). If desired, brush the top with water or milk and sprinkle extra rolled oats or seeds.
- Bake for 30–35 minutes, until golden brown and the loaf sounds hollow when tapped.
Step 9: Cool and Serve
- Remove the bread from the pan and let it cool on a wire rack for at least 1 hour before slicing.
Notes
- For a Softer Crust: Brush the loaf with butter immediately after baking.
- To Add More Grains: Try adding chia seeds, sesame seeds, or quinoa for extra nutrition.
- For a Gluten-Free Version: Use a gluten-free flour blend and ensure grains are certified gluten-free.
- Storage Tips: Keep in an airtight container for up to 3 days or freeze for up to 2 months.

