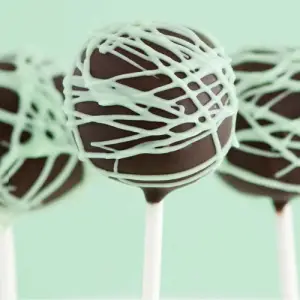
These Mint Chocolate Chip Cake Pops are a delightful treat that combines rich chocolate flavor with refreshing mint notes.
Packed with a modest amount of protein from eggs and healthy fats from butter and chocolate, they’re an indulgent yet balanced snack.
Easy to make and perfect for meal prep, they’re ideal for parties, dessert tables, or a fun everyday treat.
Mint Chocolate Chip Cake
Equipment
- 1 x 9×13-inch baking pan
- 1 x Stand mixer or electric hand mixer
- 1 x Wire cooling rack
- 1 x Large mixing bowl
- 1 x Small ice cream scoop
- 1 x Microwave-safe bowl
- 1 x Piping bag with small round tip
- Lollipop sticks (30)
- Styrofoam block
Ingredients
Chocolate Cake
- 2 cups sugar
- 1¾ cups all-purpose flour
- ¾ cup unsweetened cocoa powder
- 2 tsp baking soda
- 1 tsp baking powder
- 1 tsp salt
- 2 large eggs
- 1 cup buttermilk
- 1 cup strong black coffee
- ½ cup vegetable oil
- 2 tsp vanilla extract
Buttercream
- ½ stick unsalted butter room temperature
- 1 cup powdered sugar
- 2 tsp milk
- ½ tsp vanilla extract
Cake Pop Coating & Filling
- 1 lb dark chocolate melting
- ¼ lb white chocolate light green
- ¼ cup mini chocolate chips
- ¼ tsp mint extract
Instructions
- Prepare the Oven and Pan: Begin by preheating your oven to 350°F (175°C). Grease a 9×13-inch baking pan lightly with butter or nonstick spray, then line it with parchment paper. This ensures that the cake will release easily after baking and prevents sticking. Set the pan aside while you prepare the batter.
- Combine Dry Ingredients: In a large mixing bowl, combine 2 cups sugar, 1¾ cups all-purpose flour, ¾ cup unsweetened cocoa powder, 2 teaspoons baking soda, 1 teaspoon baking powder, and 1 teaspoon salt. Use a whisk or a spoon to mix these dry ingredients thoroughly. Ensuring even distribution of leavening agents will help the cake rise uniformly and develop a consistent texture.
- Mix Wet Ingredients into Batter: Add 2 large eggs, 1 cup buttermilk, 1 cup strong brewed black coffee, ½ cup vegetable oil, and 2 teaspoons vanilla extract to the dry ingredients. Using a stand mixer fitted with the paddle attachment—or a hand mixer—start on low speed to incorporate the liquids slowly, then increase to medium speed. Mix for approximately 2 minutes until the batter is smooth. The batter will be slightly thin, which is normal for a moist chocolate cake.
- Bake the Cake: Pour the batter evenly into the prepared pan, smoothing the top with a spatula. Place the pan in the preheated oven and bake for 30–35 minutes. To check doneness, insert a wooden toothpick into the center of the cake. If it comes out clean or with just a few crumbs, the cake is ready. Remove the pan from the oven and allow the cake to cool completely on a wire rack before handling. Cooling is crucial to prevent the buttercream from melting when mixed with the crumbs.
- Prepare the Buttercream: While the cake cools, make the buttercream. In a clean mixing bowl, beat ½ stick room-temperature unsalted butter on high speed until it becomes light, fluffy, and creamy. Reduce the speed to low and gradually add 1 cup powdered sugar, allowing it to incorporate slowly without creating a cloud of sugar. Once combined, add 2 teaspoons milk and ½ teaspoon vanilla extract, then beat on high speed again for 2–3 minutes until the buttercream is airy and smooth.
- Crumble the Cake: Once the cake has fully cooled, transfer it to a large bowl. Using your hands or two forks, break the cake into fine, even crumbs. Aim for a texture that’s small enough to mix easily with the buttercream but not so fine that it becomes powdery.
- Mix Cake with Buttercream and Mint: Add 1/4 cup plus 1 tablespoon of buttercream, ¼ teaspoon mint extract, and ¼ cup mini chocolate chips to the crumbled cake. Mix thoroughly with your hands or a fork until the buttercream is fully incorporated and the mixture is moist but firm enough to hold its shape. Taste the mixture and adjust the mint extract if you desire a stronger mint flavor.
- Shape Cake Balls: Using a small ice cream scoop or tablespoon, portion the mixture into small, even amounts. Roll each portion gently between your palms to form smooth, round balls about 1–1.5 inches in diameter. Place the balls on a plate or tray lined with plastic wrap. Once shaped, refrigerate for at least 2 hours to firm them up. This step is essential for ensuring the balls hold their shape during dipping.
- Melt the Dark Chocolate: Place 1 pound of dark chocolate in a microwave-safe bowl that is deep enough to submerge the cake balls. Heat the chocolate in 30-second increments, stirring after each session, until fully melted and smooth. This prevents burning and ensures a glossy coating on the cake pops.
- Insert Lollipop Sticks: Dip the tip of each lollipop stick into the melted chocolate, then insert it halfway into the center of a cake ball. This step acts as glue, securing the stick inside the cake and helping it stay stable when dipped.
- Coat the Cake Pops in Chocolate: Holding the cake pop by the stick, dip it into the melted chocolate until fully coated. Gently rotate the cake pop and tap off excess chocolate to achieve an even coating. Carefully place the coated cake pop upright into a Styrofoam block or cake pop stand to set. Allow the chocolate to harden completely before decorating. This prevents smudging and ensures a professional finish.
- Melt and Prepare Green Chocolate for Drizzle: In a separate microwave-safe bowl, melt ¼ pound of white chocolate tinted light green. Use short 20–30 second intervals, stirring frequently, to achieve a smooth consistency. Transfer the melted chocolate into a piping bag fitted with a small round tip for precise decoration.
- Decorate Cake Pops: Drizzle the green chocolate over each cake pop in a decorative pattern. You can use crisscross lines, spirals, or random streaks. Hold the piping bag just above the cake pop and move it steadily for even lines. Once decorated, place the cake pops back into the Styrofoam block to allow the drizzle to fully set.
- Serve or Store: Once the chocolate is completely hardened, the cake pops are ready to enjoy. Serve immediately or store in an airtight container at room temperature for up to 2 days. For longer storage, refrigerate up to a week or freeze for up to 1 month. Before serving, allow refrigerated cake pops to come to room temperature for optimal flavor and texture.
Notes
- Makes approximately 30 cake pops, depending on the size of each ball.
- Use room-temperature ingredients for smoother buttercream and better cake texture.
- Chill cake balls thoroughly before dipping to prevent them from falling apart in the chocolate coating.
- Adjust the mint extract to taste; a little goes a long way.
- For a smoother coating, ensure chocolate is completely melted and slightly cooled before dipping.
- Styrofoam blocks or cake pop stands are essential for drying and maintaining shape.
Chef’s Secrets for Perfect Pops
The key to perfect cake pops lies in texture and temperature control.
Make sure the cake is fully cooled before combining it with buttercream to avoid a gooey mixture.
When mixing, aim for a moist but firm consistency—too much buttercream will make the balls hard to shape, and too little will make them dry.
Chill the balls for at least two hours; this keeps them intact during chocolate dipping.
Use high-quality chocolate for a glossy, smooth finish, and slightly thin it with a few drops of oil if it feels too thick.
Finally, always tap off excess chocolate after dipping to achieve a clean, professional look.
Serving Suggestions for Mint Pops
These cake pops are versatile and visually appealing, making them perfect for parties, holiday celebrations, or casual snacking.
Arrange them in a festive vase or Styrofoam block for a stunning dessert display.
Pair them with a cup of coffee, hot chocolate, or a refreshing mint tea for a complementary flavor experience.
They’re also ideal for gifting, as they’re individually portioned, easy to package, and transport well.
For extra flair, sprinkle finely crushed peppermint candies or edible glitter over the chocolate drizzle before it sets.
Storage Tips to Maintain Freshness
To keep cake pops fresh, store them in an airtight container at room temperature for up to 2 days.
For longer storage, refrigerate them for up to one week, but allow them to come to room temperature before serving to maintain optimal flavor and texture.
Cake pops can also be frozen for up to one month. Wrap each pop individually in plastic wrap and place them in a freezer-safe container.
Thaw in the refrigerator for a few hours, then bring to room temperature before serving.
Avoid storing in humid conditions to prevent chocolate from sweating.
Frequently Asked Questions
1. Can I use a different cake flavor?
Absolutely! You can swap chocolate for vanilla, red velvet, or even a spiced cake.
Adjust the buttercream and chocolate coating flavors to complement your choice for best results.
2. How do I prevent cake pops from falling off sticks?
Dip the tip of the stick into melted chocolate before inserting it into the cake ball.
This acts like glue and stabilizes the pop during dipping. Chilling the balls before dipping also helps maintain shape.
3. Can I make these ahead of time?
Yes! Cake pops can be prepared up to a week in advance.
Store in an airtight container in the refrigerator or freeze for longer storage, then bring to room temperature before serving.
4. What’s the best chocolate for coating?
High-quality melting chocolate or candy melts work best.
Dark chocolate gives a rich flavor, while white chocolate can be tinted for decoration.
Avoid low-quality chocolate, as it may seize or create a dull finish.
5. Can I make them nut-free or vegan?
For nut-free pops, ensure all chocolate and ingredients are labeled nut-free.
For a vegan version, substitute butter with plant-based margarine, use non-dairy milk in the buttercream, and select vegan-friendly chocolate. Texture may vary slightly but will still be delicious.
