All products are selected by our editorial team for quality. If you buy through our links, we may earn a small commission at no extra cost to you.
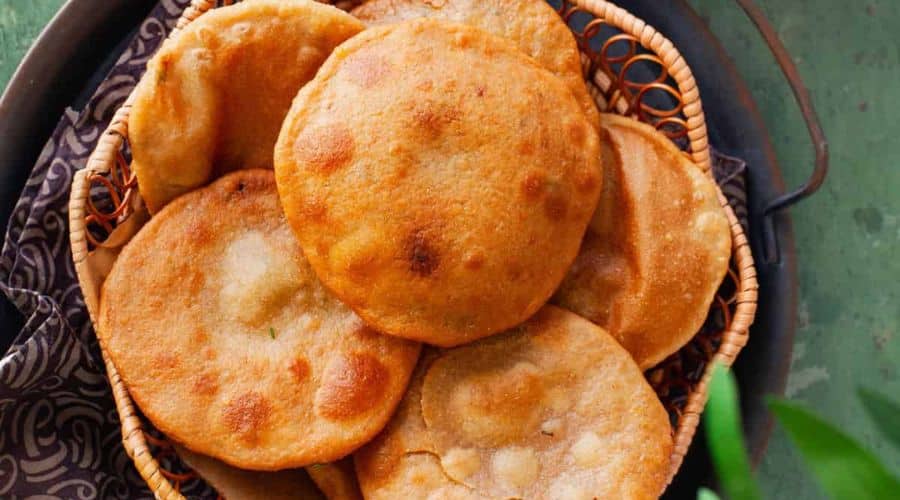
Kachori is a beloved snack that originates from India, with roots deep in the culinary traditions of North India.
It is a deep-fried pastry with a crisp, golden-brown exterior, often filled with a variety of savory fillings like spiced lentils, potatoes, onions, or peas.
While its exact origin remains debated, Kachori has become a staple in Indian street food culture and is enjoyed by many for its delightful texture and burst of flavor in every bite.
From spicy to tangy to sweet, the fillings can be customized to suit any palate, making it an ever-popular treat.
Whether served as a quick breakfast, a delicious evening snack, or as part of a festive meal, Kachori’s versatility and comforting nature make it a favorite across generations.
This recipe will guide you through making this crispy delight in your kitchen.

Ingredients Needed for Kachori
To make perfect Kachoris at home, you’ll need the following ingredients:
For the Dough:
- All-purpose flour (maida) – This is the base for the dough, providing a soft yet flaky texture.
- Ghee or oil – Ghee is preferred for that authentic rich taste, but oil can also be used.
- Water – To bind the dough together.
- Salt – For seasoning.
- Carom seeds (ajwain) – Optional, but they help in digestion and enhance the flavor of the dough.
For the Filling:
The filling can vary based on personal preference, but here are some common ingredients for different types of Kachoris:
- Moong dal (yellow lentils) – A popular choice for a light yet flavorful filling.
- Potatoes – Mashed and spiced, they make for a hearty and comforting filling.
- Onions – Sautéed with spices for a sweet and savory filling.
- Green chilies, ginger, and garlic – For a punch of heat and flavor.
- Cumin seeds, coriander powder, turmeric, garam masala, red chili powder – Essential spices to bring the filling to life.
- Tamarind pulp (optional) – For a slight tanginess, depending on the variation.
For Frying:
- Ghee or oil – Ghee gives a richer taste, but oil can also be used for frying the Kachoris to perfection.
Optional sides:
- Chutneys (mint, tamarind, or coriander chutney) – To complement the crispy Kachoris.
Step-by-Step Instructions
Step 1: Preparing the Dough
Begin by sifting all-purpose flour into a mixing bowl. Add a pinch of salt and optional carom seeds for extra flavor.
Now, mix in ghee or oil (about 2 tablespoons) and rub it into the flour, ensuring the mixture resembles breadcrumbs.
Gradually add water, a little at a time, to form a smooth and soft dough. Knead the dough for about 5-7 minutes to make it smooth and elastic.
Cover the dough with a damp cloth and let it rest for 30 minutes to an hour.
Resting helps the dough become more pliable, ensuring better crispiness when fried.
Step 2: Preparing the Filling
For a moong dal filling, soak the moong dal for 30 minutes and then cook it in water until soft but not mushy.
Drain the excess water, and in a pan, heat some oil or ghee.
Add cumin seeds, green chilies, ginger, and garlic. Sauté for a minute until aromatic, then add the spices (coriander powder, cumin powder, turmeric, red chili powder, and garam masala).
Stir in the cooked dal and cook it for a few minutes to let the flavors meld. Let the filling cool completely before using it to stuff the Kachoris.
For a potato filling, boil potatoes, peel, and mash them. In a pan, heat some oil, and sauté onions until golden.
Add green chilies, garlic, and ginger, followed by the spices. Combine the sautéed mixture with the mashed potatoes, and your filling is ready.
Step 3: Shaping the Kachoris
Divide the dough into equal-sized balls. Roll each ball into a smooth ball and flatten it into a small disc.
Place a spoonful of the filling in the center, being careful not to overstuff it. Gather the edges of the dough and pinch them together to seal the filling inside.
Gently flatten the stuffed dough ball with your fingers or palms to form a thick disc. Repeat with the remaining dough and filling.
Step 4: Frying the Kachoris
Heat enough ghee or oil in a deep frying pan to submerge the Kachoris.
Once the oil is hot (test by dropping a small piece of dough into the oil—it should sizzle and rise immediately), lower the heat to medium.
Gently slide the prepared Kachoris into the hot oil. Fry in batches, making sure not to overcrowd the pan.
Cook each Kachori until it is golden brown and crisp, flipping occasionally to ensure even frying.
Once done, remove the Kachoris with a slotted spoon and drain them on a paper towel to remove excess oil.
Tips for Perfect Kachoris
- Right dough consistency: The dough should be soft but not too sticky. It should hold its shape without tearing when you stuff it.
- Resting the dough: Always allow the dough to rest after kneading; it helps make the Kachoris flakier.
- Filling consistency: Ensure the filling is cool before stuffing it into the dough. A warm filling can cause the dough to become soggy.
- Frying temperature: The oil should be hot enough to fry the Kachoris but not smoking. If the oil is too hot, the Kachoris will burn before cooking through; too cold, and they will absorb too much oil.
- Seal properly: Ensure the edges are tightly sealed to prevent the filling from spilling out during frying. You can also gently pinch the sealed edges to reinforce them.
- For extra crispiness: Add a little semolina (rava) to the dough for an extra crunch.
Serving Suggestions
Kachoris are incredibly versatile and can be served in several delightful ways.
Here are a few serving suggestions to elevate your Kachori experience:
Pairing with Chutneys
The most popular way to serve Kachoris is with a variety of chutneys. Try pairing your crispy Kachoris with:
- Tamarind Chutney: The tangy sweetness of tamarind complements the savory Kachoris perfectly.
- Mint Chutney: This refreshing chutney adds a cooling balance to the spiced filling of the Kachoris.
- Coriander Chutney: Fresh and zesty, this chutney brings out the herbs in the filling.
With Yogurt or Raita
For a creamy contrast, serve Kachoris with a side of yogurt or raita.
The cool, smooth texture of yogurt balances the heat and crunch of the Kachoris, making each bite even more enjoyable.
As Part of a Meal
Kachoris can be a great snack or even a main dish when served with a hearty side:
- Vegetable curry or dal: Pair Kachoris with a flavorful vegetable curry or spiced dal for a filling, well-rounded meal.
- Salads: A refreshing salad can complement the richness of the fried Kachoris, adding a fresh, crunchy contrast.
Tea or Coffee Pairing
For a classic snack experience, serve your Kachoris with a hot cup of tea or coffee. The warmth of the beverage contrasts perfectly with the crispy, savory Kachoris.
Troubleshooting Common Issues
Making Kachoris at home can sometimes present a few challenges, but with the right tips, you can easily overcome them.
Here are some common issues and their solutions:
1. Dough Too Soft or Sticky
If your dough is too soft or sticky, it will be difficult to handle and shape.
- Solution: Add a little more flour and knead the dough until it reaches the right consistency. Make sure the dough isn’t too wet, and allow it to rest for at least 30 minutes to firm up.
2. Dough Too Hard or Dry
If your dough is too hard, your Kachoris may end up dense and not crispy.
- Solution: Gradually add a little more water, knead the dough until soft and smooth, and let it rest. Be sure the dough is moist but not sticky.
3. Kachoris Not Puffing Up While Frying
Kachoris should puff up as they fry, but if they don’t, it could be due to:
- The oil temperature being too low: Ensure the oil is hot but not smoking when frying.
- Dough not resting enough: Resting the dough allows the gluten to relax, which helps the Kachoris puff up when fried.
4. Filling Leaking Out
If the filling leaks out during frying, it’s usually because the dough wasn’t sealed properly.
- Solution: Be sure to pinch the edges of the dough tightly after adding the filling. You can also slightly flatten the stuffed dough ball with your palms to ensure the edges are well sealed.
5. Kachoris Too Oily
Overly oily Kachoris can occur if the oil temperature is too low or if the Kachoris are fried for too long.
- Solution: Maintain a medium heat while frying, and don’t overcrowd the pan. Once the Kachoris are done, drain them on a paper towel to absorb excess oil.
6. Kachoris Becoming Soggy After Cooling
If your Kachoris become soggy after cooling, it could be because the filling is too moist or the oil temperature wasn’t ideal.
- Solution: Make sure your filling is not too wet before stuffing. Also, store Kachoris in an airtight container after they cool completely to maintain their crispiness.
By following these troubleshooting tips, you can avoid common issues and ensure your Kachoris come out perfectly crisp and delicious every time!
Storage and Reheating Tips
To keep your Kachoris fresh and crispy even after they’ve been made, here are some helpful storage and reheating tips:
Storing Kachoris
- At Room Temperature: Once the Kachoris have cooled down completely, store them in an airtight container at room temperature. They will stay fresh for up to 2-3 days. Be sure to keep them in a dry place to avoid moisture buildup, which could make them soggy.
- Freezing Kachoris: For longer storage, you can freeze Kachoris before frying. Place the uncooked, stuffed Kachoris on a tray in a single layer and freeze them for 2-3 hours. Once frozen, transfer them to a ziplock bag or airtight container. They can be stored in the freezer for up to 1 month. To fry, take them directly from the freezer and fry as usual.
Reheating Kachoris
- Oven Method: To preserve their crispiness, preheat your oven to 350°F (175°C). Place the Kachoris on a baking sheet and heat for 5-10 minutes or until they are crispy again.
- Air Fryer: If you have an air fryer, it’s a great way to reheat Kachoris without making them greasy. Set the air fryer to 350°F (175°C) and heat the Kachoris for 3-5 minutes, checking for crispness.
- Pan Frying: If you don’t have access to an oven or air fryer, you can also reheat Kachoris by placing them on a pan over low heat, turning them occasionally until they crisp up again.
Avoid using a microwave to reheat Kachoris, as it will make them soft and chewy instead of crispy.
Conclusion
Making Kachoris at home is a rewarding experience that brings the taste of authentic Indian street food right to your kitchen.
Whether you enjoy them as a quick snack, a party appetizer, or a hearty breakfast, these crispy, flavorful treats are sure to impress your family and friends.
With the right dough, flavorful filling, and perfect frying technique, you’ll be able to create Kachoris that rival your favorite street food vendors.
Don’t hesitate to get creative with the fillings—whether you prefer classic moong dal, spicy potatoes, or tangy onions, there’s a Kachori variation for every taste.
So, roll up your sleeves, gather your ingredients, and treat yourself to this delicious Indian snack today!
Frequently Asked Questions (FAQ)
1. Can I make Kachoris ahead of time?
Yes, you can prepare the dough and filling in advance.
Store the dough and filling separately in the fridge for up to a day before assembling and frying them.
Alternatively, you can freeze unstuffed dough balls and filling, then assemble and fry when needed.
2. Why are my Kachoris not puffing up?
If your Kachoris aren’t puffing up while frying, it may be due to either the dough not resting long enough or the oil temperature being too low.
Make sure the dough rests for at least 30 minutes and fry in medium-hot oil for the best results.
3. Can I bake Kachoris instead of frying them?
While traditional Kachoris are deep-fried for that crispy texture, you can bake them for a healthier alternative.
Preheat your oven to 375°F (190°C) and bake the Kachoris for about 20-25 minutes, turning them halfway through.
However, keep in mind that they may not be as crispy as the fried version.
4. Can I use whole wheat flour instead of all-purpose flour?
Yes, you can substitute whole wheat flour for all-purpose flour to make a healthier version of Kachoris.
However, the texture will be slightly different, as whole wheat flour tends to be denser.
You may need to adjust the water amount to get the right dough consistency.
5. How can I avoid the Kachoris becoming oily?
To prevent oily Kachoris, make sure the oil temperature is high enough before frying (but not smoking).
Fry the Kachoris in batches, ensuring they have enough space to puff up. Also, drain the fried Kachoris on paper towels to remove excess oil.

Kachori
Equipment
- Mixing bowl (1, large)
- Rolling Pin (1)
- Frying Pan or Kadhai (1)
- Slotted Spoon (1)
- Paper Towels (for draining oil)
Ingredients
For the Dough:
- 1 ½ cups 180g All-purpose flour (maida)
- 2 tbsp 30g Ghee (or oil)
- ½ tsp Salt
- ½ tsp Carom seeds ajwain (optional)
- Water as needed, about ¼ cup
For the Filling:
- 1 cup 150g Moong dal (yellow lentils) (or substitute with mashed potatoes or onions)
- 2 tbsp 30g Oil (for sautéing)
- 1-2 Green chilies finely chopped
- 1 tbsp Ginger grated
- 1 tbsp Garlic minced
- 1 tsp Cumin seeds
- ½ tsp Coriander powder
- ½ tsp Cumin powder
- ½ tsp Turmeric powder
- 1 tsp Red chili powder
- 1 tsp Garam masala
- Salt to taste
For Frying:
- Oil or ghee for deep frying
Instructions
- Prepare the Dough: In a large mixing bowl, combine the flour, salt, and carom seeds (if using). Add ghee and rub it into the flour until it resembles breadcrumbs. Gradually add water and knead the dough until it is soft but not sticky. Cover and let it rest for 30 minutes.
- Prepare the Filling: If using moong dal, wash and soak it for 30 minutes, then cook it in water until soft. Drain any excess water and set aside. In a pan, heat oil, and sauté cumin seeds, green chilies, ginger, and garlic until fragrant. Add the spices and sauté for another minute. Stir in the cooked moong dal, mixing it well, and cook for a few minutes. Let the filling cool completely.
- Shape the Kachoris: Divide the dough into equal-sized balls. Roll each ball into a small disc and place a spoonful of the cooled filling in the center. Carefully seal the edges and gently flatten the stuffed dough ball to form a thick disc. Repeat with the remaining dough and filling.
- Fry the Kachoris: Heat oil or ghee in a deep frying pan or kadhai over medium heat. Once hot, carefully drop the Kachoris into the oil, ensuring they are not overcrowded. Fry until they turn golden brown and crispy, turning occasionally to ensure even frying. Remove from the oil and drain on paper towels.
- Serve: Let the Kachoris cool slightly before serving with your favorite chutney or yogurt.
Notes
- Resting the dough is crucial for achieving the flaky texture of the Kachoris.
- If you’re making a potato filling, boil the potatoes thoroughly and mash them well to avoid any lumps.
- Do not overcrowd the frying pan while cooking the Kachoris, as this can cause uneven cooking.
- You can freeze unbaked Kachoris for up to a month. Fry them directly from the freezer for a quick snack anytime.
