All products are selected by our editorial team for quality. If you buy through our links, we may earn a small commission at no extra cost to you.
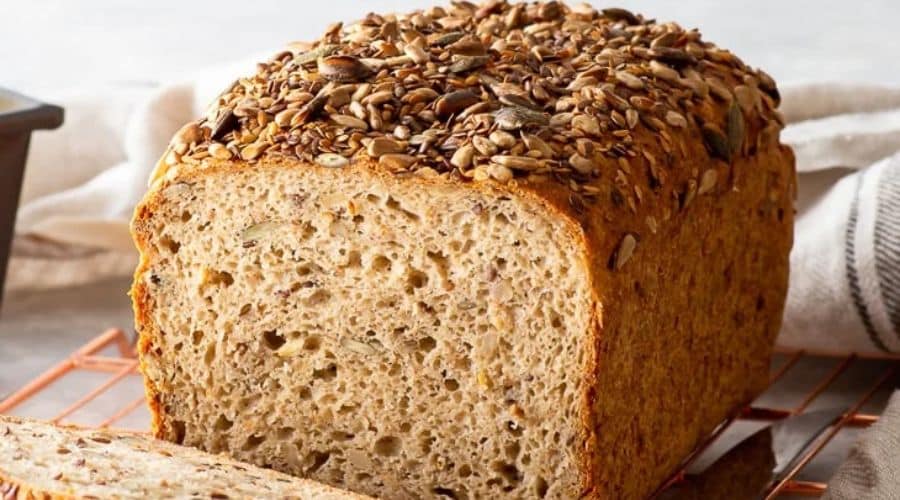
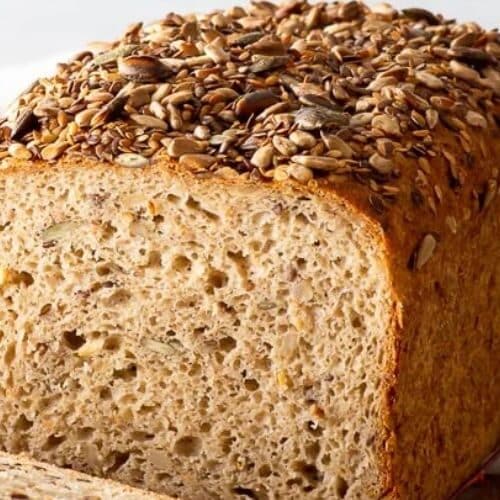
If you’re looking for a wholesome, nutritious alternative to regular bread, gluten-free seeded bread is the perfect solution.
Packed with a variety of seeds, this bread provides a wonderful crunch and extra flavor, while being entirely free from gluten.
Whether you are sensitive to gluten or simply want to try something new, this bread is a great option for breakfast, lunch, or a snack.
Plus, the combination of ingredients makes it a delicious and health-boosting choice.
This gluten-free seeded bread is easy to make and perfect for those who love to bake fresh bread at home.
It’s packed with nutrients from the seeds, providing fiber, healthy fats, and antioxidants.
And, with a slight nutty flavor from the seeds, it offers a unique twist on traditional bread. Keep reading to discover how to make this nourishing loaf that’s sure to become a family favorite!

Key Ingredients for Gluten-Free Seeded Bread
Gluten-Free Flour Blend
The foundation of any gluten-free bread is the flour.
To create a light and fluffy loaf, use a gluten-free flour blend that is specifically designed for bread.
Typically, these blends combine rice flour, potato starch, and tapioca flour, which work well to mimic the texture of traditional wheat bread.
You can also make your own blend, but using a store-bought one simplifies the process.
Variety of Seeds
The true star of this recipe is the mix of seeds that not only add flavor but also texture. Popular seeds include:
- Sunflower seeds: These add a subtle nutty flavor and are high in vitamin E.
- Chia seeds: These tiny seeds help to bind the bread together and provide a healthy dose of omega-3 fatty acids.
- Flaxseeds: Rich in fiber and antioxidants, flaxseeds add a gentle crunch.
- Sesame seeds: These bring an earthy, nutty taste and are great for a crunchy topping.
Yeast
For this recipe, active dry yeast is essential to ensure that your dough rises.
Gluten-free yeast dough needs time to rise and activate, which is why it’s important to use the right type of yeast and allow for proper proofing.
Water and Oil
Water is used to activate the yeast and bind the ingredients together, while oil provides moisture and helps the bread stay tender.
Olive oil is commonly used for its light flavor, but you can experiment with other oils like avocado or coconut oil depending on your preference.
Sweetener
A touch of honey or maple syrup is used to give the dough a subtle sweetness while helping activate the yeast.
These liquid sweeteners contribute to the rich flavor of the bread.
Salt
Salt is essential to balance the flavors and enhance the overall taste of the bread.
Optional Ingredients
Feel free to get creative with your gluten-free seeded bread!
You can add herbs like rosemary or thyme, or even extra seeds or dried fruits like cranberries or raisins for added flavor and texture.
Equipment You’ll Need
To make the process easier and more efficient, make sure you have the right equipment on hand.
Mixing Bowls
A large mixing bowl will help combine the dry ingredients, while a separate smaller bowl can be used for the wet ingredients.
Hand Mixer or Stand Mixer
While mixing by hand is possible, a stand mixer or hand mixer can help to achieve a smooth, well-mixed dough.
The dough will be slightly thicker than regular bread dough, so using a mixer will save you time and effort.
Bread Loaf Pan or Baking Tray
For a traditional loaf shape, use a standard loaf pan.
Alternatively, you can shape the dough into a round or free-form loaf and bake it on a baking tray.
Make sure to line the pan or tray with parchment paper for easy removal.
Parchment Paper
Parchment paper is a great way to avoid the bread sticking to the pan and also helps with even baking.
Measuring Cups and Spoons
Accurate measurements are key to gluten-free baking.
Make sure to have both liquid and dry measuring cups, as well as spoons for the precise measurement of yeast, salt, and sweeteners.
Step-by-Step Instructions for Making Gluten-Free Seeded Bread
Step 1: Preparing the Dry Ingredients
Start by gathering your dry ingredients: the gluten-free flour blend, salt, and seeds.
In a large mixing bowl, whisk them together thoroughly to ensure even distribution.
This will help prevent any clumping and ensure that the seeds are evenly spread throughout the dough.
Step 2: Activating the Yeast and Combining Wet Ingredients
In a separate bowl, combine the warm water and honey (or maple syrup) and stir until the sweetener dissolves.
Sprinkle the yeast into the water mixture and let it sit for about 5 minutes, or until it becomes frothy.
This step is crucial to ensure the yeast is activated and will properly rise the dough. Add in the oil and mix to combine.
Step 3: Mixing the Dough
Once the yeast mixture is ready, slowly pour it into the dry ingredients.
Use a hand mixer or stand mixer on low speed to begin combining the ingredients. Gradually increase the speed and mix until the dough comes together and is smooth.
The dough will be a bit thicker than traditional bread dough, but it should be sticky and moist.
If necessary, add a little extra water, a tablespoon at a time, until you achieve the right consistency.
Step 4: Kneading and Shaping the Dough
Transfer the dough onto a floured surface (use gluten-free flour to prevent sticking) and knead it for about 5 minutes.
Once the dough is smooth, shape it into a loaf or divide it into smaller portions for individual rolls.
Gently place the dough into your prepared loaf pan or shape it into a free-form loaf on a baking tray.
Step 5: Proofing the Dough
Cover the dough with a clean kitchen towel and let it rise in a warm area for 1-2 hours, or until it has roughly doubled in size.
Gluten-free dough tends to take a bit longer to rise, so be patient.
If you’re short on time, you can preheat the oven to 200°F (90°C) for a few minutes, then turn it off and place the dough inside to rise.
Step 6: Preheating the Oven
While the dough is rising, preheat your oven to 375°F (190°C).
This ensures that the oven is hot enough for baking when the dough is ready.
Step 7: Baking the Bread
Once the dough has risen, place the loaf into the preheated oven. Bake for 30-35 minutes, or until the top is golden brown and the bread sounds hollow when tapped on the bottom.
If you have a kitchen thermometer, the internal temperature should reach around 200°F (93°C).
Step 8: Cooling the Bread Before Slicing
Allow the bread to cool completely before slicing.
Gluten-free bread can be a little crumbly when freshly baked, so it’s essential to let it cool for at least 30 minutes.
This helps it set properly and enhances its texture.
Tips and Tricks for Perfect Gluten-Free Seeded Bread
Achieving the Right Dough Consistency
Gluten-free dough is often thicker and stickier than traditional bread dough, so it can be tricky to get it just right.
To ensure your dough has the right consistency, avoid adding too much flour.
If the dough is too wet, add a small amount of extra gluten-free flour, but remember, it should remain slightly sticky.
This moisture helps give the bread a soft texture once baked.
Let the Dough Rise Properly
Gluten-free bread typically requires a longer rise time compared to wheat-based bread, as it lacks the gluten structure that helps it rise quickly.
Be patient and allow the dough to double in size in a warm, draft-free environment.
A great trick is to place the dough in an oven that has been preheated to a low temperature (around 200°F or 90°C) for just a few minutes and then turned off, providing a warm and controlled space for the dough to rise.
Don’t Overwork the Dough
Unlike traditional dough, gluten-free dough doesn’t benefit from excessive kneading.
Kneading it too much can make the texture dense. Simply mix the dough until it’s well combined and let the yeast do its job.
Know When the Bread is Fully Baked
Gluten-free bread needs a little more attention than conventional bread.
The bread is ready when the top is golden brown and sounds hollow when tapped on the bottom.
If you’re unsure, use a kitchen thermometer to check the internal temperature.
It should reach 200°F (93°C) to be fully baked.
Let the Bread Cool Before Slicing
Gluten-free bread continues to set as it cools. Slicing it too soon can result in a crumbly texture.
Let your bread cool completely on a wire rack before cutting into it for the best results.
Experiment with Seed Combinations
Feel free to get creative with the seeds you use.
You can swap out sunflower seeds for pumpkin seeds or even add in a mix of nuts.
The key is to have a balance of both small and larger seeds for texture and flavor.
Health Benefits of Gluten-Free Seeded Bread
High in Fiber
The mix of seeds in this bread, especially chia, flax, and sunflower, provides a substantial amount of dietary fiber.
Fiber is essential for healthy digestion, helping to keep things moving smoothly in the digestive system.
It also helps to regulate blood sugar levels, making it a great option for people with diabetes or those looking to maintain stable energy throughout the day.
Rich in Healthy Fats
Seeds are a fantastic source of healthy fats, particularly omega-3 fatty acids, which are essential for heart health.
Chia seeds, flaxseeds, and sunflower seeds are all packed with these fats, which can help reduce inflammation, improve brain function, and support overall cardiovascular health.
Packed with Antioxidants
Many of the seeds used in this recipe are rich in antioxidants, including vitamin E, which helps combat free radicals in the body.
Free radicals contribute to aging and disease, and antioxidants play a critical role in protecting cells from damage.
Sunflower seeds and flaxseeds, in particular, are great sources of these protective compounds.
Supports Healthy Skin, Hair, and Nails
The healthy fats and vitamins in the seeds also contribute to glowing skin, strong hair, and nails.
Vitamin E, found in abundance in sunflower seeds, is known to support skin health, reducing the appearance of wrinkles and protecting against UV damage.
Gluten-Free and Gut-Friendly
This bread is naturally gluten-free, making it a great option for individuals with gluten sensitivity, celiac disease, or anyone who prefers to avoid gluten for health reasons.
Because it’s made without any gluten-containing grains, it’s easy on the gut, promoting a healthy, balanced digestive system.
Keeps You Full Longer
Thanks to its high fiber and protein content, gluten-free seeded bread helps to keep you feeling fuller for longer.
This makes it an excellent choice for those looking to control their appetite, manage weight, or reduce snacking between meals.
A Low Glycemic Option
Compared to conventional white bread, gluten-free seeded bread has a lower glycemic index (GI).
Foods with a lower GI release sugar more slowly into the bloodstream, helping to stabilize blood sugar levels and prevent energy crashes throughout the day.
This makes it a suitable choice for people looking to manage their blood sugar levels.
Conclusion
Incorporating gluten-free seeded bread into your diet not only provides a delicious and nutritious alternative to traditional bread, but it also offers a wide range of health benefits.
With the crunchy texture of the seeds and the rich flavor from a blend of wholesome ingredients, this bread makes a perfect addition to your meals.
Whether you’re preparing a sandwich, enjoying it with a spread, or simply savoring a slice with your morning coffee, gluten-free seeded bread is versatile and satisfying.
This recipe is simple enough to make at home, and with a little patience during the rising and baking process, you’ll be able to create a loaf that’s both healthy and delicious.
It’s a great choice for those with gluten sensitivities, and the combination of fiber, healthy fats, and antioxidants makes it a nutrient-packed addition to any diet.
Enjoy the process, experiment with variations, and most importantly, enjoy the fruits of your labor with a fresh, homemade loaf!
Frequently Asked Questions (FAQ)
1. Can I use a different flour blend for this recipe?
Yes, you can experiment with other gluten-free flour blends, but keep in mind that each flour has different properties.
It’s best to use a bread-specific blend for the best texture.
If you use a different blend, you may need to adjust the liquid quantities to get the right dough consistency.
2. Can I make this recipe dairy-free or egg-free?
Yes!
This recipe is naturally dairy-free and egg-free. If you’d like to replace the honey, you can use maple syrup or agave syrup for a fully vegan version.
3. How long will this bread last?
Homemade gluten-free seeded bread typically lasts about 3-4 days when stored in an airtight container at room temperature.
If you want it to last longer, you can store it in the refrigerator for up to a week or freeze it for up to 3 months.
4. Can I freeze gluten-free seeded bread?
Absolutely!
Slice the bread before freezing, then wrap each slice tightly in plastic wrap or foil and store it in a freezer-safe bag.
This allows you to pull out individual slices as needed.
5. Why is my bread not rising?
If your bread isn’t rising, it could be due to inactive yeast.
Make sure your yeast is fresh and properly activated by allowing it to foam in warm water with sugar. Also, ensure that the dough is kept in a warm, draft-free place to rise properly.
If the environment is too cold, the yeast will not activate as needed.
Gluten-Free Seeded Bread
Equipment
- 1 large mixing bowl
- 1 Small Mixing Bowl
- 1 Hand Mixer or Stand Mixer
- 1 Loaf Pan (9×5-inch)
- 1 parchment paper sheet
- 1 kitchen towel (for proofing)
- 1 measuring cup
- 1 Set of Measuring Spoons
- 1 Wire rack (for cooling)
Ingredients
- 2 cups 240g gluten-free flour blend
- 1/4 cup 30g sunflower seeds
- 2 tbsp chia seeds
- 2 tbsp flaxseeds
- 2 tbsp sesame seeds
- 2 tsp active dry yeast
- 1 cup 240ml warm water
- 1 tbsp honey or maple syrup for vegan option
- 2 tbsp olive oil
- 1 tsp salt
Instructions
Prepare the Dry Ingredients:
- In a large mixing bowl, combine the gluten-free flour blend, sunflower seeds, chia seeds, flaxseeds, sesame seeds, and salt. Mix well to evenly distribute the seeds and dry ingredients.
Activate the Yeast:
- In a small mixing bowl, combine the warm water and honey (or maple syrup). Sprinkle the yeast over the water and let it sit for 5 minutes, or until it becomes frothy.
Mix the Dough:
- Once the yeast is activated, pour the wet mixture into the dry ingredients. Add the olive oil and stir with a hand mixer or stand mixer on low speed. Gradually increase speed and mix until the dough comes together.The dough should be sticky but not overly wet. If it’s too sticky, add a little more gluten-free flour until you reach the right consistency.
Shape the Dough:
- Transfer the dough to a lightly floured surface. Knead gently for about 1 minute until the dough is smooth. Shape it into a loaf and place it in a greased loaf pan lined with parchment paper.
Proof the Dough:
- Cover the dough with a kitchen towel and place it in a warm area. Allow it to rise for 1-2 hours, or until it has doubled in size.
Preheat the Oven:
- Preheat your oven to 375°F (190°C) while the dough is proofing.
Bake the Bread:
- Once the dough has risen, bake it in the preheated oven for 30-35 minutes, or until the top is golden brown and the bread sounds hollow when tapped on the bottom. You can also use a kitchen thermometer to check the internal temperature, which should read 200°F (93°C).
Cool the Bread:
- Remove the bread from the oven and allow it to cool on a wire rack for at least 30 minutes before slicing.
Notes
- Storage: Store the bread in an airtight container at room temperature for up to 3-4 days. For longer storage, freeze individual slices wrapped in plastic wrap for up to 3 months.
- Seed Variations: Feel free to use different seeds based on your preference. Pumpkin seeds, hemp seeds, or even a blend of your favorite nuts can be substituted.
- No Loaf Pan? If you don’t have a loaf pan, you can form the dough into a round loaf and bake it on a parchment-lined baking tray.
- Gluten-Free Flour Blends: Not all gluten-free flour blends behave the same, so you may need to adjust the amount of liquid based on the blend you’re using.
