All products are selected by our editorial team for quality. If you buy through our links, we may earn a small commission at no extra cost to you.
Gluten-free baking has become increasingly popular over the years, and for good reason.
Many people are discovering the benefits of eliminating gluten from their diets, whether due to celiac disease, gluten sensitivity, or simply choosing a healthier lifestyle.
However, one common challenge for those following a gluten-free diet is finding a satisfying bread that mimics the texture, flavor, and softness of traditional wheat-based loaves.
This Gluten-Free Rosemary Olive Oil Bread not only solves that problem but also brings a delightful flavor profile with the earthy goodness of rosemary and the rich, smooth taste of olive oil.
This bread is the perfect addition to any meal, from a simple slice on its own to a flavorful accompaniment to soups, salads, or dips.
With its tender crumb and herby aroma, it’s sure to become a staple in your gluten-free baking repertoire.

Why Choose Gluten-Free Rosemary Olive Oil Bread?
Health Benefits of Going Gluten-Free
For those with gluten sensitivities or celiac disease, a gluten-free diet is essential.
While wheat-based breads are a no-go, gluten-free options like this rosemary olive oil bread allow individuals to enjoy a hearty, flavorful loaf without worry.
Moreover, gluten-free flours can often offer additional nutrients and fibers that might be lacking in traditional breads, making this recipe not just a delicious alternative, but also a healthier choice.
Olive Oil’s Richness
Olive oil is the cornerstone of Mediterranean cooking, known for its heart-healthy fats and distinctive flavor.
When incorporated into bread, it adds a subtle richness and moisture that results in a softer crumb and a slightly crisp crust.
This combination of health benefits and flavor elevates gluten-free bread from basic to something truly special.
The Fragrant Rosemary
Rosemary, with its fragrant, pine-like aroma and slightly peppery taste, pairs beautifully with olive oil.
The herb infuses the bread with a delightful scent that fills the kitchen as it bakes, making it irresistible from the first moment you smell it.
Not only does rosemary enhance the flavor of the bread, but it also offers various health benefits, such as boosting digestion and providing antioxidants.
In short, Gluten-Free Rosemary Olive Oil Bread is the perfect marriage of flavor and health.
It’s a satisfying, nutritious alternative to traditional bread, offering the rich depth of rosemary and the luxurious texture provided by olive oil.
Whether you follow a gluten-free diet by necessity or by choice, this recipe is bound to win you over.
Ingredients You’ll Need
To make this delightful Gluten-Free Rosemary Olive Oil Bread, you’ll need a few simple, high-quality ingredients. Here’s what you’ll need to gather:
- 2 ½ cups gluten-free flour blend (ensure it’s a blend designed for baking)
- 1 tablespoon fresh rosemary, finely chopped
- ¼ cup olive oil, preferably extra virgin for the best flavor
- 2 teaspoons active dry yeast
- 1 tablespoon honey (or sugar) to activate the yeast
- 1 ¼ cups warm water (about 110°F/43°C)
- 1 teaspoon salt
- 1 teaspoon apple cider vinegar (optional, for better texture)
- ½ teaspoon garlic powder (optional, for extra flavor)
- ¼ cup chopped olives (optional, for a Mediterranean twist)
These ingredients come together to create a tender, flavorful bread with an aromatic rosemary touch and the richness of olive oil.
Step-by-Step Instructions
1. Preparing the Yeast Mixture
To begin, you’ll need to activate your yeast. In a small bowl, combine the warm water, honey (or sugar), and active dry yeast.
Stir gently and allow the mixture to sit for about 5-10 minutes, or until it becomes foamy.
If your mixture doesn’t foam, it may mean your yeast is inactive, and you should try again with fresh yeast.
2. Mixing the Dough
In a large mixing bowl, combine the gluten-free flour blend, chopped rosemary, salt, and garlic powder (if using).
Make a well in the center and pour in the activated yeast mixture and olive oil. Mix everything together until the dough starts to come together.
Unlike traditional bread dough, gluten-free dough will be slightly wetter and stickier.
If needed, add a bit more flour or water to achieve a thick, but not dry, consistency.
3. Kneading and Resting the Dough
Gluten-free dough doesn’t require the same kind of kneading as wheat dough, but it still benefits from a few minutes of light kneading to ensure all ingredients are fully combined.
You can use your hands or a spoon to gently work the dough in the bowl.
Once the dough is well mixed, cover the bowl with a clean kitchen towel and let it rest in a warm place for 1-1.5 hours, or until it has slightly risen.
4. Shaping the Dough
Once your dough has risen, it’s time to shape it. Lightly grease a loaf pan or line a baking sheet with parchment paper.
Transfer the dough into the pan or onto the baking sheet, gently shaping it into your desired loaf shape.
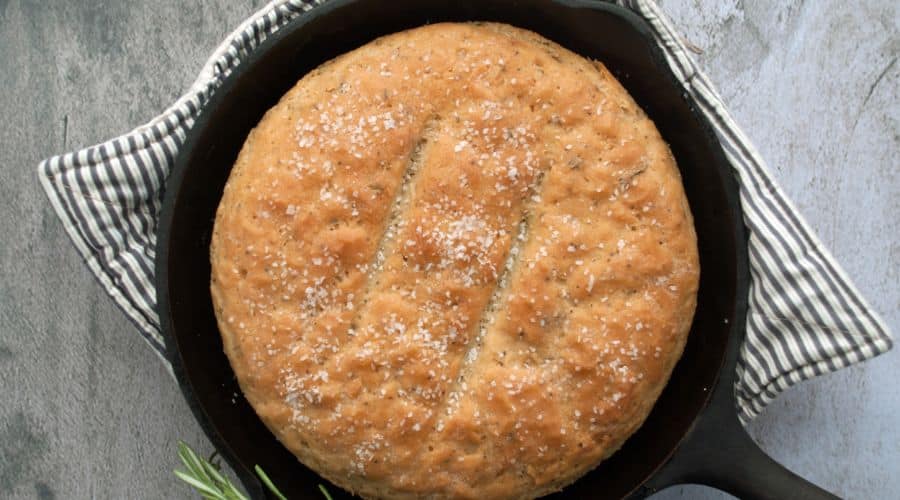
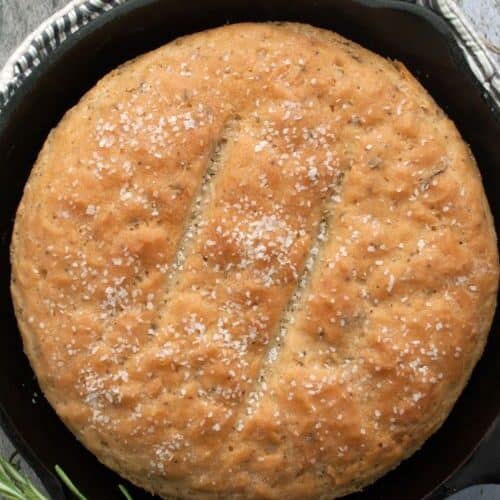
If you want to create a rustic round loaf, shape it by hand. You can also score the top with a sharp knife to create a decorative pattern, though this step is optional.
5. Baking the Bread
Preheat your oven to 375°F (190°C). Place the bread in the preheated oven and bake for 30-40 minutes, or until the bread is golden on top and sounds hollow when tapped.
For a crispier crust, you can place a small dish of water at the bottom of the oven while baking to create steam.
Remove the bread from the oven and allow it to cool on a wire rack before slicing.
6. Cooling and Serving
Allow your bread to cool completely before slicing, as this helps to set the texture.
It’s tempting to cut into it immediately, but waiting will yield a better result. Serve with your favorite dips, spreads, or enjoy it on its own for a flavorful treat.
Tips for Perfect Gluten-Free Rosemary Olive Oil Bread
Use a Quality Gluten-Free Flour Blend
The key to a light, fluffy texture in gluten-free bread lies in the flour blend.
Make sure you’re using a blend designed for baking, as it will likely contain xanthan gum or guar gum to help bind the ingredients and provide structure.
If you’re unsure which one to use, look for one that contains a mix of rice flour, potato starch, and tapioca flour.
Don’t Skip the Olive Oil
Olive oil is essential for both flavor and texture. It helps keep the bread moist and adds a richness that complements the rosemary beautifully.
For the best results, choose a high-quality extra virgin olive oil, as its fruity and peppery notes will shine through in the final loaf.
Allow the Dough to Rest and Rise
Gluten-free dough requires adequate resting time to rise properly.
Don’t rush the rising process, as this gives the yeast enough time to activate and develop the flavors.
If your dough doesn’t rise much, don’t worry—gluten-free dough typically rises less than wheat dough but will still yield a soft, flavorful result.
Optional Add-ins for Extra Flavor
To make your bread even more special, consider adding extra ingredients like chopped olives, garlic, or even a drizzle of balsamic vinegar.
These additions will enhance the Mediterranean flair and give your bread even more depth of flavor.
Proper Storage
To keep your bread fresh, store it in an airtight container at room temperature for up to 3 days.
For longer storage, slice the bread and freeze individual pieces for easy access later.
When ready to enjoy, simply toast or warm it up to bring back its fresh-baked taste.
By following these tips, you’ll be able to make the perfect Gluten-Free Rosemary Olive Oil Bread that is soft, flavorful, and a true crowd-pleaser every time.
How to Enjoy This Bread
This Gluten-Free Rosemary Olive Oil Bread is incredibly versatile and can be enjoyed in many ways. Here are a few suggestions to help you make the most of this delicious loaf:
- As a Simple Snack: A warm slice with a drizzle of olive oil or a sprinkle of sea salt makes for a satisfying snack on its own. The rosemary and olive oil flavors make it special enough to enjoy without any additional toppings.
- With Soups and Salads: This bread pairs beautifully with hearty soups, such as tomato basil, lentil, or vegetable soup. Its herby aroma and soft texture complement the richness of these dishes perfectly. Try serving it with a fresh salad for a light, flavorful meal.
- For Sandwiches: Slice the bread thickly and use it as the base for your favorite sandwich fillings. The soft interior and slightly crispy crust make it ideal for creating satisfying sandwiches, whether you prefer grilled vegetables, turkey, or cheese.
- Dips and Spreads: Toasted slices of this bread are wonderful for dipping into hummus, tapenade, or olive oil with balsamic vinegar. Its robust flavor and texture stand up well to bold, savory dips.
- With Cheese: This rosemary olive oil bread also pairs wonderfully with a variety of cheeses. The slight earthiness of the rosemary complements sharp cheeses like goat cheese, feta, or a tangy aged cheddar.
Conclusion
In conclusion, Gluten-Free Rosemary Olive Oil Bread is a flavorful, easy-to-make option for anyone looking to enjoy gluten-free baked goods without sacrificing taste.
The combination of fresh rosemary and rich olive oil makes it a unique and aromatic alternative to traditional bread.
Whether you’re eating it on its own, pairing it with meals, or creating delicious sandwiches, this bread is sure to become a favorite in your gluten-free baking repertoire.
Give it a try and savor the tender, herby goodness!
Frequently Asked Questions
1. Can I use a different flour blend?
Yes, you can use a different gluten-free flour blend. Just ensure that the blend you use is suitable for baking and includes binding agents like xanthan gum or guar gum to provide structure to the bread.
2. Can I make this bread vegan?
Yes, to make this bread vegan, simply replace the honey with a vegan sweetener like maple syrup or agave.
The olive oil is already plant-based, so the only change needed is in the sweetener.
3. How can I store the bread?
Store your bread in an airtight container at room temperature for up to 3 days.
To keep it fresh longer, slice it and freeze individual pieces. Toast or warm the slices when ready to enjoy.
4. What can I add to the dough for more flavor?
For extra flavor, try adding chopped garlic, sun-dried tomatoes, olives, or a dash of balsamic vinegar to the dough.
These ingredients will complement the rosemary and olive oil, creating a more complex flavor profile.
5. My bread turned out too dense. What went wrong?
If your bread turned out too dense, it could be due to not enough rising time or using a flour blend that doesn’t contain adequate binding agents.
Ensure that your yeast is active and that the dough has plenty of time to rise.
You can also experiment with adding a bit more liquid to the dough for a lighter texture.
Gluten-Free Rosemary Olive Oil Bread
Equipment
- 1 large mixing bowl
- 1 Small Bowl (for yeast mixture)
- 1 loaf pan or baking sheet
- 1 kitchen towel (for covering dough)
- Measuring Cups and Spoons
- 1 Spatula or spoon for mixing
- Wire Rack (for cooling)
- 1 oven
- 1 knife (for scoring, optional)
Ingredients
- 2 ½ cups Gluten-Free Flour Blend
- 1 tablespoon Fresh Rosemary finely chopped
- ¼ cup Olive Oil
- 2 teaspoons Active Dry Yeast
- 1 tablespoon Honey or Sugar to activate yeast
- 1 ¼ cups Warm Water 110°F/43°C
- 1 teaspoon Salt
- 1 teaspoon Apple Cider Vinegar optional
- ½ teaspoon Garlic Powder optional
- ¼ cup Chopped Olives optional
Instructions
Activate the Yeast
- In a small bowl, combine the warm water, honey (or sugar), and active dry yeast. Stir gently and let it sit for 5-10 minutes until it becomes foamy.
Mix the Dough
- In a large bowl, combine the gluten-free flour blend, rosemary, salt, and garlic powder (if using). Create a well in the center and pour in the activated yeast mixture and olive oil. Stir until the dough begins to come together. Add more flour or water if needed to achieve a thick, sticky dough.
Knead and Rest
- Knead the dough lightly for a few minutes to ensure the ingredients are fully combined. Cover the bowl with a kitchen towel and allow the dough to rest in a warm area for 1-1.5 hours, or until it has risen slightly.
Shape the Dough
- Transfer the dough into a greased loaf pan or onto a parchment-lined baking sheet. Shape it into your desired loaf form.Optionally, score the top of the dough with a knife to create a decorative pattern.
Bake the Bread
- Preheat the oven to 375°F (190°C). Bake the bread for 30-40 minutes, or until it’s golden on top and sounds hollow when tapped. Remove the bread from the oven and let it cool on a wire rack before slicing.
Cool and Serve
- Allow the bread to cool completely before slicing. Serve warm with dips, spreads, or enjoy as a snack.
Notes
- Flour Blend: Be sure to use a high-quality gluten-free flour blend designed for baking, as it typically contains binding agents such as xanthan gum or guar gum that will help create the right texture.
- Storage: Store any leftover bread in an airtight container at room temperature for up to 3 days. For longer storage, slice and freeze individual pieces for later use.
- Flavor Additions: Feel free to add extra ingredients like olives, garlic, or even a touch of balsamic vinegar to enhance the flavor and make the bread your own.
- Yeast Activation: If your yeast doesn’t foam, it may be expired or the water temperature may have been too hot or too cold. Use a thermometer to ensure the water is around 110°F (43°C).
