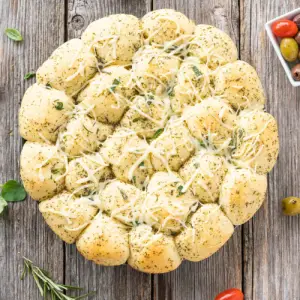
This Garlic Pull Apart Bread is a savory, irresistible treat that combines soft, fluffy bread with rich herb butter and melted cheese.
Packed with wholesome ingredients like olive oil and fresh herbs, it provides healthy fats and fiber while keeping saturated fats low.
Quick to prepare and perfect for meal prep or entertaining, this bread is ideal as a side for barbecues, soups, or a cozy weeknight snack.
Easy Garlic Herb Pull Apart Bread
Equipment
- 1 large mixing bowl
- 1 pizza tray, baking dish, or springform pan (approx. 11 in / 28 cm)
- 1 dough scraper or sharp knife
- 1 Pastry brush
Ingredients
For the Yeast Dough:
- 450 g 3 ⅔ cups all-purpose flour
- 7 g 1 sachet dry yeast
- ½ tsp sugar
- 90 ml 6 tbsp lukewarm water
- 160 ml ¾ cup lukewarm milk
- 1 ½ tsp salt
- 30 g 0.1 cup olive oil
- 1 tsp fresh herbs chopped
For Spreading:
- 140 g ⅔ cup herb butter
- 1 tsp fresh herbs chopped
- 70 g ⅔ cup grated cheese (optional)
Instructions
- Preparing the Yeast Mixture: Start by activating your yeast to ensure a light and fluffy bread. In a small bowl, combine the lukewarm water, lukewarm milk, and sugar. Stir gently until the sugar dissolves completely. Sprinkle the dry yeast over the liquid mixture and let it sit for about 5–10 minutes. You will notice the mixture start to foam and bubble—this indicates the yeast is active and ready for baking.
- Making the Dough: In a large mixing bowl, combine the all-purpose flour and salt. Add the olive oil and fresh chopped herbs, then pour in the activated yeast mixture. Using a spatula or your hands, mix the ingredients until they come together into a rough dough. Transfer to a floured surface and knead for 5–10 minutes until the dough is smooth, elastic, and slightly tacky to the touch.
- First Rise (Proofing the Dough): Lightly oil the same mixing bowl and place the kneaded dough inside. Cover it with a clean kitchen towel or plastic wrap and let it rise in a warm, draft-free place for about 45 minutes, or until it has doubled in size. This step develops the dough’s flavor and ensures a soft, airy texture.
- Preparing the Pan: While the dough is rising, prepare your baking pan. Choose a round pizza tray, springform pan, or an 11-inch (28 cm) baking dish. Spread about 40 grams (approximately 3 tablespoons) of herb butter evenly over the bottom of the pan to prevent sticking and infuse extra flavor into the bread.
- Shaping the Dough: Once the dough has doubled in size, lightly flour a clean work surface. Transfer the dough and knead it gently for a few seconds to remove excess air. Divide the dough into halves, then quarters, and continue cutting until you have about 26–30 small, even portions. This ensures that each piece will bake evenly and pull apart beautifully.
- Forming the Dough Balls: Take each small portion of dough and roll it into a smooth, round ball using the palms of your hands. Make sure the balls are uniform in size so they cook consistently. Place them side by side in the prepared baking pan, arranging them snugly so they touch but still have room to expand.
- Second Rise (Final Proofing): Cover the pan with a clean kitchen towel and let the dough balls rise again for at least 20 minutes. This final proofing allows the dough to become extra soft and airy, creating the signature pull-apart texture. During this time, preheat your oven to 360°F (180°C).
- Preparing the Herb Butter: While the dough is rising, gently warm the remaining 100 grams (about ⅓ cup) of herb butter in a small saucepan or microwave until soft and spreadable. Stir in the remaining teaspoon of fresh chopped herbs to enhance the flavor. This butter will be brushed on top of the dough before baking, giving the bread a rich, aromatic finish.
- Brushing the Dough with Butter: Once the second rise is complete, carefully brush the tops of each dough ball with the warm herb butter. Be thorough but gentle to avoid deflating the dough. Ensure that the butter seeps slightly into the gaps between the balls, adding flavor and preventing dryness during baking.
- Baking the Bread: Place the pan in the preheated oven and bake for 20 minutes. The dough will start to puff up and turn golden brown. After 20 minutes, remove the bread briefly and sprinkle the top evenly with fresh herbs and optional grated cheese. Return the pan to the oven and bake for an additional 5–10 minutes, until the cheese is melted and slightly golden, and the bread is fully cooked inside.
- Cooling and Serving: Once baked, remove the bread from the oven and let it cool in the pan for 5–10 minutes. This allows the flavors to settle and makes it easier to handle. Serve warm directly from the pan, letting everyone pull apart their own pieces. Pair it with soups, salads, or grilled dishes for a delicious, aromatic, and comforting treat.
Notes
- Use lukewarm water and milk to activate the yeast properly; too hot or too cold can prevent the dough from rising.
- Fresh herbs like parsley, rosemary, or thyme enhance flavor, but dried herbs can work in a pinch.
- For a cheesy variation, use a blend of mozzarella and cheddar for a melty, flavorful topping.
- Make sure your dough balls are evenly sized so they bake uniformly.
- This bread can be made ahead and frozen after the second rise for convenient meal prep.
Chef’s Secrets For Perfect Bread
The secret to achieving soft, fluffy pull apart bread lies in proper kneading and proofing.
Knead the dough until it is smooth and elastic, which develops the gluten for a tender texture.
Allowing it to rise twice ensures a light, airy crumb. When brushing with herb butter, use a soft, warm mixture and apply it gently so the dough doesn’t deflate.
Using a mix of fresh herbs not only boosts flavor but also adds a visually appealing touch.
For extra richness, you can fold a little cheese into each dough ball before the final proofing.
Serving Suggestions To Impress Guests
Garlic Pull Apart Bread is versatile and pairs well with a variety of dishes. Serve it warm alongside creamy soups, fresh salads, or grilled meats for a comforting meal.
For brunch, slice and top with avocado, smoked salmon, or a poached egg.
It’s also a great appetizer—present the bread in a basket and let everyone pull apart their own portion, creating a fun, interactive experience.
Adding a small drizzle of extra virgin olive oil or a sprinkle of chili flakes can elevate the flavor further.
Storage Tips To Keep Bread Fresh
Store the bread in an airtight container at room temperature for up to 2 days, keeping it soft and flavorful.
For longer storage, wrap tightly in plastic wrap or foil and freeze for up to 1 month.
To enjoy, thaw at room temperature and warm briefly in the oven at 180°C (350°F) for 5–10 minutes.
Avoid refrigerating as this can dry the bread. Reheat gently rather than microwaving, which may make the texture chewy instead of soft.
Frequently Asked Questions
1. Can I make this bread dairy-free?
Yes! Replace the milk with unsweetened plant-based milk, such as almond or oat milk, and use a vegan butter for spreading.
The texture will remain soft, and the flavor will still be delicious.
2. Can I prepare the dough the night before?
Absolutely! After the first rise, cover the dough and refrigerate overnight.
Bring it to room temperature before shaping, then continue with the second rise and baking.
This method enhances flavor and allows for easy prep.
3. Can I use different types of flour?
All-purpose flour works best, but you can experiment with bread flour for a chewier texture or whole wheat flour for a slightly denser, nutty flavor.
If using whole wheat, consider increasing hydration slightly.
4. Can I add other fillings?
Yes! In addition to cheese, you can stuff small pieces of cooked bacon, caramelized onions, or roasted garlic into each dough ball for extra flavor.
Be careful not to overfill, which may affect the bread’s rise.
5. How do I prevent the bread from sticking?
Always grease your pan with butter or oil before placing the dough. You can also line the pan with parchment paper for added security.
Avoid cutting the bread immediately after baking, as letting it cool for 5–10 minutes helps prevent sticking and keeps the texture soft.
