These Easy Chickpea Patties are a delicious, plant-based option that’s perfect for a quick weeknight meal or meal prep.
Packed with protein and fiber, they’re naturally low in saturated fat and high in good carbs, making them both nutritious and satisfying.
Versatile and simple to prepare, they can be baked, pan-fried, grilled, or air-fried to perfection.
20-Minute Crispy & Healthy Chickpea Patties
Equipment
- 1 Food processor
- 1 box grater (optional, if no processor)
- Baking tray with parchment paper
- Large ice cream scoop or 2 spoons
- Spatula or hands for shaping
Ingredients
- 250 g cooked chickpeas approx. 1 can, drained
- 50 g oats approx. ⅔ cup
- 100 g red onion approx. 1 medium
- 200 g carrots approx. 2 medium
- 5 cloves garlic
- 1 teaspoon ground cumin
- 1 tablespoon tomato paste
- 1 tablespoon harissa or alternative like BBQ sauce
- 1 tablespoon lemon zest optional
- Salt and pepper to taste
Instructions
- Prepare Your Vegetables: Start by peeling your red onion and garlic cloves. Chop the onion into medium-sized chunks and peel the carrots, then cut them into similar-sized pieces. Preparing the vegetables in uniform sizes ensures even blending later and prevents large chunks in the patties. Set these aside in a bowl for the next step.
- Process the Oats into Flour: Place your measured oats into a food processor. Pulse for 10–15 seconds until the oats are finely ground into a coarse flour. This step helps bind the patties together, preventing them from falling apart during cooking. If you don’t have a food processor, you can grind the oats in a blender or use pre-made oat flour.
- Blend the Chickpea Patty Base: Add the cooked chickpeas, chopped onion, carrots, garlic, ground cumin, tomato paste, harissa (or your preferred alternative), lemon zest (if using), and a pinch of salt and pepper into the food processor with the oat flour. Blend the mixture until it forms a slightly coarse, sticky dough. Avoid over-blending into a paste — you want a little texture for the best bite. Taste the mixture and adjust seasoning if necessary, adding more salt, pepper, or harissa according to preference.
- Shape the Patties: Lay a sheet of parchment or baking paper on a clean tray. Using a large ice cream scoop or two spoons, portion the chickpea mixture into equal-sized balls (this recipe makes about 6 large patties). Place a second sheet of parchment paper over the top and gently press down with a spatula or your hands to form evenly sized, round patties. Ensuring they are compact and even will help them cook uniformly.
- Chill for Firmness: For the best texture and easier handling, place the formed patties in the fridge for at least 30 minutes. Chilling helps the ingredients bind together naturally, which prevents the patties from breaking while cooking. While waiting, you can prepare your sides, burger buns, or sauces.
- Cooking the Patties: Pan-Fry Method: Heat a non-stick frying pan over medium heat and lightly spritz with oil. Place the chilled patties in the pan, leaving space between each. Cook for about 4–5 minutes on the first side without moving them to allow a golden crust to form. Flip carefully with a spatula and cook for another 3–4 minutes until both sides are lightly browned and slightly crispy. Remove and set aside.
- Cooking the Patties: Oven Bake Method: Preheat your oven to 180°C (350°F) and line a baking sheet with parchment paper. Arrange the patties on the sheet and lightly spritz the tops with oil for extra crispiness. Bake for 15–18 minutes, flipping halfway through, until golden brown on both sides. Baking is a great hands-off method for a healthier version.
- Cooking the Patties: Air Fry Method: Preheat your air fryer to 180°C (350°F). Place as many patties as fit comfortably in the basket without overlapping. Spritz lightly with a neutral oil such as sunflower oil for a crisp exterior. Air fry for 8–10 minutes, flipping halfway, until they are slightly browned and firm. Air frying produces a wonderfully crunchy texture without using too much oil.
- Cooking the Patties: Grill or BBQ Method: Preheat a grill pan or BBQ to medium heat and brush lightly with oil to prevent sticking. Place the chilled patties on the grill and cook for 3–5 minutes on each side, leaving them undisturbed to form a crust before flipping. Once both sides are golden and firm, remove from the heat. Grilling gives the patties a smoky flavor that pairs beautifully with buns or salad.
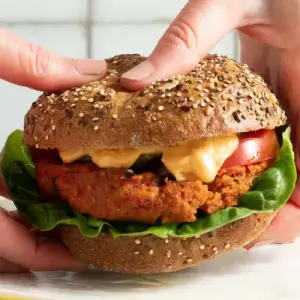
- Serve and Enjoy: Serve your chickpea patties hot on burger buns with fresh salad, pickles, and condiments, or enjoy them on their own with a side of fries or a green salad. They also work well as a filling for sandwiches, wraps, or even a grain bowl. Leftovers can be stored in the fridge for up to 3 days or frozen for longer meal prep options.
Notes
- Ingredient Variations: You can easily swap the harissa for BBQ sauce, sriracha, or even plain tomato paste if you prefer a milder flavor. Lemon zest adds a bright note, but it is optional. For gluten-free preparation, ensure your oats are certified gluten-free.
- Binding the Patties: Pulsing the oats into flour is key for keeping the patties intact, but if you skip this step, the mixture may be slightly looser. Chilling the patties before cooking also improves texture.
- Consistency Tips: If your mixture feels too wet, add a small amount of oat flour or breadcrumbs. If it’s too dry, add a splash of water or olive oil to help it hold together.
- Cooking Options: These patties are versatile — they can be pan-fried, oven-baked, air-fried, or grilled. Each method yields a slightly different texture, from crispy edges to a soft, tender center.
Chef’s Secrets for Perfect Patties
To achieve the perfect chickpea patties, start by making sure the chickpeas are well-drained and slightly mashed for easier blending.
Don’t overprocess the mixture — leaving a little texture ensures the patties have a satisfying bite.
When pan-frying or grilling, allow the patties to develop a crust before flipping; this prevents sticking and gives a lovely golden finish.
For extra flavor, you can toast the spices lightly before blending or add fresh herbs like parsley or coriander.
Small adjustments like these elevate the patties from simple to restaurant-quality.
Creative Serving Suggestions for Patties
These chickpea patties are incredibly versatile.
Serve them on toasted buns with avocado, lettuce, tomato, and a dollop of vegan mayo for a classic burger experience.
For a lighter option, place them over a grain salad or wrap them in a tortilla with fresh veggies and hummus.
They also pair beautifully with roasted vegetables, air-fried fries, or a simple green salad.
Leftovers can be sliced and added to sandwiches or grain bowls, making them an excellent choice for meal prep.
Storage Tips for Chickpea Patties
Cooked chickpea patties can be stored in an airtight container in the refrigerator for up to three days.
To reheat, gently pan-fry, bake, or air-fry until warmed through and slightly crisp on the outside.
For longer storage, freeze the uncooked patties on a tray for 1–2 hours, then transfer to a freezer-safe bag or container.
They can be cooked straight from frozen, though you may need to add a couple of extra minutes to your cooking time.
Proper storage preserves both flavor and texture.
Frequently Asked Questions
1. Can I use canned chickpeas instead of cooked?
Yes! Just make sure to drain and rinse them thoroughly. Canned chickpeas are convenient and work perfectly in this recipe.
2. How can I make the patties spicier or milder?
Adjust the harissa or use alternatives like sriracha, chili powder, or a mild BBQ sauce.
Taste the mixture before shaping to ensure the heat level is to your liking.
3. Can I make these gluten-free?
Absolutely. Ensure that your oats are certified gluten-free, and avoid breadcrumbs that contain gluten.
The patties will still bind well thanks to the chickpeas and oat flour.
4. What is the best cooking method for crispy patties?
Pan-frying or air-frying tends to produce the crispiest edges, while oven-baking gives a softer, more uniform texture.
For grilling, brush lightly with oil to prevent sticking.
5. Can I prepare the patties ahead of time?
Yes! You can form the patties and store them in the fridge for up to 24 hours before cooking.
For longer prep, freeze the patties uncooked and cook directly from frozen.
