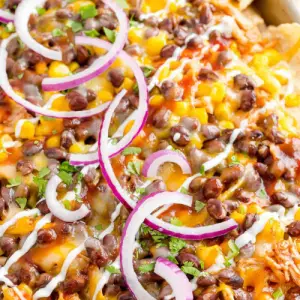
These BBQ Chicken Nachos are a delicious blend of sweet, smoky, and savory flavors, perfect for a quick meal or snack.
Packed with protein from shredded chicken and fiber from black beans and corn, they’re both satisfying and nutritious.
Easy to assemble and bake in under 30 minutes, they make a perfect weeknight dinner, game-day treat, or meal-prep favorite.
Cheesy BBQ Chicken Nachos
Equipment
- 1 sheet pan (11 x 17 inches)
- Foil or parchment paper (optional)
- Nonstick cooking spray
- 1 Mixing bowl
Ingredients
- 8 –10 oz tortilla chips 1 bag
- 2 cups cooked shredded chicken breasts (rotisserie chicken works)
- ½ cup BBQ sauce plus extra if desired
- 1 can 15 oz corn, drained
- 1 can 15 oz black beans, rinsed and drained
- 3 cups shredded Cheddar or Monterey Jack cheese or a blend
- Optional garnishes: fresh cilantro red onions or pickled red onions, guacamole, additional BBQ sauce, sour cream, sliced or pickled jalapeño peppers
Instructions
- Preheat and Prepare the Pan: Begin by preheating your oven to 400°F (200°C). This ensures that when the nachos go in, they cook evenly and the cheese melts perfectly. While the oven is warming, prepare a large 11 x 17-inch sheet pan. Line it with foil or parchment paper for easier cleanup, or leave it bare if you prefer. Lightly spray the surface with nonstick cooking spray to prevent sticking and to help the cheese and toppings stay in place.
- Coat the Chicken in BBQ Sauce: In a medium mixing bowl, place 2 cups of cooked, shredded chicken. Pour ½ cup of your favorite BBQ sauce over the chicken. Using a spoon or spatula, thoroughly toss the chicken until every piece is evenly coated. Taste and, if desired, add a little extra BBQ sauce for more tangy, smoky flavor. Proper coating ensures that each bite of chicken contributes a perfect sweet-savory kick.
- Arrange the Base Layer of Chips: Spread the tortilla chips evenly across the prepared sheet pan. Make sure they are in a single layer to ensure even cooking and prevent overcrowding, which can cause soggy chips. This crispy base is essential because it supports the toppings while staying firm and crunchy after baking.
- Add the First Layer of Cheese: Sprinkle half of the shredded Cheddar or Monterey Jack cheese evenly over the chips. This first layer acts like glue, helping the subsequent toppings stick and ensuring every chip has a cheesy base. The cheese also begins to melt during baking, creating pockets of creamy, gooey goodness.
- Layer the Chicken, Beans, and Corn: Evenly distribute the BBQ-coated shredded chicken over the cheese layer. Next, sprinkle the drained corn and rinsed black beans across the pan. This combination adds texture, color, and fiber-rich nutrition. Arrange toppings carefully to ensure each bite includes a balance of protein, veggies, and flavor.
- Add the Remaining Cheese: Sprinkle the remaining half of the shredded cheese over the chicken, beans, and corn. This top layer will melt during baking, forming a delicious golden crust. Ensure coverage is even so that every chip has a cheesy topping, making the nachos visually appealing and extra indulgent.
- Bake Until Melty and Golden: Place the prepared sheet pan in the preheated oven. Bake for 10–12 minutes, keeping an eye on the nachos. You want the cheese fully melted and slightly golden at the edges while the chips stay crisp. Avoid overbaking, as it can dry out the toppings and make the chips too hard.
- Prepare Optional Garnishes: While the nachos are baking, prepare any optional garnishes you like. Chop fresh cilantro, thinly slice red onions or pickled onions, and cut jalapeños if using. Scoop guacamole or sour cream into serving bowls. These garnishes will elevate both flavor and presentation.
- Add Toppings and Serve Immediately: Once the nachos are done, remove the sheet pan from the oven carefully. Immediately add your desired toppings: sprinkle chopped cilantro, onions, or jalapeños, and dollop guacamole or sour cream. Drizzle additional BBQ sauce if you like it extra saucy. Serve hot to maintain the perfect contrast of crispy chips and melty, savory toppings.
- Enjoy and Store Leftovers Properly: Serve the nachos straight from the pan or transfer to a large platter for sharing. If you have leftovers, store them in an airtight container in the refrigerator for up to 2 days. Reheat in the oven at 350°F (175°C) for 5–7 minutes to bring back crispiness. Avoid microwaving if possible, as it can make the chips soggy.
Notes
- For maximum flavor, use rotisserie chicken for a quick shortcut. It’s already tender and seasoned, which boosts the overall taste.
- Drain the beans and corn thoroughly to prevent soggy nachos. Pat them dry with a paper towel if necessary.
- Adjust the amount of BBQ sauce based on your sweetness preference—some like it tangier, others sweeter.
- Layering is key: spreading toppings evenly ensures each chip gets a little bit of everything.
- Experiment with cheese types; a blend of Cheddar and Monterey Jack provides creamy melt and a sharp tang.
Chef’s Secrets: Tips For Perfect Nachos
To achieve the ideal BBQ Chicken Nachos, layering and timing are crucial.
Start with a single layer of chips to avoid overcrowding, which keeps them crisp during baking.
Coat the chicken evenly with BBQ sauce to ensure consistent flavor in every bite.
When selecting cheese, choose varieties that melt well and create gooey pockets rather than dry, rubbery spots.
Finally, adding fresh garnishes like cilantro, pickled onions, or jalapeños right before serving enhances both visual appeal and flavor, giving your nachos a restaurant-quality touch.
Serving Suggestions: Ways To Enjoy Nachos
These nachos are versatile and perfect for multiple occasions.
Serve them straight from the pan at a casual family dinner or transfer to a platter for a crowd at game nights.
Pair them with a light side salad or roasted veggies for a balanced meal.
For extra indulgence, offer guacamole, sour cream, or a drizzle of additional BBQ sauce.
They also work wonderfully as finger food for parties or a late-night snack.
Storage Tips: Keep Nachos Fresh Longer
BBQ Chicken Nachos are best enjoyed immediately for the perfect crunch and melted cheese.
If you have leftovers, store them in an airtight container in the refrigerator for up to 2 days.
Reheat in a preheated oven at 350°F (175°C) for 5–7 minutes to restore crispiness.
Avoid microwaving, which tends to make chips soggy.
Keep garnishes like guacamole or sour cream separate until ready to serve to maintain freshness.
Frequently Asked Questions
1. Can I make this recipe ahead of time?
You can prep the chicken, beans, and corn in advance, but assemble and bake the nachos just before serving to keep the chips crisp.
2. What can I use instead of tortilla chips?
Sweet potato chips, pita chips, or even crispy flatbread pieces make excellent alternatives, adding a slightly different flavor and texture.
3. How can I make it spicier?
Add sliced jalapeños, a sprinkle of crushed red pepper, or a dash of hot sauce to the chicken or as a garnish. Adjust to taste.
4. Can I freeze these nachos?
While the components can be frozen separately, fully assembled nachos don’t freeze well because chips lose their crunch.
Freeze cooked chicken and beans instead for quick future assembly.
5. Can I make this recipe healthier?
Yes! Use reduced-fat cheese or a light BBQ sauce, and add extra vegetables like bell peppers or zucchini.
Black beans provide fiber and protein, keeping it nutritious without sacrificing flavor.
