This Banana Split Ice Cream Sandwich Cake transforms the classic dessert into a fun, no-bake treat that’s perfect for family gatherings or a sweet weeknight indulgence.
Layers of creamy ice cream sandwiches, fresh fruit, and light whipped topping deliver fiber from fruit and moderate protein from dairy, making it a satisfying dessert.
Quick to assemble and naturally portioned, it’s an easy, crowd-pleasing option for everyday dessert prep.
Banana Split Ice Cream Cake
Equipment
- 1 x 9×13-inch baking dish
- 1 x Mixing bowl
- 1 × spatula or spoon
- 1 × knife for slicing fruit
- Plastic wrap or saran wrap
Ingredients
For the Cake Layers:
- 19 ice cream sandwiches vanilla
- 1 container 8 ounces Cool Whip, thawed
- 1/4 cup chocolate syrup
- 1 pint fresh strawberries sliced
- 1 –2 bananas sliced
- 1 small can crushed pineapple drained
For the Toppings:
- Cool Whip thawed (as desired)
- Chocolate syrup as desired
- Caramel sauce as desired
- Cherries as desired
Instructions
- Gather Ingredients and Equipment: Before you begin, make sure all ingredients are ready and easily accessible. Thaw your Cool Whip in the refrigerator for at least 30 minutes, and have your ice cream sandwiches on hand. Prepare your fresh fruit by washing the strawberries thoroughly and slicing them evenly. Peel the bananas and slice them into thin, uniform pieces. Drain the crushed pineapple to avoid excess liquid. Grab a 9×13-inch baking dish, a mixing bowl, a spatula, and plastic wrap.
- Create Chocolate-Whipped Layer: In a medium mixing bowl, combine the thawed Cool Whip with 1/4 cup of chocolate syrup. Using a spatula or spoon, fold the chocolate into the Cool Whip gently but thoroughly until it is evenly mixed and smooth. This chocolate-whipped layer will add richness and a slightly decadent flavor to your ice cream sandwich cake while keeping it light and fluffy.
- Arrange the Base Layer of Ice Cream Sandwiches: Line half of the ice cream sandwiches (9–10 sandwiches) in a single layer at the bottom of your 9×13-inch baking dish.If needed, gently trim any extra pieces to fit snugly. This layer forms the solid base of your dessert, providing structure while keeping the creamy fillings in place.
- Spread First Chocolate-Whipped Layer: Evenly spread half of your prepared chocolate-whipped mixture over the ice cream sandwiches, covering the entire surface. Use a spatula to smooth it out, creating an even layer. Be gentle to avoid breaking the ice cream sandwiches. This layer acts as a binder and adds creamy chocolate flavor that contrasts with the fresh fruit layers.
- Add First Layer of Fruit: Over the chocolate-whipped layer, evenly distribute half of the sliced strawberries and bananas. Drop small spoonfuls of the drained crushed pineapple across the top. Spread the fruit gently to ensure every bite contains a combination of berries, bananas, and pineapple. This layer brings natural sweetness, fiber, and fresh flavor to balance the creamy base.
- Arrange Second Layer of Ice Cream Sandwiches: Place the remaining ice cream sandwiches carefully on top of the fruit layer, forming a second layer. Press down lightly to pack the sandwiches together, but do not squish them. This layer will serve as a second foundation for more chocolate and fruit layers, building height and indulgence in your cake.
- Spread Remaining Chocolate-Whipped Layer: Take the remaining chocolate-whipped mixture and spread it evenly over the second layer of ice cream sandwiches. Smooth the surface gently with your spatula. This ensures that the top of your cake is creamy, rich, and ready to hold the next fruit layer and any toppings you plan to add later.
- Add Second Fruit Layer: Repeat the fruit layer by placing the remaining strawberries and banana slices evenly over the chocolate-whipped top. Scatter tiny spoonfuls of crushed pineapple over the top. Make sure the layer looks balanced and colorful, as this will be visible once the cake is sliced.
- Cover and Freeze: Tightly cover the baking dish with plastic wrap to prevent freezer burn and maintain the cake’s texture. Place the dish in the freezer and let it chill for at least 8 hours or overnight. Freezing ensures that the ice cream sandwiches firm up and the layers meld together, resulting in a perfect sliceable dessert.
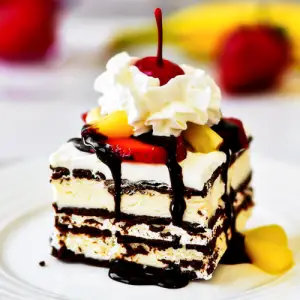
- Serve with Toppings: When ready to serve, remove the cake from the freezer and slice carefully into portions. Drizzle extra chocolate syrup, caramel sauce, and a dollop of Cool Whip over each slice. Top with fresh cherries for a classic banana split look. Serve immediately and enjoy the creamy, fruity, and indulgent layers of your homemade ice cream sandwich cake.
- Optional TipsFor extra flavor, sprinkle a handful of chopped nuts between layers.To make slicing easier, run a sharp knife under warm water before cutting.Leftovers can be stored in the freezer for up to 1 week, tightly covered.
Notes
- Use ripe but firm bananas to prevent them from turning mushy when frozen.
- For convenience, buy pre-sliced strawberries or slice them evenly yourself to maintain a neat appearance.
- Make sure the Cool Whip is fully thawed before mixing; this ensures smooth, easy spreading.
- Press layers gently, not hard—over-compressing the ice cream sandwiches can make the cake dense.
- Plan ahead: this is a no-bake recipe but requires at least 8 hours of freezing for the best results.
- Slice with a sharp knife dipped in warm water for clean, even portions.
Chef’s Secrets: Expert Tips For Success
To elevate this dessert, always focus on layer balance and texture.
Alternate creamy layers with fresh fruit to ensure every bite has a mix of sweet, tart, and smooth flavors.
Using room-temperature fruit helps it blend better with the Cool Whip layers, while keeping the ice cream firm prevents sogginess.
For a touch of elegance, add a thin drizzle of caramel or chocolate over each slice just before serving—it enhances flavor and presentation.
Finally, assemble the cake on a tray you can transfer to the freezer easily to avoid spilling or disturbing layers.
Serving Suggestions: Delicious Presentation Ideas
Serve this dessert straight from the freezer, adding freshly sliced bananas or strawberries on top for a vibrant look.
A scoop of vanilla ice cream on the side complements the layers beautifully.
Drizzle chocolate, caramel, or even a fruit coulis over each slice to make it feel gourmet.
For celebrations, garnish with cherries, mint leaves, or crushed nuts to add visual appeal and texture.
This cake is perfect for summer parties, birthday celebrations, or as an easy weekend treat.
Storage Tips: Keep It Fresh Longer
Keep your Banana Split Ice Cream Sandwich Cake tightly covered with plastic wrap or an airtight lid to prevent freezer burn.
It can be stored for up to 1 week in the freezer, though it’s best enjoyed within the first 2–3 days for optimal texture and flavor.
If slices start to harden too much, allow them to sit at room temperature for 5–10 minutes before serving for easy cutting and softer bites.
Avoid refreezing once thawed to maintain the best quality.
Frequently Asked Questions
1. Can I use flavored ice cream sandwiches instead of vanilla?
Yes! Chocolate, strawberry, or cookies-and-cream ice cream sandwiches can work well.
Keep in mind that flavored sandwiches may alter the color and sweetness of the dessert slightly.
2. Can this cake be made ahead of time?
Absolutely. This no-bake dessert can be fully assembled and frozen overnight or up to a week in advance, making it perfect for parties or meal prep.
3. Can I substitute Cool Whip with homemade whipped cream?
Yes, freshly whipped cream works beautifully.
Ensure it is stabilized with a small amount of powdered sugar or gelatin if you want it to hold its shape for longer in the freezer.
4. Can I use other fruits instead of bananas and strawberries?
Definitely! Fresh raspberries, blueberries, or mango slices are excellent alternatives.
Choose fruits that freeze well and are not too watery to maintain texture.
5. How do I cut the cake neatly without it falling apart?
Use a sharp knife dipped in warm water before slicing. Wipe the knife clean between cuts for neat portions.
Slightly thawed cake for 5 minutes also helps with cleaner slices.
