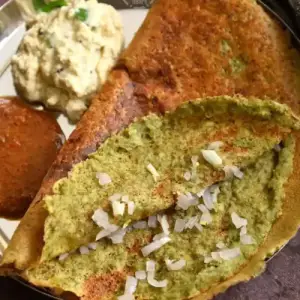
Discover the wholesome goodness of Andhra-style Pesarattu, a crisp green moong dal dosa that’s as nutritious as it is delicious.
Packed with plant-based protein, fiber, and essential nutrients, this low-fat, light breakfast or dinner is perfect for daily meals.
Quick to prepare, naturally gluten-free, and effortlessly satisfying, it’s a smart, healthy choice for everyday cooking.
Crispy Andhra Pesarattu
Equipment
- 1 blender
- 1 Cast Iron Dosa Tawa
- 1 Ladle
- 1 Bowl
Ingredients
- 2 cups Whole Green Moong Dal Pesalu
- 2 tablespoons Raw Rice
- 1 inch Ginger
- 1 Green Chilli
- 2 teaspoons Cumin Seeds
- Salt as needed
- Oil for drizzling
- 1 cup Finely Chopped Onions for topping
Instructions
- Preparing and Soaking the Ingredients: Begin by thoroughly rinsing 2 cups of whole green moong dal under running water until the water runs clear. This removes any dust or impurities. Next, add 2 tablespoons of raw rice to the dal; this small addition helps make the Pesarattu crisp and spread easily on the tawa. Place both the dal and rice in a large bowl and cover with enough water so that it is at least two inches above the ingredients. Allow the mixture to soak for 4–6 hours or overnight for best results. This soaking softens the dal, making it easier to blend into a smooth batter.
- Preparing the Flavor Base: While the dal is soaking, prepare the flavoring ingredients. Peel a fresh 1-inch piece of ginger and roughly chop it. Wash 1 green chili and remove seeds if you prefer a milder spice. These aromatics, when blended with the dal, create a subtle heat and depth of flavor. Keep them ready to add directly to the blender with the soaked dal and rice.
- Blending the Batter: Drain the soaked dal and rice completely and transfer them into a high-powered blender. Add the chopped ginger, green chili, and 2 teaspoons of cumin seeds. Blend everything together, adding small amounts of water only if needed, until a smooth, thick batter forms. The consistency should be similar to idli batter: thick enough to hold shape, but smooth enough to spread gently. Avoid making it too runny, as that will make spreading difficult and affect crispiness.
- Seasoning the Batter: Transfer the blended batter into a large mixing bowl. Add salt to taste, usually about 1 teaspoon for this quantity, and mix gently but thoroughly. This ensures the flavors are evenly distributed. Let the batter rest for 5–10 minutes while you prepare the cooking surface. Although fermentation is not required, this short rest can help the flavors meld and the batter thicken slightly.
- Heating the Tawa: Place your cast iron dosa tawa on medium flame and allow it to heat thoroughly for 5–7 minutes. A properly heated tawa is essential to achieve a crispy, evenly cooked Pesarattu. You can test the heat by sprinkling a few drops of water; they should sizzle and evaporate almost immediately.
- Spreading the Pesarattu: Using a ladle, scoop a portion of batter (about 1/2 cup per Pesarattu) and gently pour it onto the center of the hot tawa. Using the back of the ladle, spread the batter outward in a circular motion to form a thin, even layer. The goal is to spread it as thin as possible without tearing, creating the perfect base for a crisp Pesarattu.
- Adding Toppings: Immediately sprinkle 1 cup of finely chopped onions evenly over the top of the batter. If desired, you can also add additional finely chopped green chili or ginger for extra spice and aroma. Lightly drizzle oil around the edges and a few drops on top; this ensures the Pesarattu becomes golden and crispy while cooking.
- Cooking to Perfection: Reduce the flame to low-medium and allow the Pesarattu to cook slowly. This gentle cooking is crucial: it ensures the batter cooks all the way through while the edges crisp beautifully. Look for golden brown spots forming on the surface. Do not rush this step; cooking slowly gives the Pesarattu its signature texture and flavor.
- Folding and Serving: Once the underside is crisp and golden, carefully lift the Pesarattu using a flat spatula and fold it in half. Transfer it to a serving plate. Repeat the process with the remaining batter, ensuring the tawa is reheated slightly if needed for each new Pesarattu.
- Pairing and Enjoying: Serve each hot Pesarattu immediately with coconut chutney, Allam Pachadi (ginger chutney), or your favorite chutney. The combination of the crispy dosa, slightly sweet onions, and spicy accompaniments creates a perfectly balanced, flavorful dish. Enjoy it as a wholesome breakfast, light dinner, or anytime snack!
Notes
- Adding ginger, green chili, and cumin seeds enhances flavor and aids digestion.
- Including a small amount of rice in the batter ensures crispiness and easier spreading.
- The batter does not require fermentation and can be used immediately.
- Maintain a thick consistency (similar to idli batter) for better spreading and texture.
- Cook on low to medium flame to achieve golden-brown, evenly cooked Pesarattu.
- A gentle drizzle of oil along the edges prevents sticking and promotes crispiness.
- Resting the batter for 5–10 minutes before cooking improves texture and spreadability.
Chef’s Secrets: Tips For Perfect Pesarattu
To achieve the ideal crispiness, a well-heated cast iron tawa is non-negotiable.
Spread the batter gently and evenly to avoid tearing.
Using a small drizzle of oil, especially along the edges, helps form a golden, crispy finish.
For extra flavor, try lightly sautéing the onions before sprinkling them on top, or add finely chopped ginger and green chili for a spicier variation.
Resting the batter for 5–10 minutes after blending can enhance its texture and consistency, making it easier to spread without compromising the crispness.
Serving Suggestions: Delicious Pairing Ideas
Serve Pesarattu hot, fresh off the tawa, for the best taste and texture.
Pair it with traditional South Indian accompaniments such as coconut chutney or Allam Pachadi (ginger chutney).
For a heartier meal, serve it alongside soft upma, creating a balanced and flavorful breakfast or dinner.
A light drizzle of melted butter over the Pesarattu can elevate its richness and add a restaurant-style touch.
Freshly chopped coriander or a squeeze of lime on top can also enhance flavor and presentation.
Storage Tips: Keep It Fresh Longer
Pesarattu is best enjoyed immediately, as it may lose crispness once cooled.
However, the batter can be stored in an airtight container in the refrigerator for 2–3 days.
When ready to use, give the batter a gentle stir and spread on a preheated tawa.
Cooked Pesarattu can also be stored for a few hours at room temperature in a covered container, but reheating may slightly soften the texture.
Avoid freezing the cooked Pesarattu, as it may become soggy upon thawing.
Frequently Asked Questions
1. Can I use split green moong dal instead of whole?
Yes, split moong dal works well and blends faster, but the texture will be slightly softer. Whole moong dal gives a more rustic, nutty flavor.
2. Is soaking necessary, or can I blend directly?
Soaking softens the dal and rice, making it easier to blend into a smooth batter. Skipping soaking may result in a gritty texture.
3. Can I make this vegan or oil-free?
Absolutely! Simply drizzle water or use minimal oil to cook instead of ghee or butter. The Pesarattu will still turn out crisp and delicious.
4. How can I make it spicier or milder?
Adjust the number of green chilies in the batter, or skip them for a milder version. You can also sprinkle extra chilies on top while cooking for more heat.
5. Can I prepare Pesarattu in advance for meal prep?
Yes, store the batter in the fridge for 2–3 days and cook fresh each time. Pre-cooked Pesarattu should be eaten the same day for best crispiness.
